Lesson 2 The Extended Work Flow
If you've completed all the steps in Lesson 1, you're ready to move on to the next stage. Lesson 2 takes you beyond the basics and into the core of the platform’s advanced functionality.
Here, you’ll learn about Generic IoT nodes and Network Protocols, HTML and CSV reporting, Organizations, OEM Branding, Roles, Connectors, External Data Sharing and Data Flows. Each section includes optional deep-dive lessons to help you strengthen your understanding and apply these features in real-world scenarios.
💡 Tip: New platform features often become available in the backend API before appearing in the web interface.
To access the latest functionality, it’s valuable to be familiar with the Swagger API interface, which allows you to configure and manage every aspect of the platform — even before full UI support is introduced.
![]()
Step 1 — The Generic Device Type: IoT Nodes and Network Protocols (from NB-IoT to BLE)
In this lesson, we’ll cover how to add IoT devices to the platform based on their transport protocol, with most devices created via the versatile Generic device type.
We’ll also explore the underlying physical and network technologies for each protocol to understand communication over MQTT, HTTP, TCP, UDP, CoAP, and other common interfaces. Finally, we’ll outline how to secure these communications using certificates or end-to-end encryption methods like OSCORE.
An IoT node doesn’t always represent a physical device — it can also be a logical or virtual element used for data flow control or access management. For example, a geofence node can count assets moving in and out of defined areas or help separate data access by role.
There are three main types of IoT nodes:
- Devices: Represent physical endpoints, typically sensors or actuators. These usually require a device-specific translator to decode incoming, compressed, or encoded data.
- Virtual Nodes: Logical nodes that hold state or indirectly represent physical devices — such as geofences, Wi-Fi beacons, calculated nodes, or simulated devices.
- Services: Nodes that receive or provide data from external services like OpenWeatherMap or Nordpool (e.g., energy prices, weather forecasts).

Let’s take a deeper look at how the horizontal integration of IoT devices works within the platform, focusing on the Generic device type that supports multiple protocols and connectivity layers.
- Application Protocols such as HTTP, MQTT, and CoAP define how devices exchange data with the platform, depending on their capability and resource constraints.
- Transport Protocols — TCP and UDP — carry these application messages. TCP ensures reliability (used by HTTP, MQTT, and LwM2M over TCP), while UDP enables efficiency for constrained devices (used by CoAP, raw UDP, and LwM2M over UDP).
- The Network Layer (IP) manages addressing and routing, ensuring communication works regardless of the underlying medium.
- The Link/Physical Layer includes technologies like Ethernet, Wi-Fi, LTE/NB-IoT/LTE-M/5G, LoRaWAN, and short-range protocols such as Bluetooth/BLE, Z-Wave, and ZigBee.
Learn More
- Training material about Generic IoT Nodes and Network Protocols
💡 This is one of the most important lessons of the training material.
Understanding how different IoT devices communicate — from the physical layer up to the application layer — is essential for successfully integrating and managing devices in the platform.
Step 2 - HTML and CSV Reports
The system supports several types of reports:
- HTML Graphs (Email Reports): These are HTML graphs embedded in emails, allowing quick insights into time series data directly from your inbox. Each report can include multiple graphs, with several devices per graph.
- CSV Export Reports (Email or Direct Download): These reports function similarly to HTML Graphs but only include the raw data in CSV format, without any graphs. CSV data can also be directly exported from any Device View and from Charts.
- Export Device List Views to CSV files: One of the easiest ways to export a view’s live data is by exporting it as CSV files via Select Many
- Export Device Time Series Data to CSV files: Export all the data in a Chart view directly to a CSV file.
Learn More
- Training material to create Simple Reports
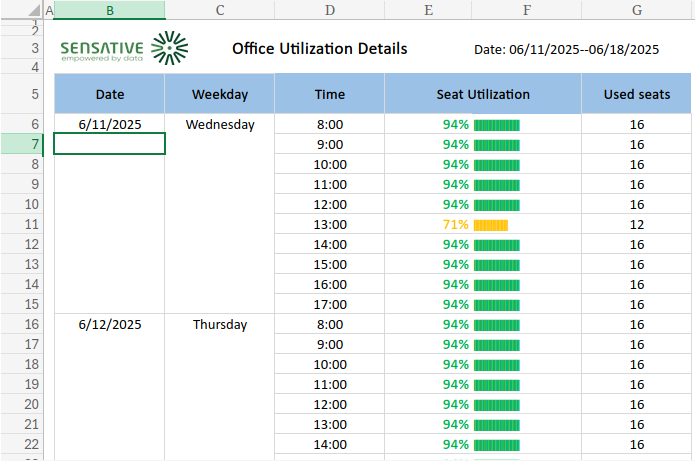
Step 3 - Excel Reports
Excel Reports are the most powerful and flexible report type available. They support a very large amount of data points per report and can leverage the full power of Excel formulas, functions, and visualizations. You can either re-use the Standard Reports "as is", modify their Report Base to extract the data you require or go with a full custom report.
How it works:
- Start with a Standard Report or create your own Excel template with formulas, charts, and layout.
- Upload the template to Yggio if you have modified any of the Standard Reports.
- When the report is generated, Yggio will populate the template with time series and raw IoT node data.
- Excel formulas automatically calculate the final KPIs, aggregations, and visualizations.
- Before delivery, Yggio removes all formulas, creating a clean, static report for preview or email delivery.
- Preview and download the report, alternative set up a schedule and get it automatically distributed to recipients.
Excel Reports are ideal for advanced reporting, regulatory compliance, customer-facing summaries, or anything where presentation and data processing must coexist.
Learn More
- Create Excel reports using the Standard Reports templates.
- Experienced Excel Users and Developers wanting more control over Excel reports should check out Custom Reports.
Step 4 - Organisation manager
Users in the platform can share resources in three ways:
- Through the Organization Manager – Set up a hierarchy and apply sharing policies accordingly.
- Direct user-to-user sharing – Share specific resources with individual users.
- User group sharing – Share resources with a group of users at once.
User groups are especially useful for managing permissions across multiple users efficiently. You can easily change access rights for a user or user group—for example, directly through the Device menu.
Shareable Resources
- IoT nodes
- Connectors
- Dashboards
- Reports
- Basic Credential Sets
- Geofences
- Images
Note: Views in the Device List and Map are not considered shareable resources. They follow a simpler sharing model, as they are seen as personal adaptations.
Views are either personal or shared with the entire organization. If shared, only an organization admin can modify or remove them.
Learn More
Step 5 - User Roles
Roles define what a user can do within Yggio. A user can have preset roles (admin, editor, viewer, installer) or a custom role. The UI and API will enforce the permissions defined by the roles.
Learn More
Step 6 - Adding Connectors
Connectors are fundamental components that bring data into the platform. They store the necessary credentials, URLs, and data topics that enable Yggio to subscribe to external data sources. Setting up connectors requires access to the remote system and coordination of credentials and permissions between both systems. Because each external system is unique, a good understanding of how that system works is usually necessary.
Most connectors use REST APIs for initial setup and MQTT for receiving live data streams. However, some legacy IoT protocols—such as BACnet and Modbus, often found in building management—operate differently.
If you encounter issues during connector setup, both Sensative (the platform support team) and the remote system’s support team can assist. Once connectors are properly configured, the rest of the process becomes more straightforward.
What Are Connectors Used For?
To add devices to Yggio, you need at least one connector. If none exist yet, you will need to create one.
Connectors link Yggio to a variety of data sources, including:
- Public services like OpenWeatherMap
- LoRaWAN servers
- Devices communicating via protocols such as MQTT, HTTP, NB-IoT, Cat M, BACnet, Modbus, and more
Learn More
- Training Material for Connectors
- Detailed instructions on creating and managing connectors are available here Connectors overview.
Step 7 - Export real time and static data out from the platform
In this lesson, you will explore how to share data outside the platform using HTTP webhooks and MQTT, learn to create and configure channels with authentication, monitor published and subscribed data using MQTT Explorer, practice publishing data via MQTT connectors to external systems, and understand key concepts for secure and reliable external data integration.
In this lesson, you will learn how to share data externally using HTTP webhooks and MQTT, focusing on sending updates directly from the platform without requiring access to external systems.
Learn More
- Training Material for External Data Sharing
- USer Guide for Generic Integration
- Developer guide for MQTT Generic
Step 8 - Flows
The term Flow refers to the combination of data flows and translators applied to IoT nodes. Flows are essentially sets of processing instructions that can be customized for specific use cases. They may include transform functions—custom code snippets uploaded to the platform and executed securely within a sandboxed environment.
Translators include a feature called "Additional Device Update", which can be used to forward parts of incoming data—or the results of calculations to other IoT nodes. Together, Data Flows and Translators form a powerful framework for implementing complex IoT use cases, enabling the platform to handle even many industrial automation scenarios.
A Data Flow consists of a behavior tree that defines how and in what order incoming data is processed within the IoT platform. It determines which functionality is triggered when an IoT node receives an update event.
Note: Flows are not supported on legacy connectors found under New Device in Devices.
Standard Flows
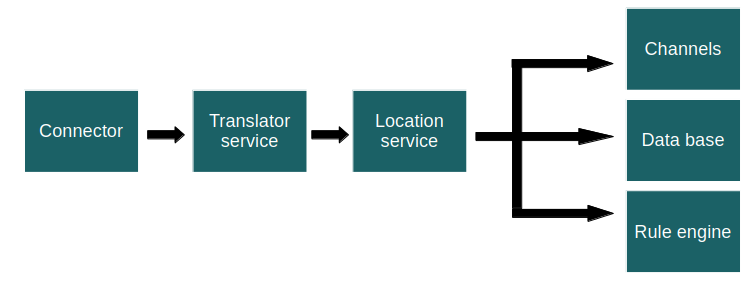
- Default Flow – Standard functionality, including Translator Service, Location Service, Calculations, Rule Engine, and Channels.
- General Timer – Includes standard functionality plus the ability to start and stop a unique timer per IoT node.
- General Geo Query – Includes standard functionality plus geo queries to check whether an IoT node is inside or outside a geofence. Recommended for tracking use cases.
- General Timer and Geo Query – Combines timers and geo queries. Useful in tracking scenarios where both geofence logic and time-based control are needed—for example, allowing a tracker to exit a geofence only during specific time periods.
Each connector has a default flow, but flows can also be assigned individually per IoT node.
General Timer Flow
The General Timer Flow is used to introduce time-based conditions into alarm logic. For example, if a door or window is opened and not closed again within a set period, an alarm is triggered. Similarly, if a temperature exceeds a defined threshold and does not return to normal within a certain time, an alarm event occurs.
Setting Up a General Timer
To use General Timers, two components are required:
-
General Timer Flow
This is a standard Flow that, after the Translator Service has executed, checks whether a timer should start.
If the timer expires, the IoT node receives an update event. -
General Timer Translator
Similar to a regular Alarm Translator, this translator includes alarm thresholds and hysteresis.
However, instead of directly triggering an alarm, it controls the timer functionality.
Common Use Cases
- Doors or windows left open for too long
- Measurement values that may temporarily exceed a threshold but must return to normal within a defined time
- Any scenario that requires a time-based filter before triggering an alert or action
General Geo Query Flow
The General Geo Query Flow works together with the Location Service—using GPS, Wi-Fi, or BLE data—to determine whether an IoT node is inside or outside a geofence.
This query executes every time an IoT node (typically a tracker) reports a new location event.
Geofences can be both outdoor and indoor.
Indoor geofences include a property called floorIndex, which maps to a specific floor level to help localize the tracker accurately.
Enabling Geofence Capabilities
-
Use General Geo Query Flows
Assign the General Geo Query Flow to the IoT nodes that should participate in geofencing logic. -
Create Geofence Generic Nodes
These nodes serve as reference points for geofences and help visualize how many trackers are within each one.
Add the translatorgeneral-geofenceto the geofence IoT nodes. -
Create Geofences
Define geofences directly on the map or through map widgets in dashboards that use geomapped floor plans.
Use the_idof the generic geofence node as the reference node in each geofence.
General Geo Timer and Query Flow
Combines timers and geo queries. Useful in tracking scenarios where both geofence logic and time-based control are needed—for example, allowing a tracker to exit a geofence only during specific time periods.
To enable this use the instructions above for General Time and General Geo Query Flow together.
Learn More
- Training Material for Standard Flows
- User Guide for Flows
- Developer guide for Geofences
Step 9 - Custom translators
The platform allows you to develop and upload your own custom translators, this enables you to unleash the full power of the platform. A translator can be anything from a small script performing basic calculations to thousands of lines of code handling advanced data aggregation and KPI (Key Performance Indicator) generation. When building an IoT use case, it's often best to start by defining the desired outcome—what you want to measure and how success will be evaluated. This is where custom translators come into play. They let you calculate the KPIs needed to track performance, automate actions, and support operational excellence. Through the use of custom translators, the platform has demonstrated its ability to manage large-scale and highly complex systems—such as asset management in airports—where detailed KPI tracking and strict compliance requirements are essential. Custom translators enable precise control over data processing, making it possible to meet demanding operational and regulatory standards in real-world deployments.
Types of Translators
There are several built-in translator types, each designed for specific use cases:
-
Hardware Translators (Decoders):
Decode compressed or proprietary sensor payloads into readable measurement values. These are the most common translators. -
Alarm Translators:
Monitor incoming data against thresholds. Often include logic for hysteresis to reduce false positives. -
Calculations:
Handle unit conversions, derived metrics (like volume or mold growth), and mathematical transformations. -
Data Share Translators:
Share measurement values between IoT nodes—often used to mirror or forward data. -
Custom Translators:
Implement advanced logic to compute KPIs or handle multi-source data dependencies.
Data Propagation via "Additional Device Update"
One key capability of translators is the ability to share data across IoT nodes using the Additional Device Update mechanism. This enables propagation of raw, aggregated, or calculated data throughout the platform and unlocks powerful use cases, such as:
- Separating network quality data from sensor payloads for cleaner classification and analysis.
- Calculating how many devices are present at a specific location at any given time.
- Tracking how many devices are present across all locations in real time.
- Determining visit frequency for specific areas or zones.
- Generating composite KPIs based on data from multiple sensors and sources.
- Summarizing overall system-level KPIs, using atomic updates to ensure data consistency across the database.
These features make translators a powerful tool in scaling and automating complex IoT systems, and they support a wide variety of advanced use cases. If you need help getting started with custom translators or want access to reference implementations, consult the Developer Guide or contact your technical support representative.
Step 10 - Custom Data Flows
The platform supports customized data flows, allowing incoming data to be routed to different components depending on what processing is required. This enables fine-grained control over how data is handled—whether it needs translation, storage, rule-based actions, or direct routing. Just like translators, custom data flows run in a secure sandboxed environment, ensuring that only safe, verified code is executed within the platform.
Example Use Case
Consider a scenario where a sensor sends high-frequency data, but that data doesn’t require complex processing. In this case, it would be inefficient to route it through the translator service, calculations or rule engine. Instead, a custom data flow could be created to bypass those services and route the data directly to the database. This reduces overhead, improves performance, and increases the platform’s ability to handle large volumes of high-frequency data. Conversely, other data streams may require advanced calculations, event detection, or custom logic—in which case the data should be routed through the translator service, calculations and rule engine components as usual.
With custom data flows, you can design exactly how each type of incoming data is processed, ensuring optimal performance and flexibility across diverse IoT use cases.
Current and Future Capabilities
At present, custom data flows must be implemented by the Sensative team. However, future versions of Yggio will include the ability to design and deploy custom data flows directly via the Rule Engine, offering a seamless configuration experience for system integrators and advanced users.