Lesson 2.1 IoT Nodes and Network Protocols — From NB-IoT to BLE
LoRaWAN is the most common device type used in modern long-range IoT networks. We covered how to add and manage them in Lesson 1.1: Adding LoRaWAN Devices.
In this lesson, we’ll explore how to add different types of devices to the system, categorized by the transport protocol they use. Most of these are added through the Generic device. We’ll also highlight the underlying physical or network technologies typically associated with each protocol, helping you understand which devices communicate over MQTT, HTTP, TCP, UDP, CoAP, and other common interfaces.
The IoT stack - Network Technology
Common Physical Protocols and Their Transport Protocols
The below tables maps the physical/network protocols to the transport protocols they typically use.
| Physical / Network Protocol | Typical Transport Protocol | Example Devices |
|---|---|---|
| NB-IoT | MQTT, CoAP, UDP | Smart meters, asset trackers, environmental sensors |
| LTE Cat-M1 (Cat-M) | MQTT, CoAP, UDP | Wearables, fleet trackers, industrial sensors |
| LoRaWAN | MQTT | Gateways, environmental sensors, smart meters |
| Wi-Fi | HTTP, MQTT, TCP | Smart home devices, cameras, smart plugs, thermostats |
| Ethernet | HTTP, MQTT, TCP | Industrial controllers, PLCs, gateways |
| BLE / Bluetooth | Gateway to MQTT/HTTP/CoAP | Wearables, beacons, smart locks, medical devices |
| Zigbee, Zwave, Matter | Gateway to MQTT | Home Automation |
| CoAP | UDP, CoAP | Constrained sensors and actuators, smart meters, smart building devices |
| Raw TCP | TCP | Industrial devices, gateways, cameras, custom IoT devices |
Some devices use lightweight or constrained protocols like CoAP over UDP or BLE, which often require a gateway to translate their messages into MQTT, HTTP, or TCP for integration with the platform. This ensures that even low-power or short-range devices can communicate reliably with cloud systems or other networked services.
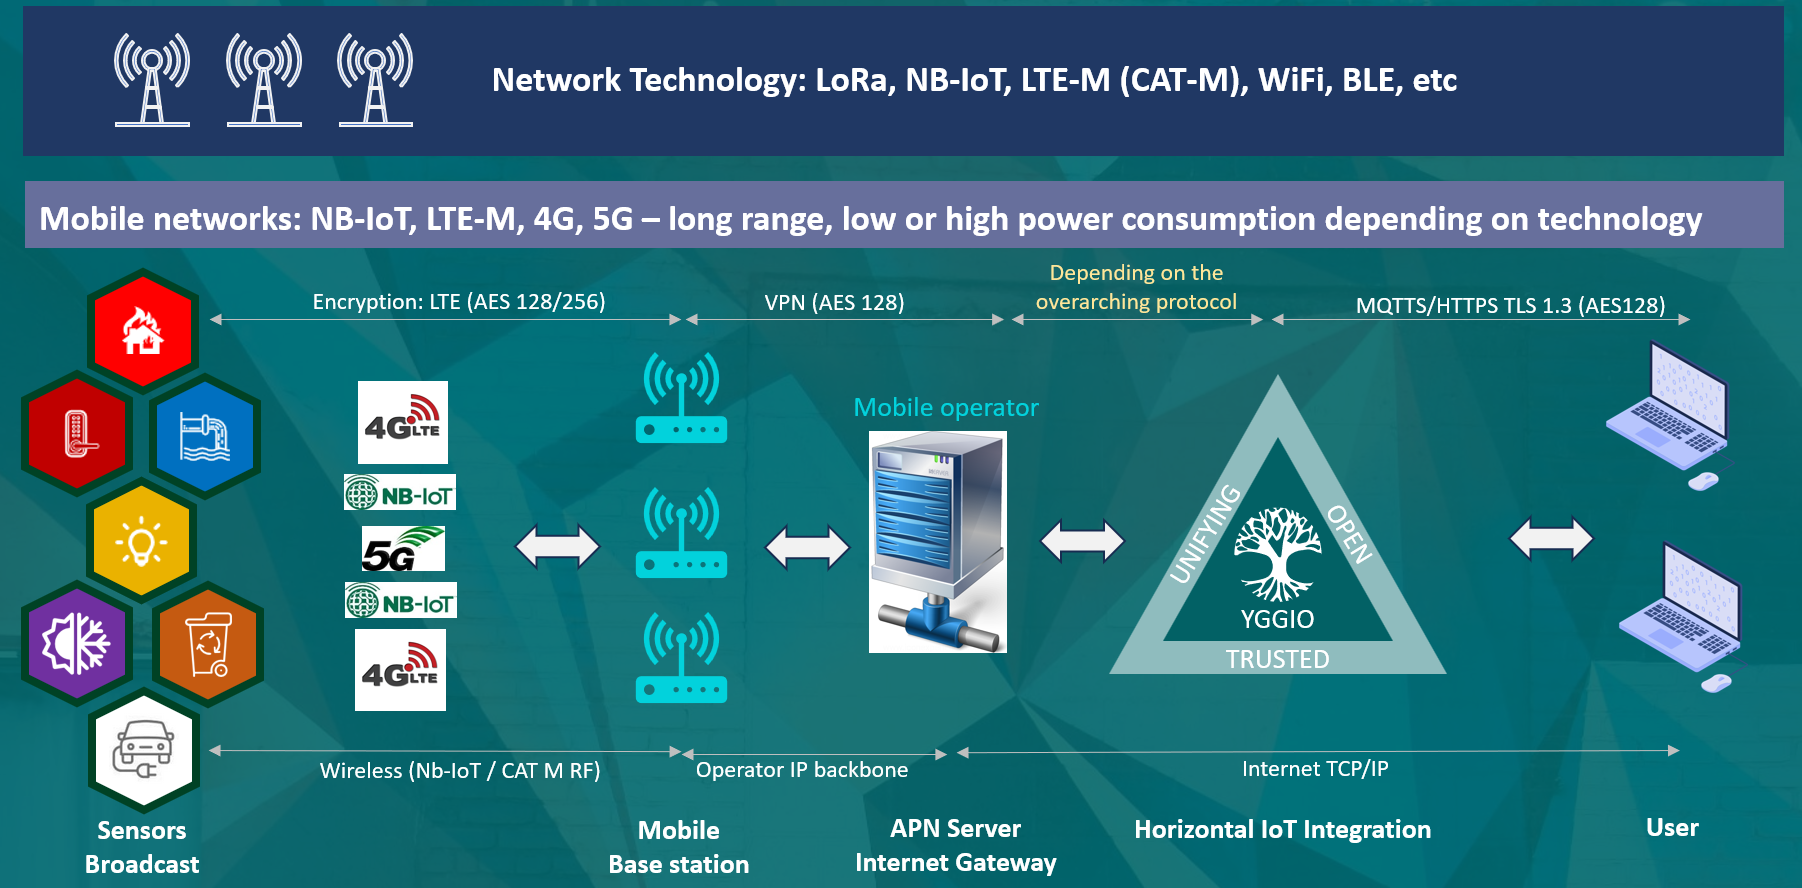
Similarly, protocols like LwM2M - Lightweight Machine-to-Machine are typically implemented on NB-IoT or Cat-M1 devices and use CoAP over UDP for communication, often requiring an LwM2M server to manage device registration, data reporting, and remote management. The IoT platform includes a LWM2M server but is currently only available on special requests.
Horizontal IoT Integration
The platform - Horizontal IoT integration
↑
├─ LwM2M (Device Management & Telemetry)
↑
Application Protocols
├─ HTTP (REST API)
├─ MQTT (Pub/Sub)
├─ CoAP (REST for resource-constrained devices)
Transport
├─ TCP ← HTTP, MQTT, Raw TCP, LwM2M (over TCP)
└─ UDP ← CoAP, raw UDP, LwM2M (over UDP/CoAP)
Network
└─ IP Internet Protocol, responsible for addressing and routing data packets regardless of medium
Link / Physical medium
├─ Ethernet
├─ Wi-Fi
├─ LTE/NB-IoT/LTE-M/5G
├─ LoRaWAN
└─ Bluetooth / BLE / Z-Wave / ZigBee
The above diagram illustrates the horizontal integration of IoT devices in the IoT platform.
- Application Protocols like HTTP, MQTT, and CoAP are used by devices to communicate with the platform, depending on their capabilities and constraints.
- Transport protocols (TCP or UDP) carry these messages across the network, with TCP used for reliable connections (HTTP, MQTT, LwM2M) and UDP for lightweight or constrained protocols (CoAP, raw UDP, LwM2M over UDP).
- The Network layer (IP) handles addressing and routing, ensuring data reaches the correct destination regardless of the underlying physical medium.
- Link/Physical layer technologies include Ethernet, Wi-Fi, LTE/NB-IoT/LTE-M/5G, LoRaWAN, and short-range protocols like Bluetooth/BLE, Z-Wave, or ZigBee.
This structure shows how the platform supports a wide variety of devices and protocols, enabling seamless integration across heterogeneous IoT networks.
Generic node
There are two main categories of connectors required to add devices based on the above protocols to the platform:
- Devices using a global generic connector
- Devices requiring a specific connector
Devices that require a generic connector can only be added if you have access to that connector — either provided during the lesson or created by you. Setting up specific device connectors requires access to the corresponding device or remote system for proper configuration. For more details, see Lesson 2.6: Connectors.
The Generic device type is the most flexible devce type in Yggio, capable of receiving data on different type of protocols. It enables integration of any device that can transmit data via transport protocols like HTTP (incl. Rest API), MQTT, CoAP, UDP or Raw TCP and that can be identified by a unique identifier. Examples include NB-IoT devices, Cat-M devices, BLE, Wi-Fi devices, TCP/IP devices (such as cameras or gateways), or various web services that post data to Yggio.
The Generic device type is also used to create virtual nodes, which can be populated with data from translators or Flows. It is a very versatile integration.
Supported Identifiers
Each generic device is identified by a unique ID, which can be based on several supported identifiers:
| Identifier Name | Description |
|---|---|
| secret | A string between 8 and 128 characters, containing only A-Z, 0-9, -, ., _ |
| imei | International Mobile Equipment Identity, 15-digit number |
| tag | Any string |
| serialNumber | Any string |
| sensorId | Any string |
Steps to Add a Generic Device Type
Create the device node through the Device List (or via API, following Adding Devices to Yggio):
- Navigate to Devices in the top panel.
- Click New Device in the top-right corner.
- Select Single Mode.
- Choose Generic from the dropdown menu and click Continue.
- Enter the unique secret for the device and click Continue.
- (Optional) Assign a device model name, then click Continue or Skip.
- (Optional) Add a translator by clicking +Add Translator, or Skip.
- Provide a device name and (optional) description, location, or contextual parameters, then click Add Device.
Note: If you want to use an identifier other than "secret", currently you must use Swagger and perform a PUT /iotnodes request on the node after it has been created.
HTTP Generic Nodes
Let's start the lesson by adding a standard generic node with secret as its identifier. Note that this secret functions as an API key and must be kept confidential. Data in an HTTP node can be updated by using an HTTP POST request —either from an IoT device, an external data provider system or directly via tools such as curl, Postman, Node-RED, or any similar application capable of sending HTTP POST requests.
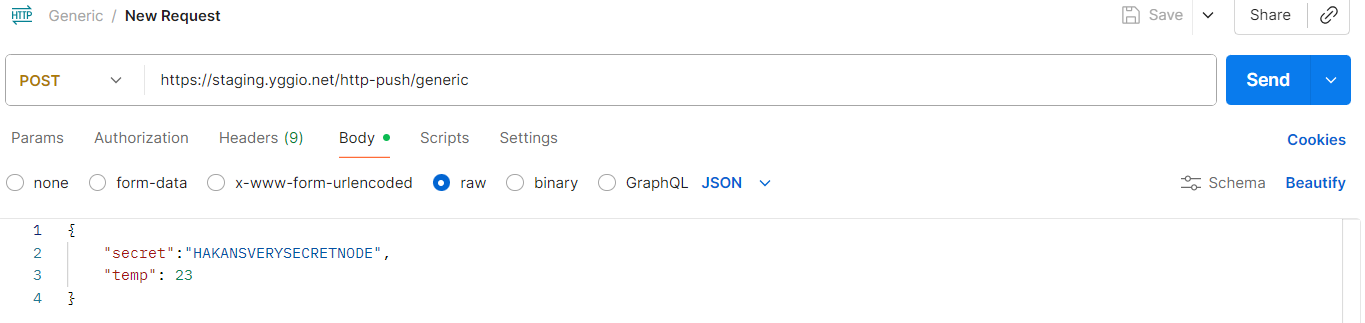
curl -sS https://staging.yggio.net/http-push/generic?identifier=secret \
-H 'content-type: application/json' \
-d @- <<EOF
{
  "secret": "SUPERSECRETAPIKEY",
  "temperature": 22,
  "data": "any",
  "informationArray": [1, 2, 3],
  "anObject": {
    "nestedValue": "is allowed"
  }
}
MQTT Generic Nodes
MQTT nodes are commonly used to receive data from various types of devices and systems. The process to create MQTT nodes is straightforward but requires some familiarity with the Swagger API UI. Log in to Swagger with your username and password, or use a token from the UI.
Steps to Create an MQTT Node
-
Create a Basic Credential Set
Use the Swagger UI endpoint to create a newBasic Credential Set. This will be used as credentials to subscribe to MQTT data. -
Create a Reserved MQTT Topic
Use the Swagger UI endpoint to create aReserved MQTT Topic. This is the topic that the remote device or system should publish data on. Important: The topic must start withyggio/generic/v2/. -
Configure the Remote System
Set the following parameters on the remote device or system:- URL:
mqtt.staging.yggio.net - Port:
8883 - Credentials: Use your
Basic Credential Set - Topic: Your reserved MQTT topic
- Version:
3.11or5.0
- URL:
Once data starts publishing, a new MQTT device will be created automatically with the name:
MQTT-[Your reserved MQTT topic].
Follow the steps above to create an MQTT node, after creating the MQTT node, use a tool like MQTT Explorer or Node-RED to publish test data and verify it is working correctly.
Notes
- You do not need to reserve subtopics under your main topic.
- If you publish to subtopics, they will automatically be published as an object on your main node.
- You can use
AdditionalDeviceUpdatein a translator to propagate data to other nodes. - This technique is commonly used when your main MQTT topic device acts as a gateway.
CoAP Generic Nodes
The CoAP protocol uses UDP as its transport layer instead of TCP like HTTP and MQTT, making it lightweight and well-suited for constrained IoT devices. Unlike TCP, UDP does not establish persistent connections, so CoAP implements its own mechanisms for message reliability, acknowledgments, and retransmissions.
For CoAP nodes, a CoAP connector is required. Each platform server should include a Generic CoAP connector by default. If you don’t have access to one, contact your technical support representative to request it.
Once access is granted, create a generic node and use the prefix generic_coap_ for your secret (see the Node-RED example below). When posting data from an IoT device, send a POST request to: coap://staging.yggio.net:5683/in/generic, include the secret and its value in the JSON body. The CoAP integration distinguishes between data in and out, so the URL must include /in/generic/.
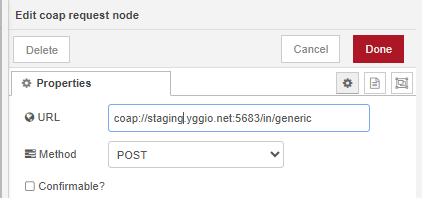
-
Continue the lesson by creating a CoAP device. First, ensure you have access to a generic CoAP connector, then create a corresponding generic node using a
secret. -
Next, send data to the node using either a CoAP-capable device or an appropriate tool that can generate CoAP requests.
Notes:
Different manufacturers implement CoAP message formats differently. If your device’s CoAP message cannot be adapted to the generic integration, a specific integration may be needed. In that case, contact your technical support team to determine the required scope of work.
Security:
- CoAP messages should be protected using DTLS. Certificates must be installed both on the device and on the platform. If a certificate is required, a new CoAP connector that includes it must be created.
- The platform also supports OSCORE (Object Security for Constrained RESTful Environments), which provides end-to-end message-level security for CoAP. OSCORE is not enabled by default—if you require it, contact your technical support team to discuss activation and configuration.
For more information about DTLS Certificates see chapter below.
UDP Generic Nodes
These nodes use the UDP protocol directly. Currently, the only available UDP integration is for IM Buildings NB-IoT devices, as there is no generic UDP integration at this time. IM Buildings devices use a manufacturer-specific protocol to encode transmitted data. The integration decodes the payload, extracts the sensor ID, and routes the data to the corresponding device in the platform.
To create an IM Buildings NB-IoT device:
- Ensure that an IM Buildings UDP connector is available on your platform.
- Create a generic node and assign any random value as its
secret. - Add the IM Buildings translator
- Copy the
_idof the newly created device. - Open the Swagger UI, navigate to
PUT /iotnode/{_id}, and add a field namedsensorIdthat matches your IM Buildings device. - Activate your IM Buildings device — it will now begin sending UDP data to the platform.
Additional Device Update
Additional Device Update is when one node shares data with another node. This feature is commonly used in the following scenarios:
-
Advanced data flows: Data moves between nodes in various configurations (many-to-one, one-to-many, or many-to-many), with each node contributing a portion of the processing logic. A common example of this is the computation of Key Performance Indicators (KPIs).
-
Controlled data access: Incoming data is separated into several nodes to manage access rights. This is necessary when different parts of the data have different classification levels. For example, network connectivity might be relevant for network administrators, but measurement values should only be visible to authorized personnel.
Virtual nodes
A logical node used in data flow to hold some type of state or indirectly represent a physical device — such as a geofence, a WiFi beacon, a calculated node, or a simulated device.
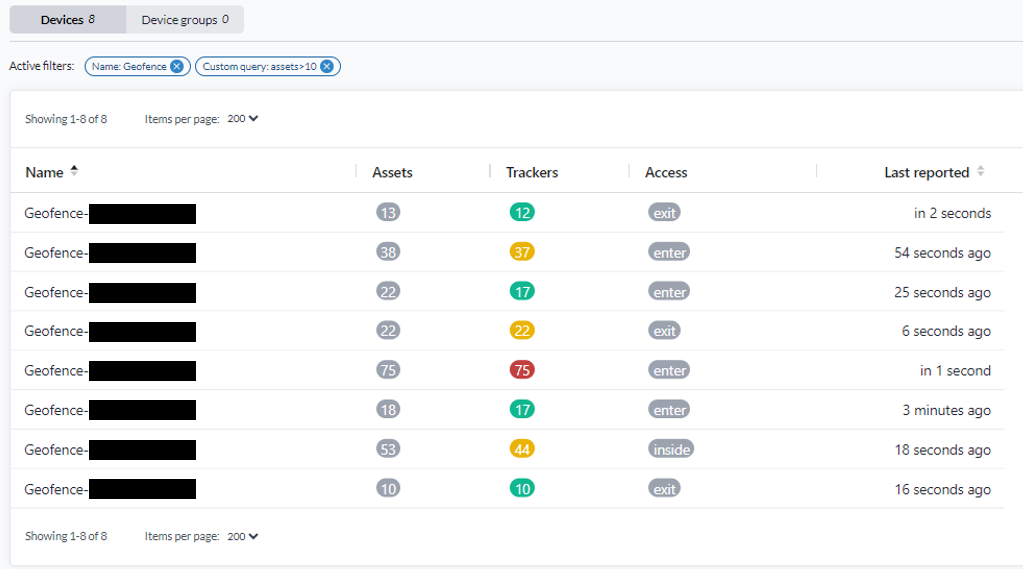
The image above illustrates geofence reference nodes, where assets entering and leaving geofences are tracked by the general-geofence translator.
Security and Certificates
TLS/SSL Certificates for MQTT and HTTP Connections
When the platform communicates with other systems (such as MQTT brokers, REST APIs, or IoT servers) over TLS/SSL, it must be able to verify and trust the certificates presented by those servers. In most cases, servers use certificates signed by a Public Certificate Authority (CA), which are automatically trusted. However, when the other server uses a private or self-signed certificate (e.g., behind a firewall or in a closed enterprise network), additional configuration is required.
Key Considerations for Private Certificates
-
Trusting the Certificate
- The platform must be able to trust the certificate presented by the external server. This is typically done by adding the server’s certificate or the CA that issued it to the platform’s trusted certificates.
-
Server Name Matching (CN and SAN)
- The certificate must contain the correct Common Name (CN) or Subject Alternative Name (SAN) that matches the server's hostname or IP address.
- The CN is the primary identifier for the server, while SANs allow multiple hostnames or IPs to be included.
- If the hostname used by the platform to connect does not match either the CN or one of the SAN entries, the TLS handshake will fail.
-
Mutual TLS (mTLS)
- If the external server requires mutual authentication, the platform must present its own certificate in addition to trusting the server.
- This ensures that both sides verify each other before exchanging data.
-
Certificate Expiration and Renewal
- Private certificates often have shorter lifetimes. It is important to monitor expiration dates and renew certificates on time to prevent communication interruptions.
-
Testing Connectivity
- After installing or trusting a certificate, verify that the platform can successfully establish a secure connection to the server.
-
Testing Secure Connectivity
- For MQTT:
mosquitto_sub --cafile private-ca.crt -h your.mqtt.server -p 8883 -t test/topic -v
- For HTTPS:
curl --cacert private-ca.crt https://your.private.api/health
- For MQTT:
DTLS Certificates for CoAP and UDP Connections
CoAP uses DTLS (Datagram Transport Layer Security) over UDP to protect communication between IoT devices and the platform. DTLS provides encryption, integrity, and authentication — similar to TLS used in HTTPS — but optimized for lightweight, unreliable transport like UDP. DTLS supports several authentication methods:
- X.509 certificates (most common and secure)
- Pre-Shared Keys (PSK)
- Raw Public Keys (RPK)
When using X.509 certificates, both the CoAP device and the platform must have matching and trusted certificates installed.
🔧 Installation Notes
-
Certificate Format
- Use certificates in PEM or DER format (
.pem,.crt, or.der). - Ensure the certificate chain (device, intermediate, and root CA) is correctly configured if applicable.
- Use certificates in PEM or DER format (
-
Private Key Protection
- The private key corresponding to the certificate must never be shared or exposed.
- Store it securely on the device (e.g., in a secure element or encrypted storage).
-
Certificate Matching
- The Common Name (CN) or Subject Alternative Name (SAN) field in the certificate should match the device ID or domain expected by the platform.
- Mismatched identifiers can cause DTLS handshake failures.
-
Platform Installation
- Import the CA certificate (or device certificate, if self-signed) into the platform’s CoAP connector configuration.
- Some platforms require you to restart the connector after adding new certificates.
-
Certificate Expiration and Renewal
- Monitor certificate expiration dates and establish an automated renewal or update process to prevent downtime.
-
Testing and Verification
- After installation, verify connectivity using DTLS test tools (e.g.,
coap-clientwith--dtlsoptions). - Check logs for handshake success and confirm encrypted traffic.
- After installation, verify connectivity using DTLS test tools (e.g.,
coap-client -m get coaps://SERVER_HOST:5684/RESOURCE \
  --cert client-cert.pem \
  --key client-key.pem \
  --cacert ca-cert.pem
--cert → client certificate (if mutual TLS is required) --key → corresponding private key --cacert → CA certificate used to verify the server
Success indicator:
Verify return code: 0 (ok)- DTLS handshake completes successfully
- Messages can be exchanged securely over UDP
Common Issues
- CN/SAN mismatch → DTLS handshake fails if the certificate does not match the server hostname or IP.
- Untrusted CA → DTLS handshake fails if the server certificate is not signed by a trusted CA.
- Expired certificate → DTLS handshake fails.
- UDP firewalls → Ensure the DTLS port (commonly 5683/5684 for CoAPS) is open.
Summary
When a server or device uses private or self-signed certificates, the platform must be configured to trust those certificates to maintain secure communication. Certificates must have the correct CN or SAN matching the server hostname, and proper certificate management—including mutual TLS if required and timely renewal—is essential for reliable and secure operation.
- Use a DTLS-enabled CoAP client or OpenSSL to test connections.
- Provide the correct CA and client certificates.
- Verify that the handshake succeeds and that certificates are validated correctly.
- Check logs for CN/SAN validation and any handshake errors.