MQTT
Yggio hosts an MQTT broker, making it easy to post and subscribe to real-time data streams.
Receiving Data (Acting as a Data Consumer)
If you want to receive data from devices, you’ll need to subscribe to a topic in Yggio’s MQTT broker.
MQTT Topic Format:
yggio/output/v2/[ID]/iotnode/[iotnodeId]
- [ID]: Your identifier — either a user ID, client app ID, or a basic credentials set ID.
- [iotnodeId]: The unique ID of the IoT node sending the data.
To receive all data from your ID, you can subscribe to:
yggio/output/v2/[ID]/#
Steps to Receive Data:
-
Set up a Channel:
Create a channel with your user ID or basic credentials. Refer to this guide for instructions. -
Get an Access Token:
Authenticate yourself using a user access token. Refer to the Authentication section below for an example. -
Subscribe to Your Topic:
Use an MQTT client to subscribe to your topic. Below is an example usingmosquitto, but any MQTT client will work.
Example:
mosquitto_sub -h mqtt.yggio.net -p 8883 -u "<your-userID>" -P "<your-access-token>" -t "yggio/output/v2/<your-userID>/#"
Sending Data (Acting as a Data Provider)
To send data to Yggio via MQTT, register your device credentials and the topic you’ll publish to.
MQTT Topic Format:
yggio/generic/v2/[your-sub-topic]/[optional-sub-topic]
-
The topic must be reserved in advance. Refer to the Reserved MQTT Topic section below for an example.
-
Payload format must be in JSON format.
Steps to Send Data:
-
Create a Basic Credentials Set
This allows your device or service to authenticate with the Yggio MQTT broker.
How to create one → -
Reserve an MQTT Topic
This topic identifies the data source (your device or service) in Yggio. How to reserve a topic → -
Publish Your Data
Start sending JSON-formatted data to your reserved MQTT topic.Example JSON payload:
{"temperature": 23.5,"unit": "C"} -
Why the Reserved Topic Matters
Yggio uses this topic to link data to a specific device entity. The topic is saved as a secret field, allowing the entity to be claimed later in the Yggio UI.
Authentication
To acquire a user access token, you need to make a login request. You can find detailed information in our Swagger documentation. Below is an example curl command you can modify and use:
curl -X 'POST' \
  'https://YGGIO_DOMAIN/api/auth/local' \
  -H 'accept: application/json' \
  -H 'Content-Type: application/json' \
  -d '{
  "username": "YOUR_USERNAME",
  "password": "YOUR_PASSWORD"
}'
Upon successful login, you will receive a response like this:
{
  "token": "eyJhbGciOiJSUzI1NiIsInR5cCIgOiAiSldUIiwia2lkIiA6ICI1YS02U3VwYWNRSVVvdVdhRGNScGJqZWp2UEpSQlpHZ1VNdF9ZNWZUc0E0In0.eyJleHAiOjE3MTY1NzIwMjUsImlhdCI6MTcxNjU1MDQyNSwiYXV0aF90aW1lIjowLCJqdGkiOiIwMzRjMzliMC04MjRkLTQ1N2UtOTFjZC1lOTZhMGFmNWYxYjEiLCJpc3MiOiJodHRwOi8va2V5Y2xvYWs6ODA4MC9hdXRoL3JlYWxtcy95Z2dpbyIsImF1ZCI6InlnZ2lvLXNlcnZpY2VzIiwic3ViIjoiZTQ4OGYzNTQtY2E3My00Yjc0LWI2N2YtOWIxZGVlZThjYzhmIiwidHlwIjoiSUQiLCJhenAiOiJ5Z2dpby1zZXJ2aWNlcyIsInNlc3Npb25fc3RhdGUiOiIwYzRjYzkyYy05NzU3LTRjMjktODQ5Zi1hNmJlMTljNmM1NjgiLCJhdF9oYXNoIjoiZVkySVBRczdKMGJOS1d1LTFpRm9xdyIsInNpZCI6IjBjNGNjOTJjLTk3NTctNGMyOS04NDlmLWE2YmUxOWM2YzU2OCIsImVtYWlsX3ZlcmlmaWVkIjp0cnVlLCJwcmVmZXJyZWRfdXNlcm5hbWUiOiJ0ZXN0IiwiZW1haWwiOiJ0ZXN0QHRlc3QuY29tIn0.WctqW4YhOrDk1ai0vSuGTZ6gplFpps-mMaGUPMnPMBS5-AcBw3VK-HMshHl_W7CT2bRzCm5RWl9dW0MwCCMXoVN0u_CB50SH3h-RcuiTVGa7wK6INbLsGYGAkB07NJETNOK030mTIeyvE5-owR3OU_oFD496ph_G9pTODqTZX73NIp-Qc416cT7T_zi7jw-qvpo6tKuBpJvr3ClYUFlqtOTVI7isCIqcSAkNK3wRy5sikJCQ_oFRQIt7C7SbRwNcIV2Rl0Xe9z0SPSl9fOg7Wkcbl9O-4sWSBueViFGiiM7tIXtwVPSanIP6xhCCyHirRAcFgewIlru7dWfAE__62w"
}
This token is crucial for accessing authenticated endpoints and consuming data securely. Ensure you store it securely and use it in subsequent requests.
basicCredentialsSet
In scenarios where it's not feasible for the client to refresh the token during subscription, you can connect the channel to a "basic credentials set". Below is an example demonstrating how to create a basic credentials set and a working mosquitto_sub command.
curl -X 'POST' \
  'https://staging.yggio.net/api/basic-credentials-sets' \
  -H 'accept: application/json' \
  -H 'Authorization: Bearer YOUR_TOKEN' \
  -H 'Content-Type: application/json' \
  -d '{
  "username": "My_basicCredentialsSet_Name",
  "password": "very-very-super-secret-password"
}'
Upon successful creation, you will receive a response like this:
{
  "_id": "123456789abcdef",
  "username": "My_basicCredentialsSet_Name"
}
You can then utilize the _id in the mosquitto_sub command as follows:
mosquitto_sub -h mqtt.staging.yggio.net -t "yggio/output/v2/123456789abcdef/#" -u My_basicCredentialsSet_Name -P very-very-super-secret-password
This approach enables secure and persistent access to data streams without the need for token refresh during subscription.
reservedMqttTopic
Here's an example illustrating how to create a reserved MQTT topic and utilize it with a mosquitto_pub command.
curl -X 'POST' \
  'https://staging.yggio.net/api/reserved-mqtt-topics' \
  -H 'accept: application/json' \
  -H 'Authorization: Bearer YOUR_TOKEN' \
  -H 'Content-Type: application/json' \
  -d '{
  "topic": "yggio/generic/v2/any/unique/topic/321",
  "basicCredentialsSetId": "123456789abcdefg"
}'
Upon successful creation, you will receive a response like this:
{
  "_id": "abababababa1212121212",
  "topic": "yggio/generic/v2/any/unique/topic/321"
}
You can then use the topic in the mosquitto_pub command as demonstrated below:
mosquitto_pub -h mqtt.staging.yggio.net -u "My_basicCredentialsSet_Name" -P "very-very-super-secret-password" -t "yggio/generic/v2/any/unique/topic/321" -m '{"health":"running"}'
This allows you to securely publish data to the specified MQTT topic using the provided credentials.
Generic Devices
In the case of generic devices, the reserved MQTT topic serves as an identifier for the corresponding entity created in Yggio. This identifier is stored in entity.secret. Users have the option, either before or after the data stream initiation, to "claim" the entity within the Yggio user interface. This is done by entering the secret, which corresponds to the reservedMqttTopic.topic, during the device onboarding process.
Once claimed, the entity inherits the access rights associated with the basicCredentialsSet used for authentication.
Examples
Below you find examples of basicCredentialsSets, reservedMqttTopics and their resulting valid MQTT-publishes.
Ex 1 - one simple device
DB-entities
// basicCredentialsSet
{
  _id: '123456789abcdefg'
  username: 'my-device-name',
  password: 'very-very-super-secret-password'
}
// reservedMqttTopic
{
  topic: 'yggio/generic/v2/any/unique/topic/321',
  basicCredentialsSetId: '123456789abcdefg'
}
valid publishes (mosquitto-syntax)
mosquitto_pub -h mqtt.staging.yggio.net -u "my-device-name" -P "very-very-super-secret-password" -t "yggio/generic/v2/any/unique/topic/321" -m '{"health":"running"}'
mosquitto_pub -h mqtt.staging.yggio.net -u "my-device-name" -P "very-very-super-secret-password" -t "yggio/generic/v2/any/unique/topic/321/stats" -m '{"battery":100, "antennaStatus": "sending"}'
mosquitto_pub -h mqtt.staging.yggio.net -u "my-device-name" -P "very-very-super-secret-password" -t "yggio/generic/v2/any/unique/topic/321/temperature" -m '{"value":22}'
All three of the above publishes will result in the update, or creation, of the below iotnode. It's important to note that publishing to a sub topic does not create a new iotnode, but instead updates the existing one with the new data.
{
  _id: 'abababababa1212121212'
  secret: 'yggio/generic/v2/any/unique/topic/321',
  health: "running",
  stats: {
    antennaStatus: "sending",
    battery: 100
  },
  temperature: {
    value: 22
  }
}
Ex 2 - gateway- or "cloud"- with sub-nodes
// basicCredentialsSet
{
  _id: '123456789abcdefg'
  username: 'my-gateway-name',
  password: 'very-very-super-secret-password'
}
// reservedMqttTopic
[
  {
    topic: 'yggio/generic/v2/any/unique/gatewaytopic/4321',
    basicCredentialsSetId: '123456789abcdefg'
  },
  {
    topic: 'yggio/generic/v2/any/unique/gatewaytopic/4321/devices/1',
    basicCredentialsSetId: '123456789abcdefg'
  },
  {
    topic: 'yggio/generic/v2/any/unique/gatewaytopic/4321/devices/2',
    basicCredentialsSetId: '123456789abcdefg'
  }
]
valid publishes (mosquitto-syntax)
mosquitto_pub -h mqtt.staging.yggio.net -u "my-gateway-name" -P "very-very-super-secret-password" -t "yggio/generic/v2/any/unique/gatewaytopic/4321" -m '{"health":"running"}'
mosquitto_pub -h mqtt.staging.yggio.net -u "my-gateway-name" -P "very-very-super-secret-password" -t "yggio/generic/v2/any/unique/gatewaytopic/4321/devices/1" -m '{"lightSwitch":on}'
mosquitto_pub -h mqtt.staging.yggio.net -u "my-gateway-name" -P "very-very-super-secret-password" -t "yggio/generic/v2/any/unique/gatewaytopic/4321/devices/2" -m '{"lightSwitch":off}'
All three of the above publishes will result in the update, or creation, of the below entities.
{
  _id: 'aaaaaaaaaaa111111111111'
  secret: 'yggio/generic/v2/any/unique/gatewaytopic/4321',
  health: "running",
}
{
  _id: 'bbbbbbbbbbbb22222222222'
  secret: 'yggio/generic/v2/any/unique/gatewaytopic/4321/devices/1',
  lightSwitch: "on",
}
{
  _id: 'cccccccccccc33333333333'
  secret: 'yggio/generic/v2/any/unique/gatewaytopic/4321/devices/2',
  lightSwitch: "off",
}
It's worth mentioning, that a publish to e.g. .../devices/3 would not create a new entity. But instead update the gateway, in this case. This is because there has not been a "reservation" for that topic, i.e. no reservedMqttTopic exists.
So, a publish like this...
mosquitto_pub -h mqtt.staging.yggio.net -u "my-gateway-name" -P "very-very-super-secret-password" -t "yggio/generic/v2/any/unique/gatewaytopic/4321/devices/3" -m '{"lightSwitch": "on"}'
...would update the entity from this...
{
  secret: 'yggio/generic/v2/any/unique/gatewaytopic/4321',
  health: "running",
}
...to this...
{
  _id: 'aaaaaaaaaaa111111111111'
  secret: 'yggio/generic/v2/any/unique/gatewaytopic/4321',
  health: "running",
  devices: {
    3: {
      lightSwitch: "on"
    }
  }
}
Generic mqtt command
Downlink using Yggio Internal MQTT Broker
To use the Yggio internal MQTT broker for downlink communication, you can configure your connector as follows:
{
    "name": "<Connector name>",
    "basicCredentialsSetId": "<basicCredentialsSetId>",
    "integration": "Generic"
}
In this JSON configuration:
- "name": Provide a name for your connector.
- "basicCredentialsSetId": Specify the ID of the Basic Credential Set to be used.
Downlink using External MQTT Broker
Alternatively, you can configure the connector to use an external MQTT broker for downlink communication:
{
    "name": "<Connector name>",
    "mqttServer": {
        "host": "mqtt.example.org",
        "port": <1883 or 8883>,
        "protocol": "<mqtt or mqtts>",
        "username": "<Username>",
        "password": "<Password>"
    },
    "downlink": {
        "topic": "<mqtt-topic>"
    },
    "integration": "Generic"
}
- "name": Provide a name for your connector.
- "mqttServer": Specify the details of your external MQTT broker,
- Example: host, port, protocol, username, and password.
- "downlink": Set the MQTT topic where downlink messages will be sent.
- "integration": Specify the integration type, which is "Generic" in this case.
Example: Sending a Downlink via Yggio Internal Broker
To send a downlink command using the Yggio internal MQTT broker, follow these steps:
-
Create a Basic Credential Set or use an existing one:
input:
curl --location "https://$YGGIO_URL/api/basic-credentials-sets" \--header "Authorization: Bearer $YGGIO_TOKEN" \--header "Content-Type: application/json" \--data '{"username": "MyUsername","password": "MySecretPassword"}'output:
{"_id":"64d5f0fa0c5b9c88f70c6ff0","username":"MyUsername"} -
Create a connector:
input:
curl --location "https://$YGGIO_URL/api/connectors" \--header "Authorization: Bearer $YGGIO_TOKEN" \--header "Content-Type: application/json" \--data '{"name": "MyConnector","basicCredentialsSetId": "64d5f0fa0c5b9c88f70c6ff0","integration": "Generic"}'output:
{"_id":"64d5f1260c5b9c88f70c6ff5","name":"MyConnector","basicCredentialsSetId":"64d5f0fa0c5b9c88f70c6ff0","integration":"Generic"} -
Subscribe to the topic yggio/push/v1/<BasicCredentialsSetId>/#
mosquitto_sub -v -h "mqtt.$YGGIO_URL" -u "MyUsername" -P "MySecretPassword" -t "yggio/push/v1/64d5f0fa0c5b9c88f70c6ff0/#" -
Send a command to the connector:
curl --location --request PUT "https://$YGGIO_URL/api/connectors/command" \--header "Authorization: Bearer $YGGIO_TOKEN" \--header "Content-Type: application/json" \--data '{"command": "sendDownlink","integrationName": "Generic","connectorId": "64d5f1260c5b9c88f70c6ff5","data": {"mqttTopic": "subTopic","message": "myMessage"}}' -
Output from the mosquitto_sub command:
yggio/push/v1/64d5f0fa0c5b9c88f70c6ff0/subTopic myMessage
Make sure to replace $YGGIO_URL with the actual URL of your Yggio server.
Axis Installation
Start off by connecting your Axis-camera to a powersource and ethernet.
Identify what the IPv4-Address is for the connected camera. And go to https://[CAMERA-IP] with a computer connected to the same network.
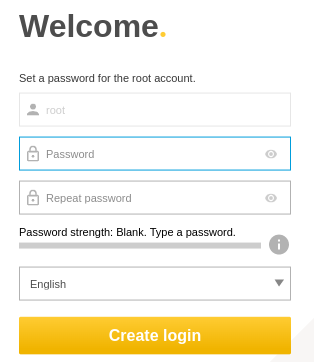
Log in.
Go to
-
Device view
-
Maintenance
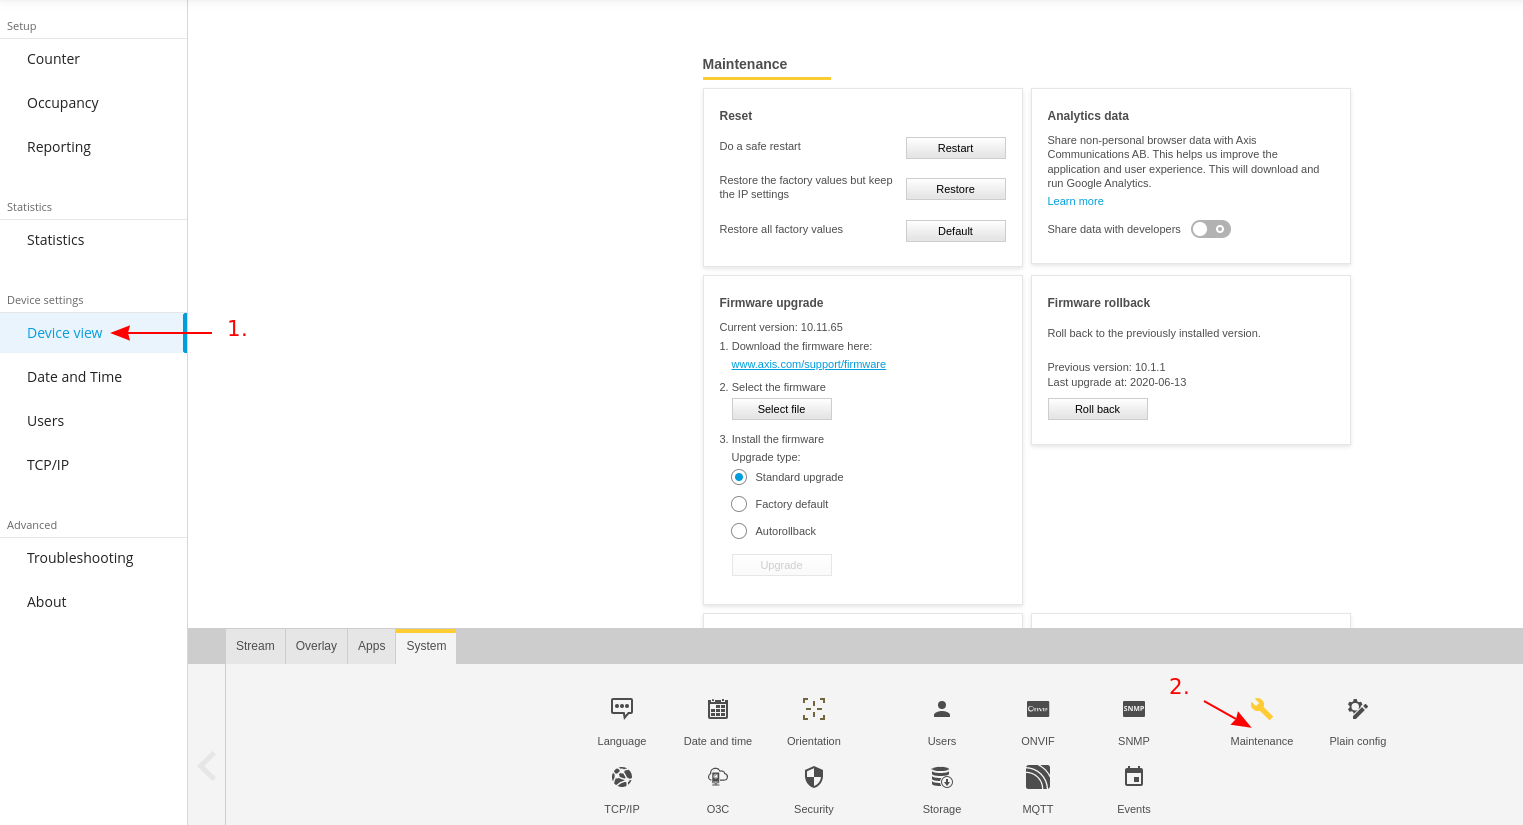
Follow the instructions to update the firmware. Yggio supports up to 10.8.x
Axis subscription to Mqtt
Go to our REST API Swagger
Authorize yourself at POST /auth/local
Take the token from the response and paste it in Authorize.
Scroll down to BasicCredentialsSets and make a POST /basic-credentials-sets.
Make sure to save the desired username, password and basicCredentialsSetId in a secure location!
Save the _id from the response and use it in the next step.
Scroll down to POST /reserved-mqtt-topics, paste the _id from previous step into basicCredentialsSetId and use yggio/generic/v2 followed by your own topics. Separated by /. See MQTT (data provider) for examples.
Axis camera local web interface
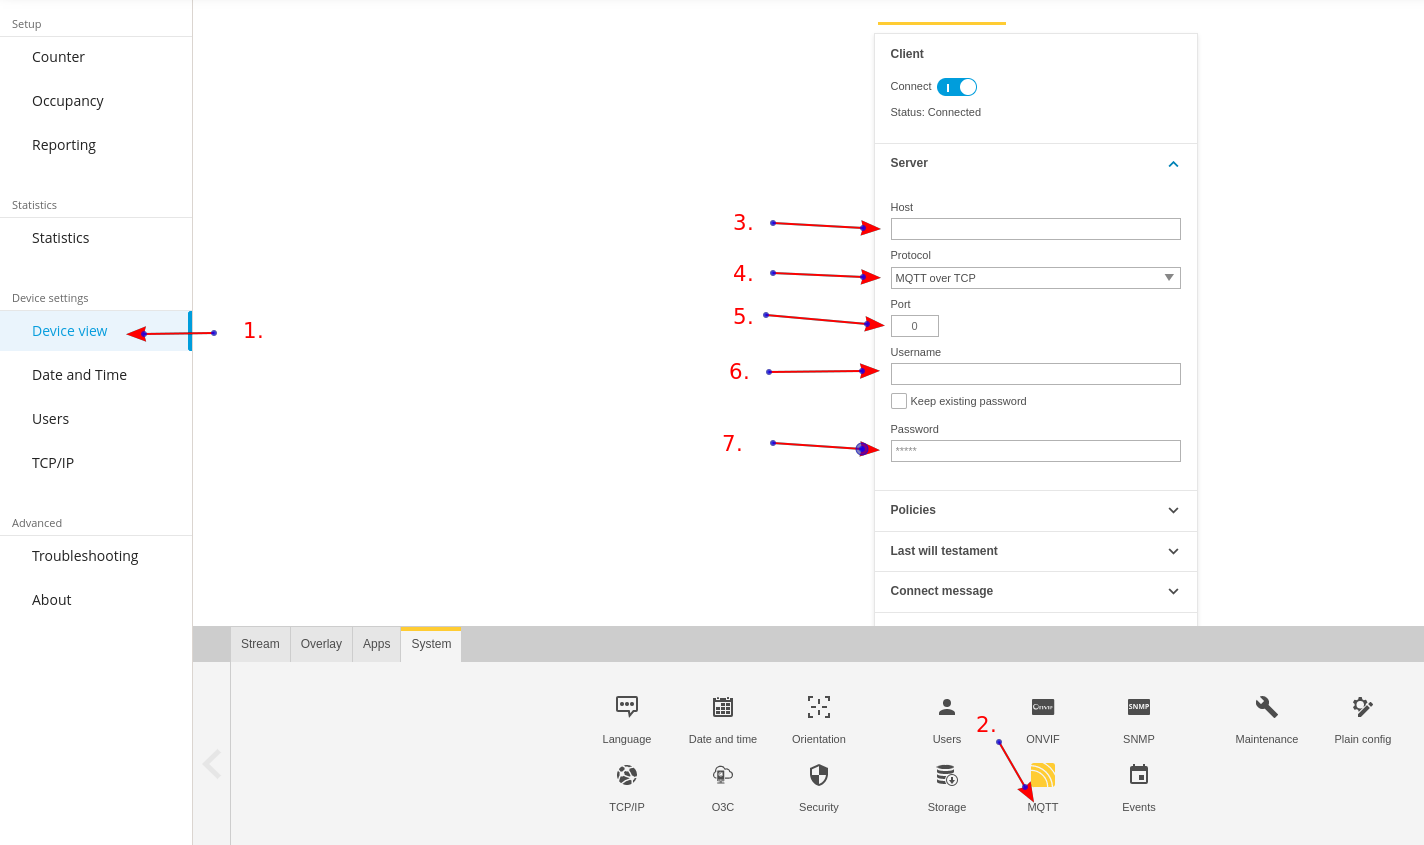
-
Device View
-
MQTT
-
staging.yggio.netas host -
MQTT over TCP
-
1883 as Port
-
Username from
BasicCredentialsSets -
Password from
BasicCredentialsSets -
Save
-
Connect
Axis Events
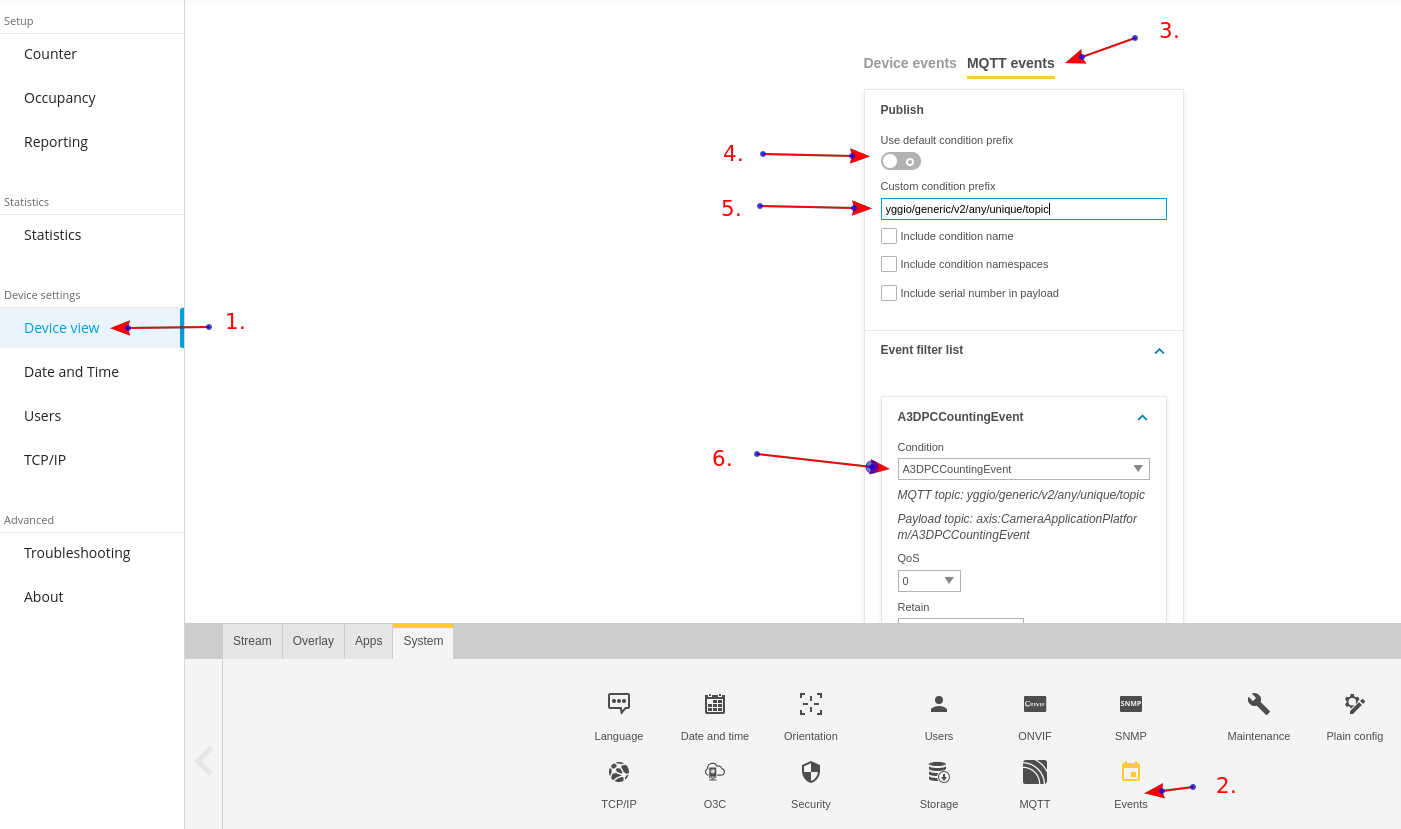
-
Device View
-
Events
-
MQTT Events
-
Use default condition prefix-> OFF -
Paste in the topic you reserved in previous steps
-
Add a condition and choose
A3DPCCountingEvent -
Save.
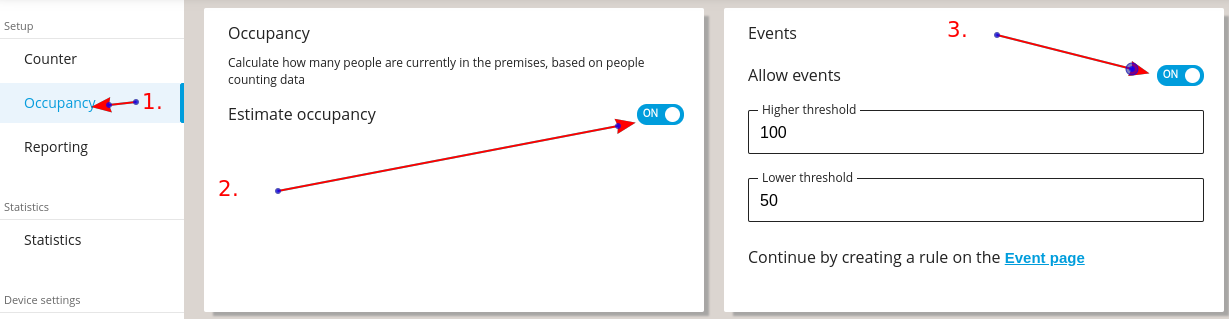
Axis Occupancy
-
Occupancy
-
Estimate occupancy -> ON
-
Allow Events -> ON
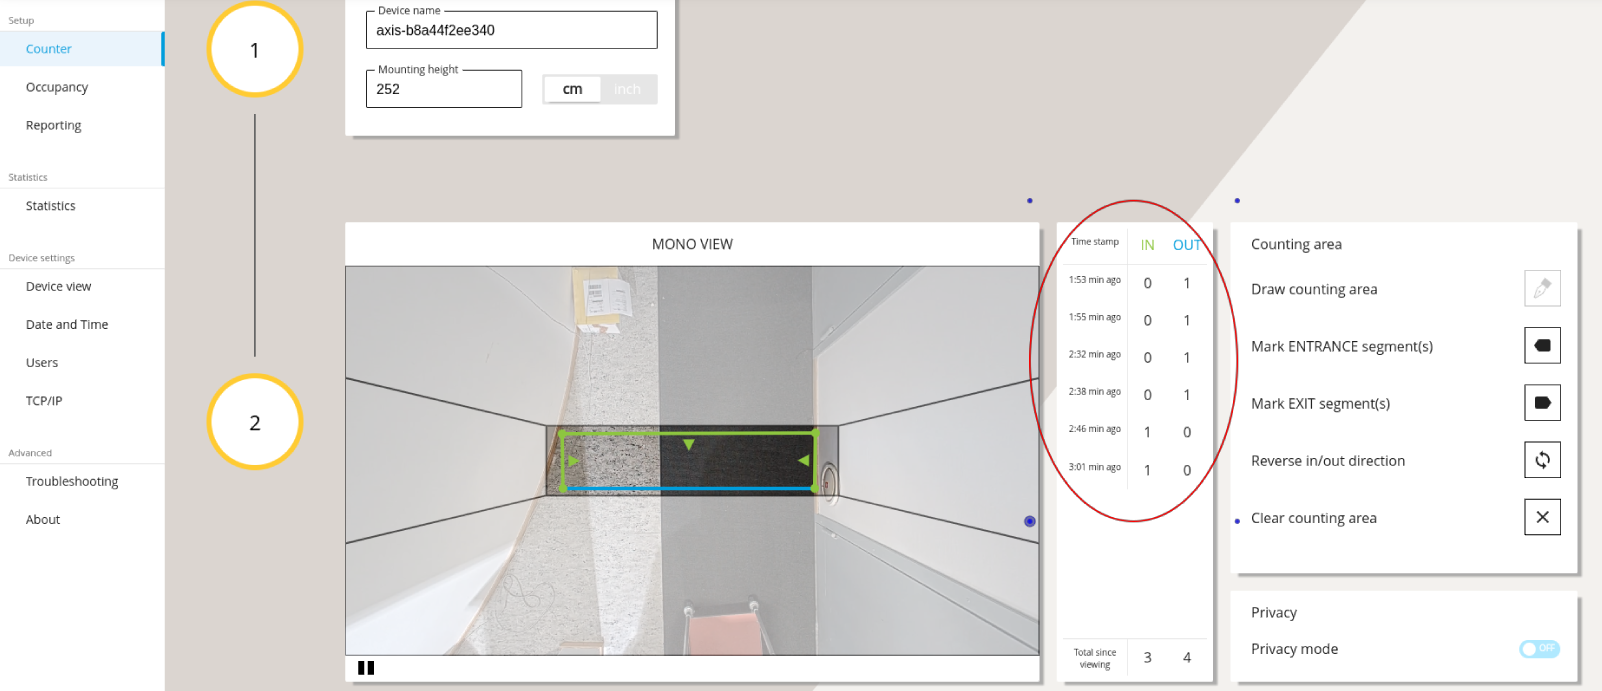
Axis Counter
You will see data coming from the device from here.
Configure device in Yggio
After the above steps have been completed and the device has posted it's first message to the reserved MQTT topic, a device will be created in Yggio.
When the device is created, it's name will be MQTT - <topic that you chose>.
Set device model name to -> axis-p8815-2-3d-people-counter.
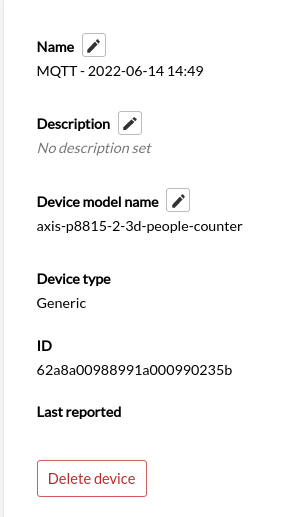
Now go to Data and you will find your peopleCounter data.