Lesson 1.1 Adding LoRaWAN devices
Adding IoT nodes to Yggio is the foundation.
There are three main types of IoT nodes:
- Devices: Represent a physical device, normally a sensor or an actuator.
- Virtual Node: A logical node used in data flow to hold some type of state or indirectly represent a physical device — such as a geofence, a WiFi beacon, a calculated node, or a simulated device.
- Services: Data coming from external services like OpenWeatherMap or Nordpool (energy price data).
Add a LoRaWAN device
LoRaWAN is the most common device type used in modern long range IoT networks, here is how to add one to the IoT platform.
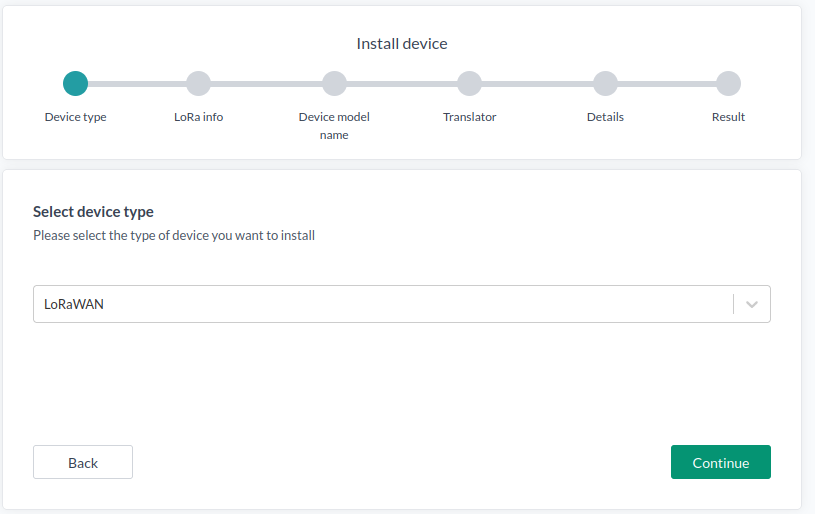
- Go to Devices and press "New Device".
- Select Single Mode.
- Choose LoRaWAN as the device type and continue.
-
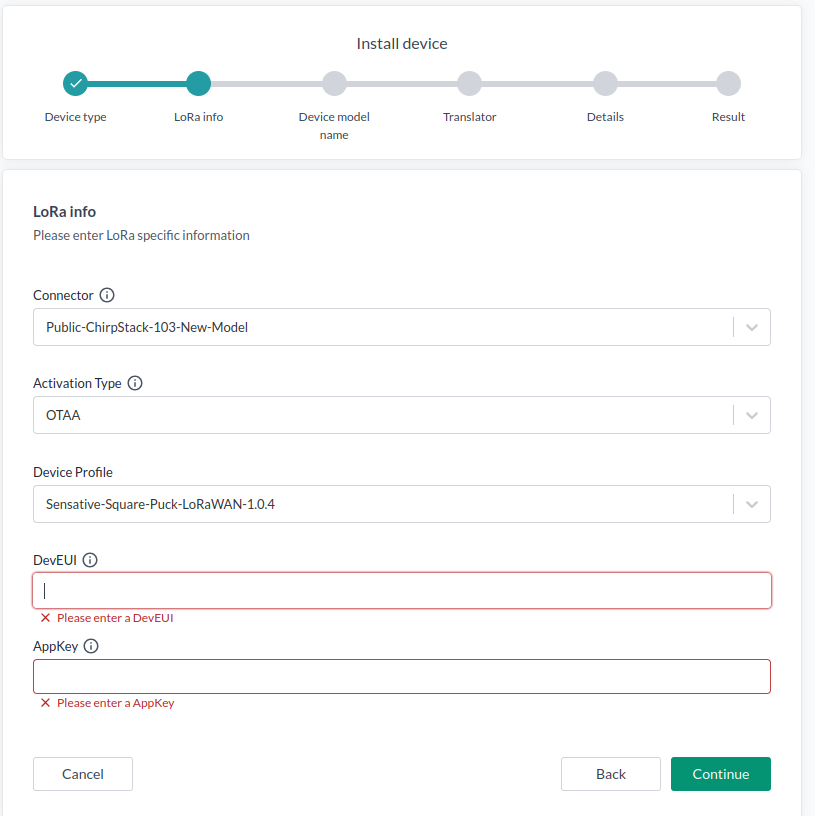
Choose a Connector.
The available fields may vary depending on the connector.
You should use OTAA - Over the air activation 99% of the time.- Device Profile should preferebly match your sensor's LoRaWAN network version, typically LoRaWAN version 1.0.4. plus regional parameters. If not there might be some join or connectivity issues.
- DevEUI is your device ID.
- AppKey is your encryption key.
You get the LoRaWAN version, DevEUI and AppKey from the device manufacturer. Continue when done.
Depending on the connector used, the IoT platform will automatically provision the new device to the LoRaWAN server. This simplifies the user experience, since there is no need to manually add the device to the LoRaWAN server as well. This automatic provisioning is supported for:
- ChirpStack v3
- ChirpStack v4
- Actility ThingPark
- Netmore
- TTN - The Things Network
For Actility and Netmore it is also possible to import the devices the connector has access to. For details about it see Connectors
If you need to add many devices then try out batch install with help of a CSV file.
-
For Device Model Name, select the type of sensor you have, this will be used to set the correct decoder translator.
-
On the next screen, a translator is automatically added. Normally, you don’t need to change this.
You can add additional translators here, or later by selecting the device in the Devices list and clicking Translators,
or by using the Select Many function. -
Specify additional details:
- Name
- Description (optional)
- Icon (optional)
- Pictures (optional) — if you're using a phone, you can take a photo directly
- Contextual parameters (optional)
-
Configure the device
After adding a device, it may need to be configured to report data at the desired time interval.
For LoRaWAN devices, this can be done directly by navigating to LoRaWAN Control and sending a configuration downlink.
Alternatively, multiple devices can be configured at once using Select Many → Configure.
The specific configuration downlink depends on the device and must be obtained from the manufacturer’s documentation. For example, for a Sensative Strip, you can use the Strips Configuration tool to quickly define device behavior and generate a downlink payload.
- Add supervision and alarms
It is often useful to add an alarm translator. This logic monitors incoming data for threshold breaches and can range from simple checks to advanced monitoring rules.
For more details, see Lesson 1-3 Alarm Views.
You can also configure alarms for multiple devices at once via Select Many → Edit Translators.
- Removing devices
⚠️ Important:
If an Actility Thingpark, ChirpStack or Netmore LoRaWAN device is deleted from Yggio, it will by default also be deleted and decommissioned from the LoRaWAN server. To avoid this, make sure to opt out of the delete action when prompted during the confirmation dialog.
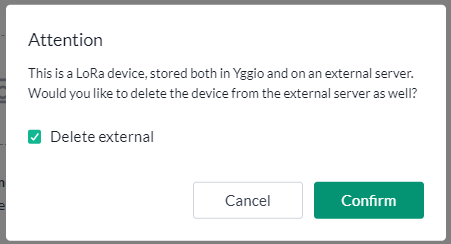
To remove a device, locate it in the Device List and click on it. In the General tab, click Delete. In the confirmation pop-up, confirm the deletion. If you want to keep the device in the LoRaWAN server, uncheck the Delete external box.
To remove multiple device, do Select Many, mark the devices to be deleted, Select Action -> Delete. In the pop-up confirm to delete the devices, if you would like to keep the devices in the LoRaWAN server uncheck the Delete external box.
- Question
- Answer
What is LoRaWAN Dev EUI?
The DevEUI is the unique ID that identifies a specific LoRaWAN device on the network.
A more detailed explanation is as follows, the DevEUI (Device EUI) is a globally unique 64-bit identifier assigned to every LoRaWAN device. It works like a serial number at the network level and ensures each device can be uniquely identified in a LoRaWAN network.
- Assigned by the manufacturer (based on IEEE EUI-64 address space)
- Cannot be changed by the user
- Required for device activation (OTAA or ABP)
Example:
70-B3-D5-7E-F0-00-AB-12
- Question
- Answer
What is the LoRaWAN App Key?
The AppKey (Application Key) is a 128-bit secret key used in LoRaWAN to securely authenticate and encrypt communication between a device and the network server. It plays a critical role during OTAA (Over-The-Air Activation) by deriving session keys that protect data confidentiality and integrity.
- 128-bit (16-byte) cryptographic key
- Known only to the device and the network server
- Used to generate session keys during OTAA
- Must always remain secret and never be shared publicly
Example:
2B7E151628AED2A6ABF7158809CF4F3C
- Question
- Answer
What is the LoRaWAN Join/App Eui key?
The JoinEUI (formerly called AppEUI) is a 64-bit identifier that specifies the Join Server responsible for handling a device’s activation. During OTAA (Over-The-Air Activation), the JoinEUI tells the network server where to forward the join request so that session keys can be securely derived.
- 64-bit identifier
- Set by the device manufacturer or network operator
- Points to the Join Server used during activation
- Required for OTAA in standard LoRaWAN deployments
Not all LoRaWAN networks implement a separate Join Server. Some, like ChirpStack, keep the join procedure and key management entirely within the network server itself. In those cases, the JoinEUI/AppEUI is ignored, since there’s no need to route join requests to an external Join Server. Instead, the server directly handles authentication and session key derivation.
Example:
70-B3-D5-7E-F0-00-00-01
- Question
- Answer
Can a LoRaWAN Gateway See Message Contents?
No — a LoRaWAN gateway cannot see the contents of a message. A gateway only acts as a transparent bridge between end devices and the network server. It simply receives LoRa radio signals, converts them into IP packets, and forwards them to the network server.
-
End-to-End Encryption:
Device messages are encrypted at the application layer using session keys (derived from the AppKey). Only the network server (and application server, depending on key separation) can decrypt them. -
Gateway Role:
The gateway just forwards packets. It does not have access to the encryption keys and therefore cannot interpret the payload.
In short: A gateway sees only metadata (signal strength, frequency, timestamp, etc.) but not the actual message contents.
- Question
- Answer
What is the difference, pros and cons with OTAA vs ABP?
LoRaWAN defines two main methods for device activation:
OTAA (Over-The-Air Activation) and ABP (Activation By Personalization).
Both determine how a device joins the network and gets its session keys.
OTAA (Over-The-Air Activation) - Dynamic and secure activation method
- The device sends a join request (with DevEUI, JoinEUI, etc.) to the network
- The network responds with a join accept and session keys are derived using the AppKey
- Session keys are unique and can change with every join
- More secure and recommended for production use
Pros:
- Stronger security (fresh session keys on each join)
- Easier device management across networks
- Supports roaming and re-keying
Cons:
- Requires join procedure (slightly longer setup time)
- Device must be in range of a network to complete the join
ABP (Activation By Personalization) - Static and preconfigured activation method
- Session keys (AppSKey, NwkSKey) and DevAddr are manually set in the device
- No join request/response is performed
- Device can start transmitting immediately
Pros:
- Simpler and faster (no join needed)
- Works even if the device cannot reach the network for a join
Cons:
- Session keys never change (weaker security)
- Harder to manage devices at scale
- No roaming support
- More vulnerable if keys are leaked
Summary:
- Use OTAA whenever possible for security and flexibility
- Use ABP only in special cases (e.g., very constrained devices, test setups)
- Question
- Answer
What is LoRaWAN Device Profile & Regional Parameters?
Device Profile A device profile defines the capabilities and configuration of a LoRaWAN end device within a network. It ensures that the network server knows how the device communicates and what features it supports.
A device profile typically includes:
- LoRaWAN version (e.g., 1.0.3, 1.1.0)
- Regional parameters revision (e.g., RP002-1.0.3)
- Maximum EIRP (transmit power limits)
- Supports Class-B / Class-C (device operating modes)
- Maximum message size (per data rate)
This profile allows the network server to correctly interpret the device’s behavior and apply the right settings.
Regional Parameters LoRaWAN operates in different frequency bands depending on the region (EU868, US915, AS923, etc.). The regional parameters define how the LoRaWAN protocol is adapted for each regulatory domain.
They specify things like:
- Frequency plans (uplink & downlink channels)
- Data rates (spreading factors)
- Maximum transmission power
- Duty cycle or dwell time limits
- Channel mask settings (for regions like US915 or AU915)
Each device must follow the correct regional parameters to stay compliant with local radio regulations and to ensure interoperability.
In short:
- The Device Profile defines what the device can do.
- The Regional Parameters define how the device must operate in its specific frequency region.
- Question
- Answer
What happen if one uses a small mismatch of LoRaWAN Device Profile & Regional Parameters for a device?
Effects of Wrong Device Profile or Regional Parameters (Small Mismatch)
If the device profile or regional parameters are slightly incorrect (like Region A instead of B):
- OTAA join requests may fail or succeed intermittently.
- Some uplink or downlink messages might be lost.
- Overall communication becomes unreliable, even if the device will appears to work most of the time.