Select many
Select many applies one of fourteen actions to a set of devices, or to a whole device group, in a single step.
Select the devices
- Narrow the list first, with search, filters or a view. The selection is easier to get right when the list already holds only what you want.
- Press "Select Many".
- Mark the devices. To take a run of them without pressing each one, mark the first, hold Shift and mark the last - everything between is selected too.
- Or switch to the Device groups tab and select a group, which selects its members.
- Press "Select Action" and choose what to do.
The actions
Organising devices
- Edit: Set metadata fields across the selection - contextual parameters, device model name, description, the order field used by the device list's group-by, and the icon. See Editing fields in bulk.
- Add to Device Group: Add devices to a group. More info about device groups.
- Add to floor plan widget: Quickly select and add devices to a floor plan widget.
Looking at the data
- Charts: Create charts with the data over time from the selected devices. More about charts.
- Calculate: Calculate the same type of value from one or several devices in multiple different ways to create a new calculated device.
- Export to File: Export the current view to file for Batch Management. This allows you to edit several devices at once and re-add them using Batch update, or extract data out of Yggio. What the file contains is decided by the columns in your view, so check the view before exporting.
Configuring devices
- Edit Translators: Add or remove translators across the selection, and edit versions, upgrade policies and parameters in bulk. See Editing translators in bulk.
- Set Connector: Set a connector on the selected devices. This can be used to move the devices from one integration to another.
- Set Report Interval: Set the expected report interval for the selected devices. If a device does not report within the expected time, you will receive a warning in the alarm log. The event "missing expected report" can also be used in the Rule Engine with a predefined condition to trigger a rule if the device stops reporting. See the Rule Engine for more details.
- Configure: Send LoRaWAN downlinks to selected devices.
- Channels: Create the same channel on every selected device. A channel publishes a device's data out of the platform: onto Yggio's own MQTT broker, onto another MQTT broker, as a webhook, or into another system through its API. Doing it here sets one up across the whole selection instead of device by device. To see or manage the channels on a single device, use Device details.
Access and lifecycle
- Access Rights: Share the whole selection at once, and change the owner of devices. See Sharing many devices.
- Synchronize: This function synchronizes a device with its integration. The main purpose is troubleshooting if a device stops reporting, to confirm that all involved systems are still connected.
- Delete: Permanently remove the selected devices. For LoRaWAN devices this deletes them from the network server too unless you clear "Delete external" first, which is ticked by default. See Removing devices.
Removing devices
- Press "Select Many" and mark the devices to delete.
- Press "Select Action", then "Delete".
- For LoRaWAN devices, decide whether to clear "Delete external" in the confirmation. It is ticked by default.
- Confirm.
Leaving "Delete external" ticked decommissions the device on the LoRaWAN server as well. Clearing it removes the device from Yggio only and leaves its registration on the network server intact.
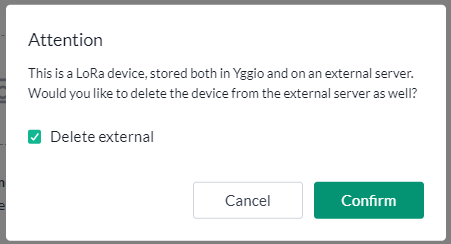
Clear it when the device is moving to another Yggio account or being re-provisioned elsewhere. A device deleted here and left on the network server keeps consuming its subscription.
The choice applies to the whole selection: a mixed batch is either all decommissioned or all left in place. Split the selection if you need it both ways.
To remove a single device, you can also do it from Device details.
Sharing many devices
Access Rights shares every device in the selection in one action, the same three ways as on a single device: to an Organization, to a User, or to a User group.
To share into an organisation:
- Press "Select Action", then "Access Rights".
- Choose the Organization tab.
- Pick the organisation, then the subunit in the tree below it. Any level can be the target, from the whole company to a single floor.
- Check the path shown under the tree, then press "Share".
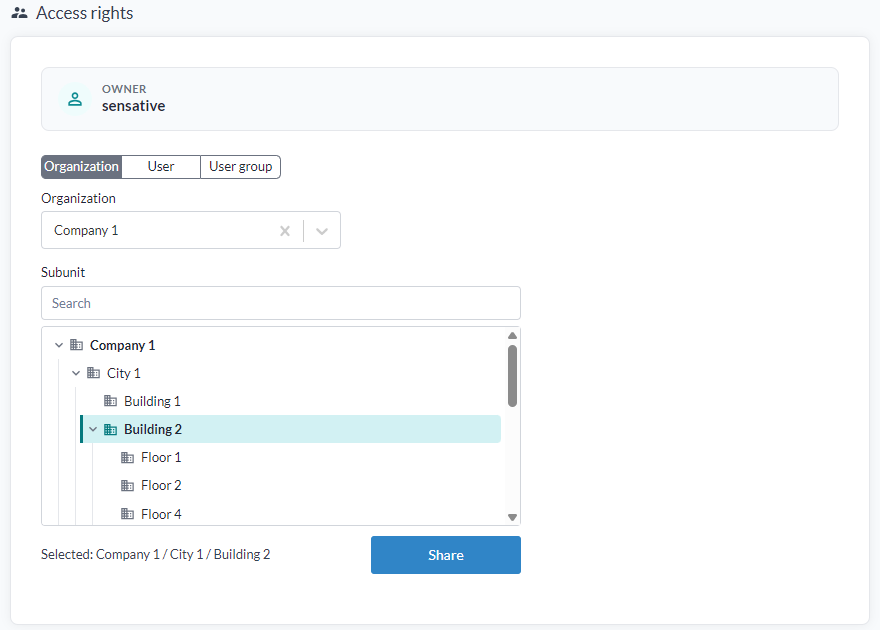
Access reaches upwards. Everyone with access to the branch you share to gets the devices, and so does everyone with access above it. Share to a building and the people at that building see them, as do those with access at the city and the company above - but not those on a neighbouring building, and not those further down.
Sharing high up the tree therefore narrows the audience to the few who hold access at that level, rather than widening it. Share at the branch the devices belong to.
It needs two rights at once: admin on the devices, and organisation admin on the organisation. Either alone is not enough.
This pane is also the only place the owner of devices can be changed: pick the new owner and press "Change owner". Owner changes apply to devices, not to device groups.
For what each access level permits, see access rights. For the same pane on one device, including the table of who currently holds what, see Access rights.
Editing fields in bulk
Edit sets the same metadata on a whole selection. It is a two-step wizard, Edit then Result.
- Press "Select Action", then "Edit".
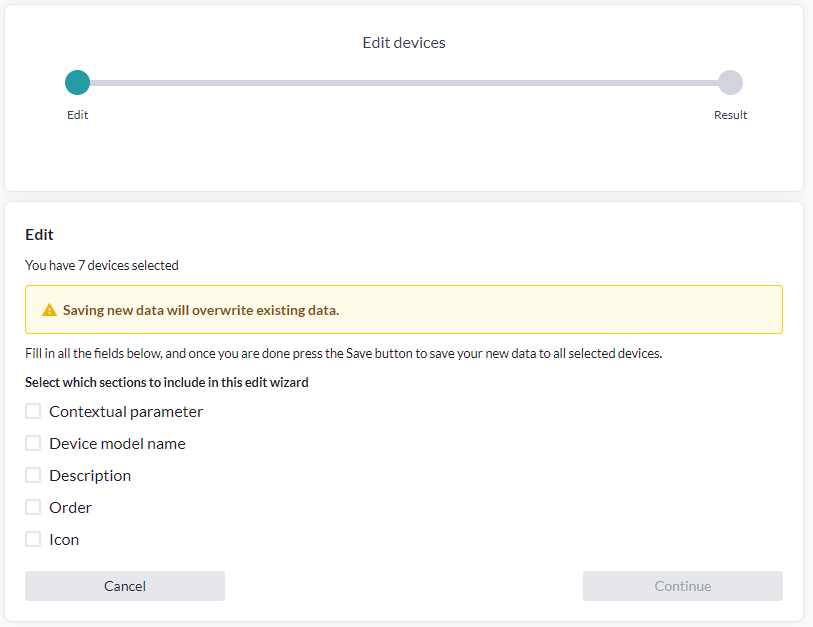
- Tick the sections to include. Tick only what you intend to change.
- Fill in the fields for each ticked section.
- Check the device count at the top, then press "Save".
The sections are:
| Section | Sets |
|---|---|
| Contextual parameter | Your own metadata - who installed it, which building, which room |
| Device model name | The model designation, which also drives translator suggestions |
| Description | The free-text description |
| Order | The field the device list's group by clusters on |
| Icon | The icon shown in the list - a preset, or an image you upload |
A section you do not tick is not part of the wizard and is not touched.
An uploaded icon is sent to each device once the save has finished, a few at a time. The Result step counts them and lists any device whose upload failed. Stay on the page until it is done: leaving stops the uploads that have not started yet.
Within a section you do tick, what you enter replaces what each device had. The same value is written to every selected device.
This is the opposite of the Edit parameters tab for translators, which leaves anything you do not type alone. Edit makes devices the same; Edit parameters changes one value and preserves the differences.
The Order field, and how group by uses it
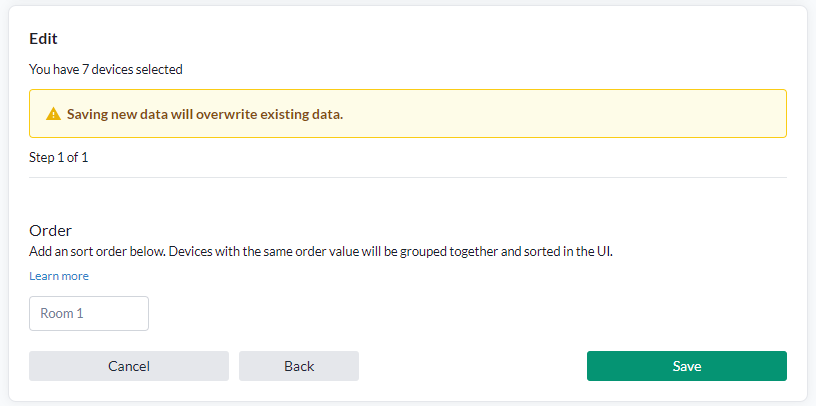
Order is free text you put on a device, and it is what the device list's group by works on. There is no list of groups to define anywhere: the list sorts alphabetically on the order value, and every device carrying the same text ends up grouped together under it.
So setting Order to "Room 1" on four devices and "Room 2" on three gives two groups, in that order, each with its own heading and table. The groups are simply the distinct order values across your devices, sorted.
The result, with group by switched on in the device list: one heading per distinct order value, in alphabetical order, each with its own table of the devices that carry it.
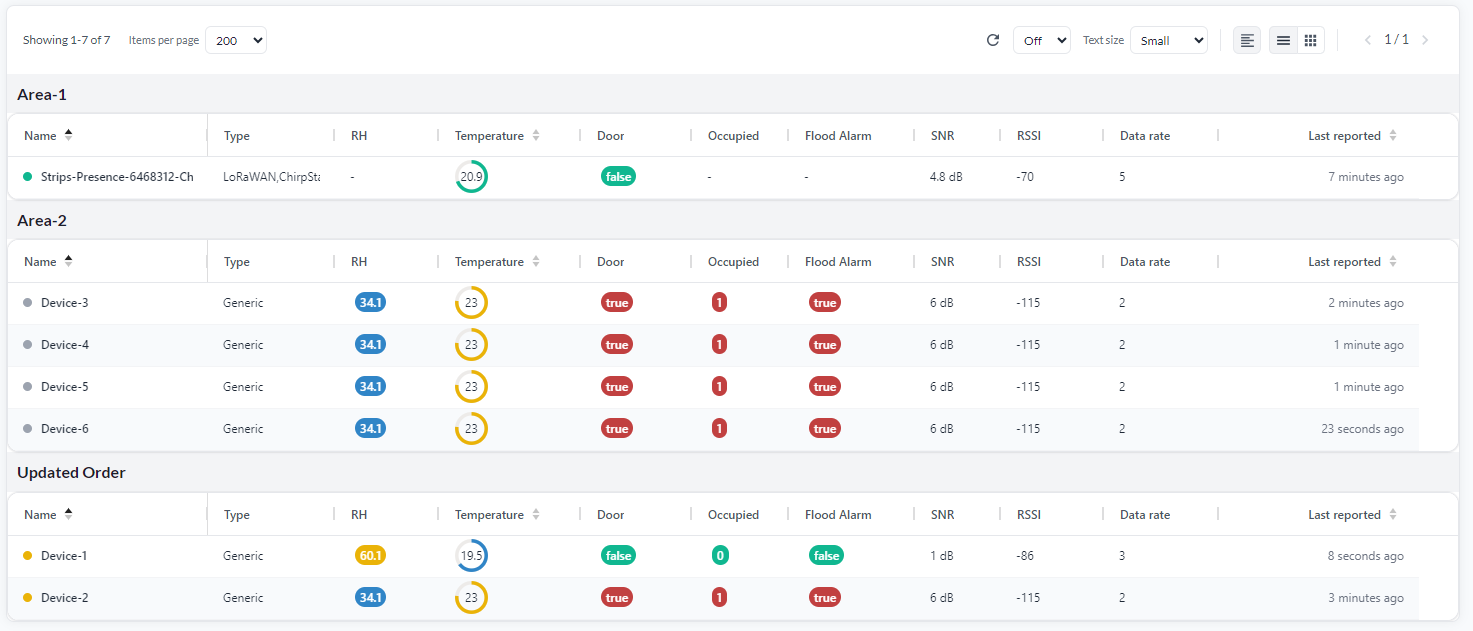
Above, three order values became three groups, listed A before U. Each group keeps the full set of columns and can be sorted on its own.
Two things follow from the value being text sorted alphabetically:
- Name the values deliberately - "Floor 1 - North", "Floor 1 - South" - and you control both the grouping and the order the groups appear in.
- "Room 10" sorts before "Room 2", because it is text and not a number. Pad the numbers - "Room 02" - if you have more than nine of anything.
This is not the same thing as a device group. A device group is a named set you create and add devices to, and it can be selected and acted on as a unit. Group by only arranges the list you are looking at.
Editing translators in bulk
The Edit translators pane has five tabs. Which one you want depends on whether you are adding, changing or removing.
| Tab | What it does |
|---|---|
| Add translators | Add one or more translators to every selected device, each with its version, upgrade policy and parameters |
| Edit version | Change the version and upgrade policy of a translator the devices already have |
| Edit parameters | Change parameter values on a translator the devices already have |
| Delete all translators | Remove every translator from the selected devices |
| Delete last translator | Remove only the last translator in each device's chain, leaving the rest |
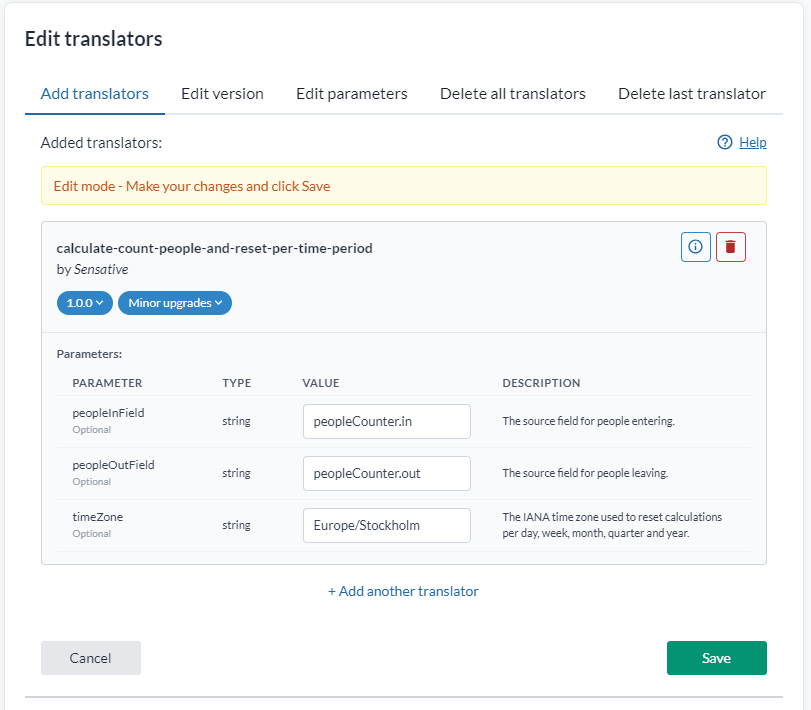
Nothing is written until you save.
The Overview
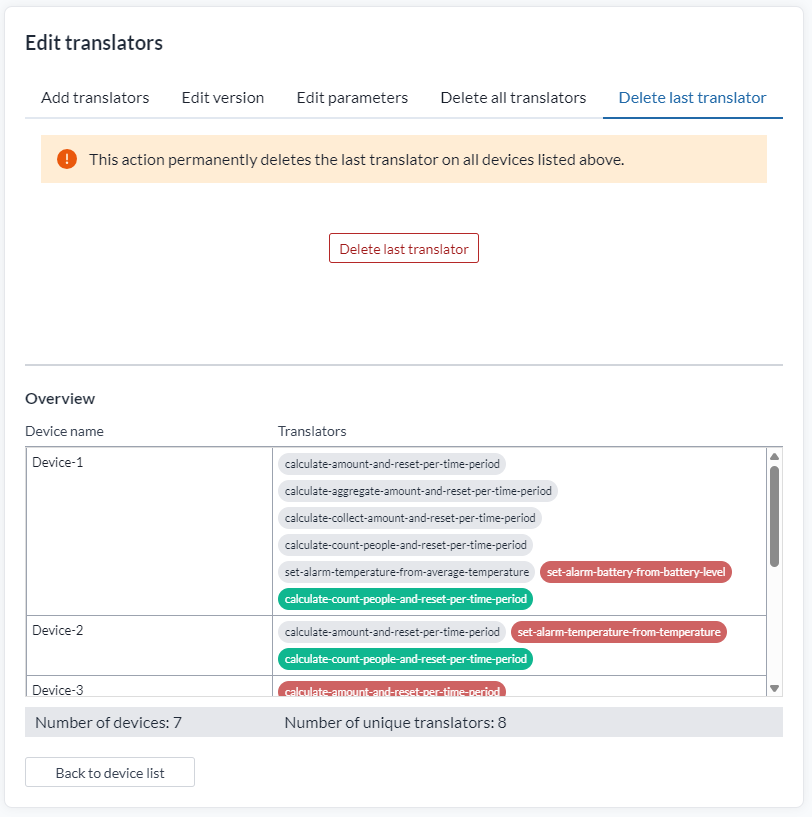
Below the tabs, the Overview lists every selected device with its translators, and colours them by what is about to happen:
| Chip | Meaning |
|---|---|
| Grey | Already on the device, and staying as it is |
| Green | Being added |
| Red, struck through | Being removed |
It also counts the devices and the unique translators across the selection. Check those counts before saving - a count you did not expect means the selection is not what you thought.
Adding and deleting
The three add and delete tabs work on any selection, whatever the devices currently have.
On Add translators, each translator you add shows its version and upgrade policy as dropdowns, and its parameters as a table with the type, whether the parameter is optional, and a description of what it does. Use "+ Add another translator" to chain several in one go.
The two delete tabs state what they are about to do and give you a single button to do it, rather than a Save.
Delete last translator removes only the last in each device's chain. On a selection where the chains differ, that is a different translator on each device. Check the Overview first.
Editing versions and parameters
Edit parameters changes translator parameters across a fleet. The alternatives are editing every device by hand or going out through a CSV file with Batch update.
Only the values you change are written. Every other parameter keeps whatever each device already
has, device by device. Each value box starts out reading "Leave unchanged"; left that way, the
parameter is not touched anywhere in the selection. So you can point two hundred devices at a new
timeZone without flattening the peopleInField values that differ between them.
The banner at the top confirms how many devices you are about to edit. Confirm applies the change.
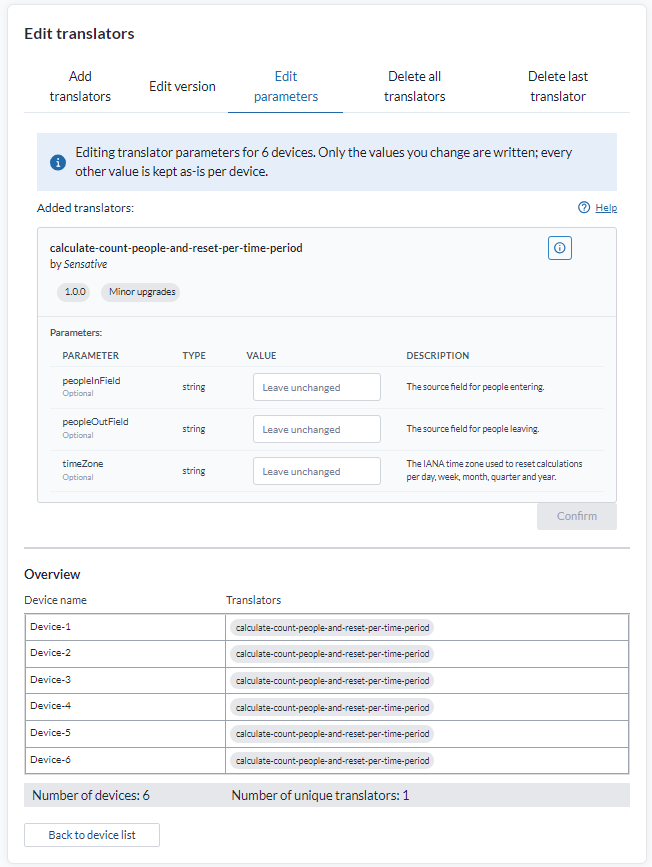
Both edit tabs need the selection to be uniform: every selected device must carry the same translators in the same order. If they do not, you get a list of the mismatches - differing versions, a differing translator order, or a translator missing on some devices. Narrow the selection until it is uniform.
The Overview's "number of unique translators" is the quick check. One translator across six devices, as above, is a selection you can edit.
Edit version works the same way, for the version and the upgrade policy.
Changing a major version
A translator's major version changes when its data model changes - field names, types, or which fields it produces at all. Yggio does not apply that quietly. It shows you the current version's data model beside the new one, with the fields being removed in red, the ones being added in green, and a count of each, and waits for you to confirm.
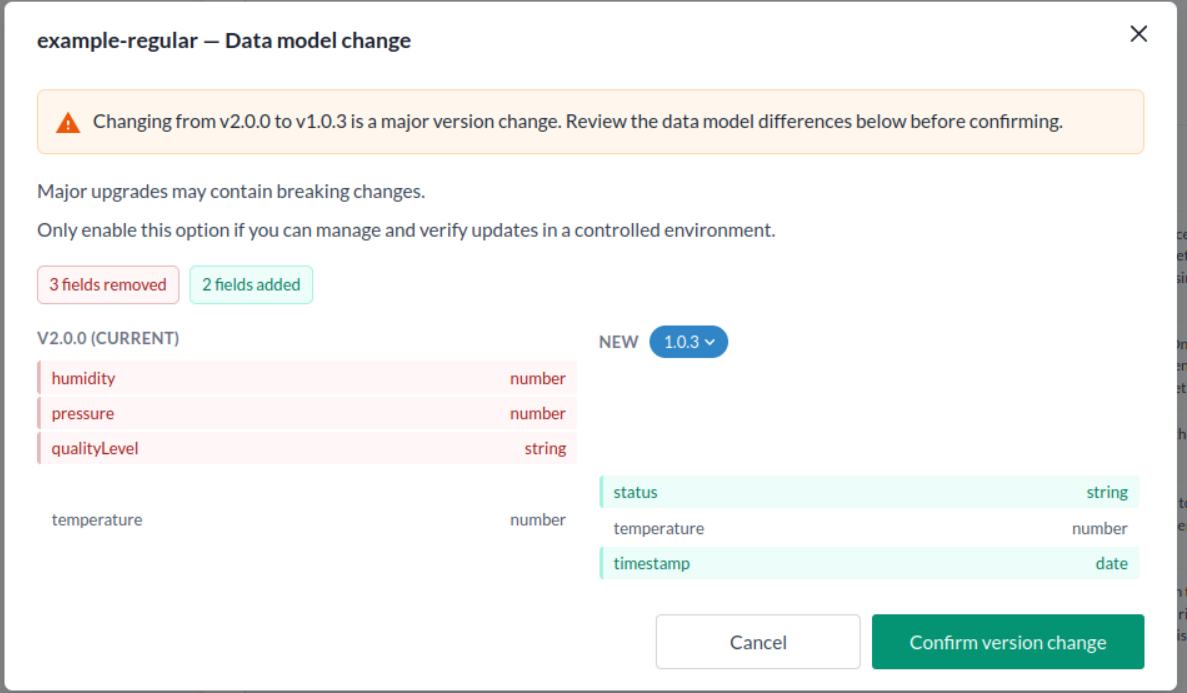
Read the two columns before confirming. Anything pointing at a field that disappears - a column in a view, a chart, a rule, a channel, a calculation - stops working and needs repointing at the new name.
Below the comparison sits a checkbox offering to remove the obsolete fields from the device. It is off by default and nothing is deleted unless you tick it. Ticking it clears the old field names from the device, so they stop appearing in views, charts and reports; the values return under their new names on the next uplink, and time series history is untouched. In Select many the removal applies to every selected device.
A field that another translator on the same device still produces is never offered for removal. It is listed as kept, naming the translator that still writes it. If one of the device's other translators cannot be read at all, because it has been removed from the catalogue or you do not have access to it, nothing is offered, since there is no way to tell what it still produces.
Many translators changed their data model in v3.40, so a version change on a device installed before that is often a major one with field renames behind it. The dialog is where you see which, for that translator, before anything is written.
The dialog appears when you change the version yourself. An upgrade policy that permits major upgrades applies them without asking, which is why that policy is worth setting only where you can verify the result - see Versions and upgrade policies.