Lesson 2.8 - Standard Flows: Timers and Geofences
General timers are used to delay alarms. Like, if a door or window opens and isn’t closed again within a certain time, the alarm goes off. Same thing if the temperature passes a limit and doesn’t drop back down soon enough.
In this lesson, we’ll explore the standard flows. Since the Flow is not supported on the generic HTTP and MQTT integration it must be tried out with real device using a new connector such as LoraWAN. This put some constraints on especially the Geo Query flows since requires movement of the IoT nodes. There are some translators available that can be used to simulate movement of devices in and out of geofences but it is beyond the scope of this training.
Timers
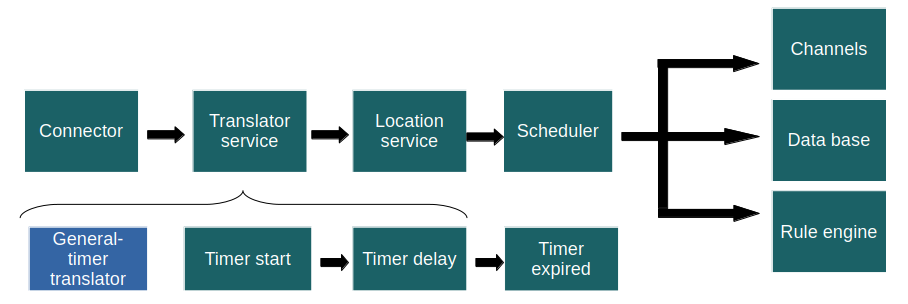
To start using General Timers two items are required:
- The
General Timer Flow: This is a special Flow that after translator service has executed checks if a timer should be started or not. If the timer expires the IoT node will get an update. - The
General Timer Translatoror a customized variant of it: This is very similar to a normal Alarm Translator with built in alarm thresholds and hysteresis but instead of setting an alarm it controls the timer functionlality.
Common Use Cases
- Garage doors that don’t close automatically like they’re supposed to.
- People forgetting to shut doors or windows behind them
- Levels that are allowed to temporaryily passed a threshold but needs to go back within a certain time.
- Assets that are allowed to be inside or outside a geofence a certain time.
- Check if assets are in use or not by starting a timer when no movement detected.
Setting one up is pretty easy:
-
Change the Device Flow
Set the flow of the device togeneral-timer., see flow for details. -
Add a
general-timertranslator
Add it via the Translator menu in the device settings, or apply it to multiple devices using Select Many. -
Open Contextual Parameters
Access contextual parameters either:- From the device menu, or
- With Select Many → Edit
-
Configure the General Timer Parameters
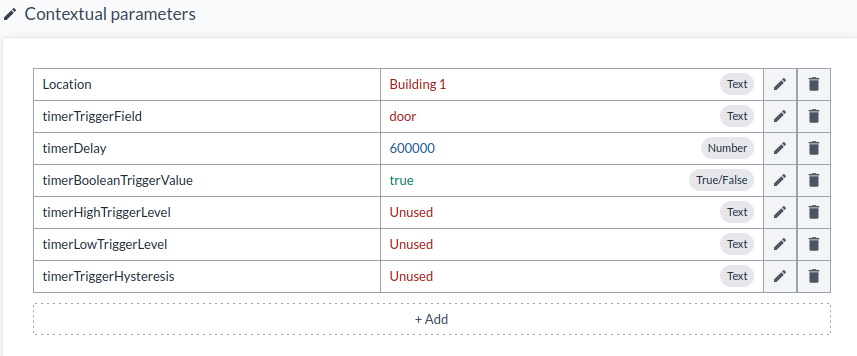
Below is a breakdown of the available parameters:
| Parameter | Description |
|---|---|
timerTriggerField | Field to monitor as a trigger (e.g., door, motion, temperature) |
timerDelay | How long (in milliseconds) the trigger must remain active before the timer expires |
timerBooleanTriggerValue | For boolean fields—set this to true or false depending on your logic |
timerHighTriggerLevel | For numeric fields—this is the upper threshold |
timerLowTriggerLevel | For numeric fields—this is the lower threshold |
timerTriggerHysteresis | Adds hysteresis to avoid rapid toggling around the threshold |
For instructions on how to create an Alarm Monitoring View, refer to the linked guide. Use the following fields:
timerStart– Indicates whether the timer has been started.timerStartAt– The timestamp when the timer started. If no timer is running, this will be an empty string.timerExpired– Indicates whether the timer has expired. This is the primary "alarm" field used to trigger alerts.
Use a suitable sensor, such as a Sensative Strip with a magnetic contact, to test the timer functionality.
- Set the trigger field to
doorand thetimerBooleanTriggerValuetofalse. - Configure the
timerDelayto 30,000 ms (30 seconds), then open and close the door to observe how the timer behaves. The timer should reset if the door is closed before the delay period expires.
Geofences
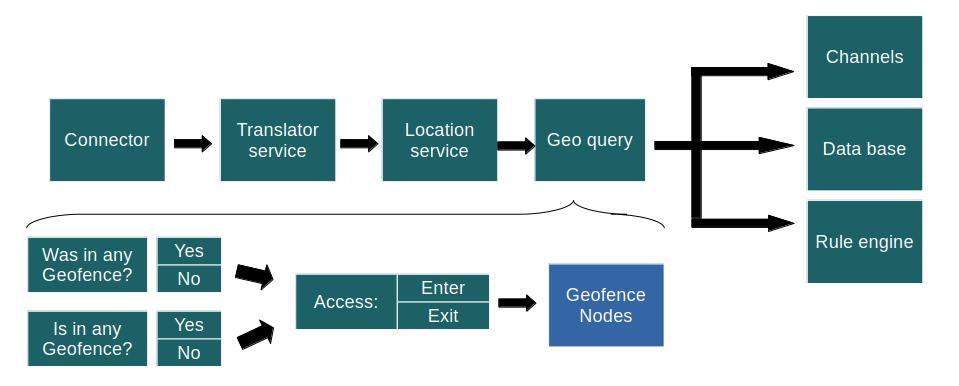
To start using Geofences two items are minimum required:
- The
General GeoQuery Flow: This is a special Flow that after translator service has executed checks if an IoT node is inside or outside geofences and if yes sends them an update event. - Geofences with reference IoT nodes with either the
General Geofence Translatoror a customized variant of it.
Geofences are difficult to test in a short training session because they require physically moving assets. Use the following as a setup guide for a proof of concept (PoC) or full commercial installation instead of expecting to fully experiment during the lesson.
Typical use cases for geofences
| Use Case | Required Trackers | Geofence Purpose | Benefits |
|---|---|---|---|
| Airport Asset Tracking | LoRaWAN or BLE trackers | Terminals, gates, restricted areas | Track equipment and luggage carts; Prevent loss; Improve logistics |
| Hospital Asset Tracking | BLE / NB-IoT trackers | Wards, operating rooms, equipment zones | Monitor critical equipment; Reduce misplacement; Improve response times |
| Railway Depot Asset Tracking | LoRaWAN / GPS trackers | Tracks, maintenance yards, restricted zones | Track rolling stock and tools; Prevent unauthorized movement; Improve efficiency |
| Warehouse Asset Management | LoRaWAN or BLE trackers | Storage zones, loading areas | Real-time asset location; Zone-breach alerts; Optimize utilization |
| Personnel Safety | Wearable BLE / NB-IoT trackers | Hazardous or restricted areas | Immediate alerts; Compliance tracking; Reduce accidents |
| Fleet & Vehicle Management | GPS-enabled LoRaWAN / NB-IoT trackers | Depots, routes, restricted areas | Detect route deviations; Unauthorized stop alerts; Improve efficiency |
| Smart Buildings / Offices | BLE / Wi-Fi badges or devices | Offices, meeting rooms, restricted areas | Automate HVAC/lighting; Occupancy analytics; Energy efficiency |
| Retail Customer Tracking | BLE / Wi-Fi trackers in carts or apps | Entrances, product sections, checkout areas | Trigger offers; Track foot traffic; Optimize layout |
| Cold Chain Monitoring | LoRaWAN / NB-IoT trackers | Cold rooms, refrigerated vehicles | Monitor asset movement; Trigger temperature alerts; Ensure compliance |
| Event Management / Security | BLE / GPS trackers | Stages, backstage, entrances | Track staff/equipment; Automate access; Reduce risks |
| Shipping / Port Asset Tracking | LoRaWAN / GPS trackers | Docks, container yards, restricted zones | Real-time cargo tracking; Prevent loss/theft; Optimize operations |
Key Notes:
- Geofences require trackers attached to assets, vehicles, or personnel.
- Each geofence triggers events:
enter,inside, andexit. - Events can be used to forward data, automate rules, or update dashboards.
- Geofences improve operational efficiency, safety, security, and data-driven decision making.
Enabling Cloud-Supported Location Services
To enable a cloud-based location service for testing, add the translator enable-location-service to your device. This activates the default Traxmate connector (the URL https://lw.traxmate.io must be reachable).
When the platform receives an uplink containing valid GNSS, WiFi, or BLE data, it will request a location lookup through the service.
The General Geo Query Flow
The General Geo Query Flow works together with the Location Service—using GPS, Wi-Fi, or BLE data—to determine whether an IoT node is inside or outside a geofence. This query executes every time an IoT node (typically a tracker) reports a new location event.
Geofences can be both outdoor and indoor. Indoor geofences include a property called floorIndex, which maps to a specific floor level to help localize the tracker accurately.
Enabling Geofence Capabilities
-
Use General Geo Query Flows
Assign the General Geo Query Flow to the IoT nodes that should participate in geofencing logic. -
Create Geofence Generic Nodes
These nodes serve as reference points for geofences and help visualize how many trackers are within each one.
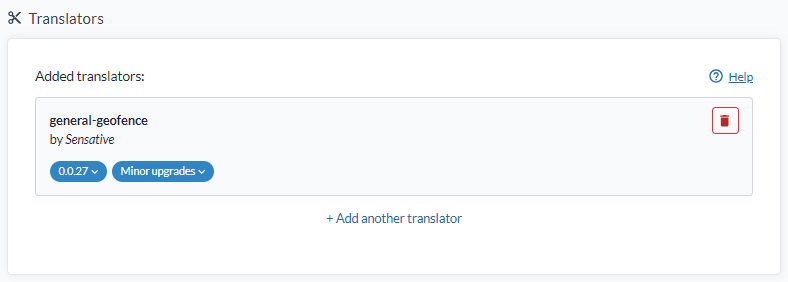
Add the translatorgeneral-geofenceto the geofence IoT nodes.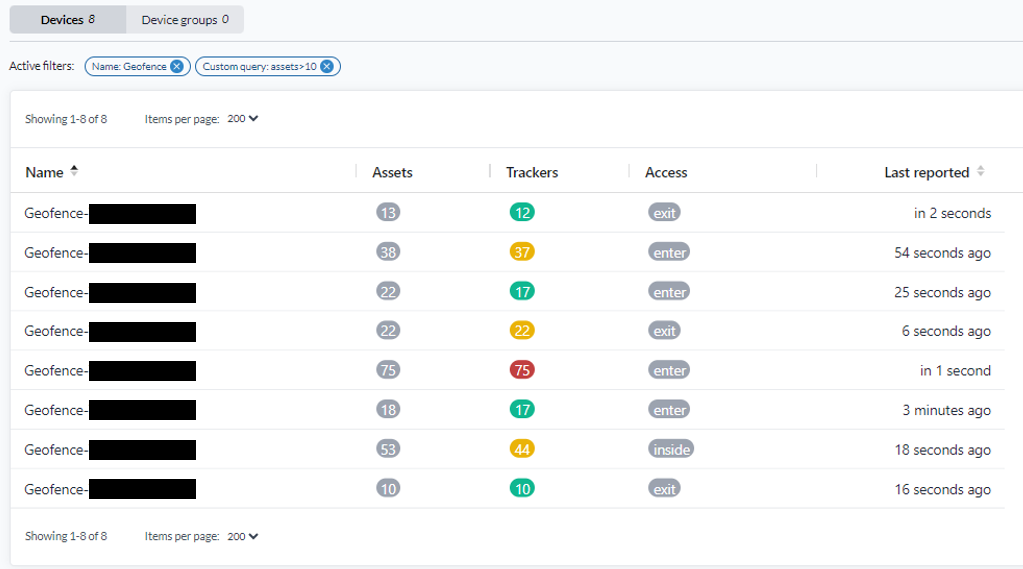
-
Create Geofences
Define geofences directly on the map or through map widgets in dashboards that use geomapped floor plans. For details how to create a Geofence see Lesson 1.5 — The Map and Map Views Use the_idof the generic geofence node as the reference node in each geofence. -
Enable Indoor Localization (Optional)
For indoor localization, Combain is the recommended provider.
To improve accuracy and distinguish between floors, a Combain AI Indoor Survey must be performed.
This survey maps Wi-Fi routers and BLE beacons’ RSSI levels for triangulation using the Combain mobile app.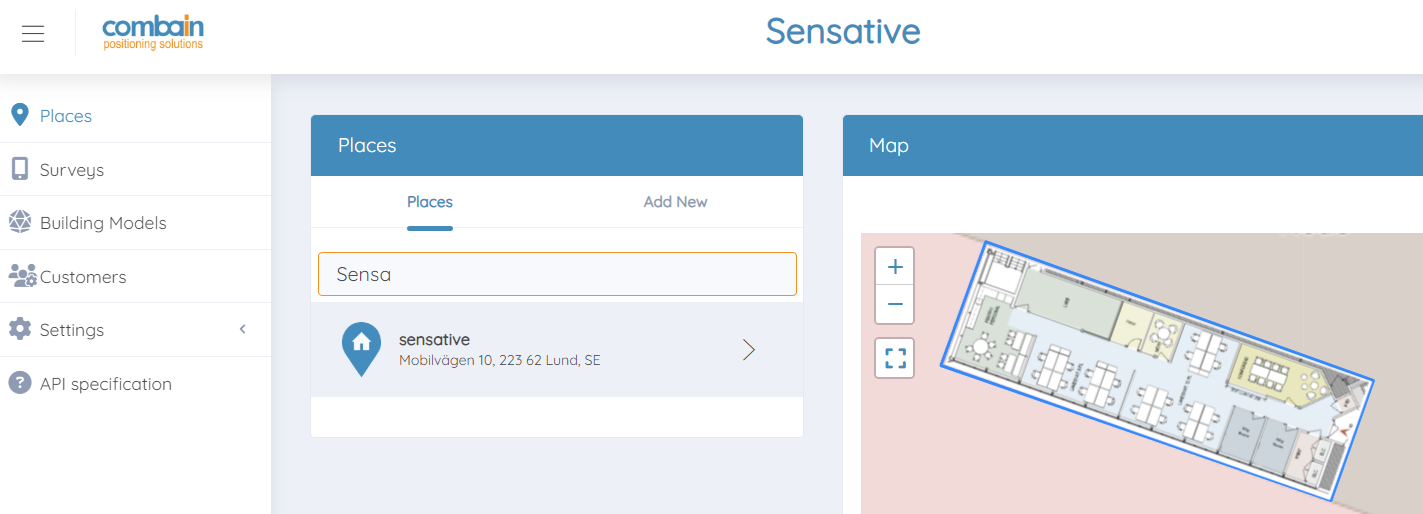
Steps for a Combain trial:
- Request a Combain account from your technical support contact.
- Log in to the Combain Indoor Portal.
- Create a new Place and choose it to be of the type Building in the portal and ensure Combain correctly recognizes the layout. If not, redo the process until it does.
- Upload and align floor plans for each level of the building.
- Perform a detailed survey using the Combain Android AI Indoor Survey App.
- The more detailed your survey, the higher the localization accuracy.
- Alternatively, if you know the locations of your Wi-Fi routers or BLE beacons, you can place them manually on the map.
For exact details of the complete Combain process and tools see Combain Indoor Positioning Guide
-
Create Map Views and Dashboards
Visualize the locations of your geofences, geofence IoT nodes, and trackers within dashboards or map views.
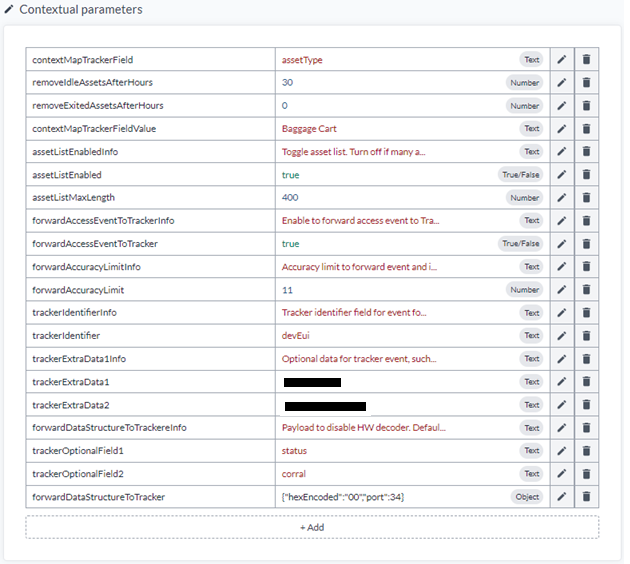
General Geofence Translator
The 'general-geofence' translator is a sophisticated translator designed to handle 'enter', 'exit' and 'inside' events from geofences.
Its key functionalities include:
- Count the number of trackers inside a geofence.
- Count the total number of assets inside a geofence.
- You can differentiate between asset categories and avoid counting all as trackers (e.g., in an airport, wheelchairs and baggage carts may considered trackers in different geofences).
- Maintain a list of all assets currently inside the geofence.
- Automatically remove idle assets after a certain time if an exit event is missed.
- Forward data to the origin asset that triggered a geofence event.
- Specify the identifier for the origin asset.
- Select the type of data to forward to the origin asset (excluding access event data).
- Optionally encode data in hex for the origin asset to accommodate hardware decoders.
- Set an accuracy threshold for forwarding data.
- Geolocation services return an accuracy figure (50% likelihood).
- If the accuracy is too low, the asset may not actually be inside the geofence, and the data can be ignored.
Improve Geofencing with Wi-Fi RSSI Level Capability
When it’s important to count the number of trackers within a specific area, for example, to provide a KPI to stakeholders it is recommended to complement the geofencing capability with Wi-Fi Router RSSI level checks.
The idea is to use Wi-Fi RSSI thresholds to cover the main area where assets should be counted, while the geofence serves as a backup to capture devices located just outside the beacon’s range. Together, these two methods provide a more accurate and reliable result.
Enabling Wi-Fi RSSI Level Detection
To enable Wi-Fi RSSI-based detection, a customized translator is used. This translator monitors the signal strength (RSSI) of known Wi-Fi beacons and decides whether a tracker should be considered inside a specific area.
This approach is commonly used in large-scale infrastructure projects, like Airports or Hospitals, where asset tracking within storage zones or restricted areas is critical.
Recommended Configuration for Optimal Performance
To improve the likelihood of accurate detection, apply the following settings:
-
Increase Wi-Fi beacon broadcast frequency
Change the beacon interval from the standard 100 ms to 40 ms for faster updates. This will significantly improve detection ratio. -
If normal WiFi environment use Wi-Fi Channel Auto, if really crowded WiFi environment try use Wi-Fi channel 0. Trackers typically start scanning from channel 0 and stop once their buffer is full. Using channel 0 ensures the highest chance of detection, in very busy Wi-Fi environments.
-
Reduce Wi-Fi router transmit power
Limit the transmission power to around 6–10 dB (instead of the maximum 26 dB). This helps avoid interference with other Wi-Fi infrastructure and isolates the beacon coverage to the desired area. You do not want the beacons that represents specific areas to overhear each other if it can be avoided. -
Use lowest bit rate
Because trackers scan for Wi-Fi and BLE only briefly to conserve energy, it’s best to keep the bit rate at the standard 1 Mbit/s. With the transmission power set low, this minimizes interference with the building’s existing Wi-Fi infrastructure while maintaining reliable detection. -
Tune the RSSI levels
Start with a permissible RSSI limit setting like -85 and see result, do opposite and test a restrictive setting of -70. Based on result set the expected limit and then do fine tune step by step until optimal setting has been identified.
By combining Wi-Fi RSSI thresholds with geofencing, the platform can achieve more precise indoor localization and reliable occupancy tracking across complex environments.
Hardware requirements for localisation services
Your tracker must support scanning the available IT infrastructure in the area. Currently, three tracker types are supported:
-
GPS or other positioning satellites only
- Requires a clear sky to see GPS satellites.
- Example: Digital Matter Oyster.
-
GPS + Wi-Fi 2.4 GHz only
- Requires a 2.4 GHz Wi-Fi infrastructure (5 GHz scanning is not supported as of 2025).
- Example: Sensative Square Tracker (supports scanning of up to 16 Wi-Fi beacons for maximum accuracy).
-
GPS + BLE + Wi-Fi 2.4 GHz
- Examples: Digital Matter and Abeeway trackers. Since these scans both BLE and Wi-Fi battery performance is worse than Wi-Fi only trackers.
Localization Service Integrations
To perform localization, a localisation service is required. The following cloud location services are currently supported by the platform:
- Traxmate: LoRaWAN Cloud standard localization solution.
- Combain: AI-based localization.
- Combain Indoor: AI-based indoor positioning. Accuracy can be improved through building location surveys.
- Platform built-in location service for predefined areas with known beacon placements. This is used for the platforms LoRaWAN Mesh solution.
Through the Munin service, AWS Location Service can also be supported.
Other service providers, for example Google, also offer location services, but these are not yet integrated. If you require integration with another provider, contact your technical support representative.
Commercial Use
The default Traxmate connector is API-rate-limited.
When moving to commercial deployment, request a quote from your support representative.
All localization services include costs based on the expected number of monthly localization pings.
Q&A: Why Timers Matter in an IoT Platform
- Question
- Answer
Why use timers in alarm logic?
Timers allow for time-based conditions to be evaluated before triggering an alarm. This is crucial when you don’t want an alarm to fire immediately upon a threshold being crossed, but only if that condition persists for a certain amount of time.
- Question
- Answer
Can’t I just trigger an alarm the moment a value exceeds a threshold?
You could—but in many cases, that leads to false positives. For example, a temperature sensor might briefly spike above a limit due to a short anomaly or noise. A timer ensures that only sustained conditions (e.g., over 10 minutes) result in an alarm, improving accuracy.
- Question
- Answer
What’s a real-world example of using a timer?
Let’s say you want to detect overheating in a server room. If the temperature rises above 30°C for more than 15 minutes, that’s a serious issue. A timer can track how long the threshold is exceeded before firing an alarm.
- Question
- Answer
Can timers help detect when a condition returns to normal?
Yes. By resetting the timer when the condition clears, you can create logic through a customized translator that also tracks recovery time, or use that state to trigger a "cleared" notification. Recovery time can also be visualized in Charts by checking how long time timerExpired were true.
- Question
- Answer
How does the platform implement timers?
Timers are exposed via the fields:
timerStart– Whether a timer has been triggeredtimerStartAt– When it startedtimerExpired– Whether the timer has expired (this is often the alarm trigger)
These fields can be used in visualizations, rule logic, or reporting.
- Question
- Answer
Are timers only useful for alarms?
No. Timers are also useful for things like:
- Tracking equipment runtime duration
- Measuring time since last motion detected
- Detecting downtime or inactivity
- Enabling delayed actions in automation flows
If the
general-timertranslator does not fulfill your needs, you can easily create other logic to start and stop timers through a custom timer translator.
- Question
- Answer
Do I need to write code to use timers?
Not for any standard use case, timers are managed via the platform’s flows, translator logic or rule engine, and can be visualized directly in reports or dashboards using standard fields. The only time you need to write code is if the standard general-timer translator does not fulfill your timer start logic needs.
Q&A: Localization and Geofences
- Question
- Answer
What is the typical accuracy of Wi-Fi based localization?
The accuracy of Wi-Fi-based localization depends on factors such as the number of access points, signal quality, environmental conditions, and the algorithm used.
-
Indoor environments:
- Usually 5–15 meters in well-covered areas
- Can degrade to 20–30 meters or worse in sparse networks or areas with heavy interference
-
Outdoor environments:
- Generally less accurate, 15–50 meters, due to weaker Wi-Fi signals
-
Factors affecting accuracy:
- Number of Wi-Fi Access Points (APs): More APs improve triangulation and localization
- Signal Strength (RSSI): Fluctuations caused by obstacles, multipath effects, and interference reduce accuracy
- Environment: Walls, metal objects, and furniture can absorb or reflect signals
- Device Calibration: Fingerprinting (measuring signal strengths at known locations) can improve accuracy
- Localization Algorithm:
- Fingerprinting: 2–5 m (high accuracy if database is dense)
- Trilateration / Triangulation: 5–15 m
- Proximity (nearest AP): 10–30 m
-
Practical considerations:
- Wi-Fi is generally suitable for room-level or building-level tracking, but not for centimeter-level precision
- Accuracy improves when combined with other sensors such as BLE beacons, GPS (outdoors), or inertial sensors
- Question
- Answer
What benefits do I get if I add Wi-Fi becons with RSSI based thresholds to determine if assets within an area?
Accuracy improvement using Wi-Fi RSSI thresholds for geofencing:
-
Adding a Wi-Fi RSSI threshold when using Wi-Fi beacons can significantly improve the reliability of zone detection.
-
How it works:
- Wi-Fi Beacon Deployment:
- Place Wi-Fi access points or dedicated beacons in areas you want to monitor
- Ensure adequate coverage and minimal signal overlap between zones
- RSSI Thresholding:
- Trackers measure the RSSI from nearby Wi-Fi beacons
- Define a threshold value (e.g., RSSI > -70 dBm) to determine whether a device is inside a zone
- Devices below the threshold are considered outside, reducing false positives
- Optional Multi-Beacon Logic:
- Combine signals from multiple beacons using triangulation or weighted RSSI for higher certainty
- Wi-Fi Beacon Deployment:
-
Accuracy improvement:
- Wi-Fi without threshold: 5–20 meters – baseline, may trigger false positives at zone edges
- Wi-Fi with RSSI threshold: 5–10 meters – reduces false positives, ensures device is truly inside
- Wi-Fi + multiple beacon triangulation: 3–8 meters – further improves reliability for larger or complex areas
-
Key insight:
- Setting an RSSI threshold ensures only devices with strong enough signals are counted as inside a geofence
- This can halve the effective zone uncertainty
- Combining Wi-Fi RSSI threshold with geofences, which the platform supports, gives reliable indoor positioning
-
Practical considerations:
- Test thresholds in the real environment; walls, metal, and interference affect RSSI
- Using multiple beacons improves accuracy but requires careful placement to avoid overlap
- Wi-Fi RSSI thresholding is a low-cost first step before adding BLE or hybrid solutions
- Question
- Answer
Do I need to write code to use geofences?
Not intended for custom or unusual use cases, the general-geofence translator automatically handles all common geofence scenarios. It can also forward events to the originating device, ensuring that the full platform functionality like dashboards, views, rules, and reports can be used immediately without additional configuration.
- Question
- Answer
Do I need to write code to use geofences combined with Wi-Fi thresholds for area localization?
Currently, there is no general translator available to handle Wi-Fi threshold-based use cases, so custom translator code must be written. However, since this is a common scenario, reference code is available to manage workflows:
- Asset → Geofence event → Asset → Storage node → Summary node
- Asset → Wi-Fi threshold event → Storage node → Summary node
Additionally, report templates are available to create professional KPI reports suitable for tracking, management, and regulatory purposes.
- Question
- Answer
Why is the Sensative Tracker superior for asset tracking use cases?
The Sensative Tracker is particularly well-suited for asset tracking because it combines all the necessary hardware sensors with a unique feature: the VSM – Virtual Sensor Machine.
The VSM enables the application layer of the tracker to be fully customized without creating new firmware, allowing the tracker to adapt precisely to the requirements of any use case. For example, it can define:
- Under what conditions Wi-Fi scans should be performed
- When GPS scans should be triggered
- What level of movement counts as "asset moving"
- What movement thresholds indicate "asset in use"
- How long an asset must remain still to be considered stationary
- Which impacts can be tolerated without triggering movement detection
- How many Wi-Fi beacons must be detected to stop a scan train
- Which Wi-Fi channels should be scanned and in what priority order
And many more parameters.
By enabling fine-grained control over sensor behavior, the VSM allows the Sensative Tracker to be perfectly tailored to the exact needs of each tracking scenario. This flexibility is a key factor in implementing successful and reliable asset tracking solutions. On top of this it scans up to 16 Wi-Fi beacons to improve localisation accuracy and comes with an exceptional battery life in a sleek, tough IP67-rated package.