Lesson 1.8 The Rule Engine
Rules trigger actions—such as sending an email—when specified conditions are met. Because both conditions and actions can be customized, the Rule Engine is ideal for monitoring thresholds and alarms.
In this lesson, we’ll cover the following topics:
- How to create Contact to receive and alarm E-mail.
- How to create Conditions to trigger a rule or evaluate a value once a rule is triggered.
- How to create and get familiar with some different types of Actions, which define what happens when a rule is triggered.
- How to combine Conditions, Actions and Contacts to build a complete rule.
It’s a straightforward and simple process, so let’s get started!
Start by creating a simple rule that monitors an alarm and sends an email notification whenever a threshold value is exceeded.
Note: Rules are single-tenant, meaning they cannot be shared with other users.
Create a Rule
Start by adding a contact
- Go to Rule Engine in Apps.
- Click Contacts.
- Press Add contact.
- Add E-mail address and eventual phone number to your contact
- When finished, press Add Contact and then go back to top menu.
Start by adding a condition
- Click Conditions.
- Press Add Condition.
- Name your condition. In this example, the condition comes from an alarm translator.
- Enter your condition. It should look similar to this:
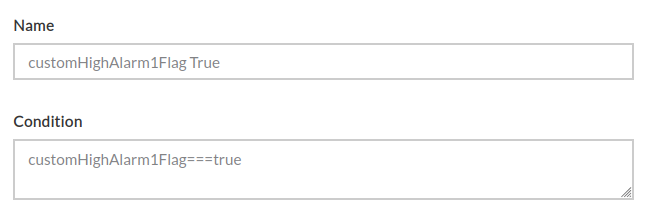
- When finished, press Add Condition.
Common operators: Common operators in conditions are:
==Equality operator (===strict equality)!=Inequality operator (!==strict inequality)>More than<Smaller than<=Less than or equal>=More than or equal||Conditional OR&&Conditional AND
Permitted data types: Number, Boolean and String
- For string comparisons, use single quotes around the string. Examples:
- Astro Clock conditions:
sunState=='Night'orsunState=='Day' - Missing expected report condition:
message=='Missing expected report'
- Astro Clock conditions:
- For all other data types, do not use quotes.
It is recommended to primarily use == equality checks and simple boolean conditions. Note that = means assign to and is not a valid operator in a condition.
Managing states in the Rule Engine can quickly become complex, as the number of possible states grows and requires many additional rules to manage them effectively. This not only makes rules harder to maintain but also limits scalability. For better performance and superior scaling, let translators handle state logic while keeping your rules focused on straightforward comparisons.
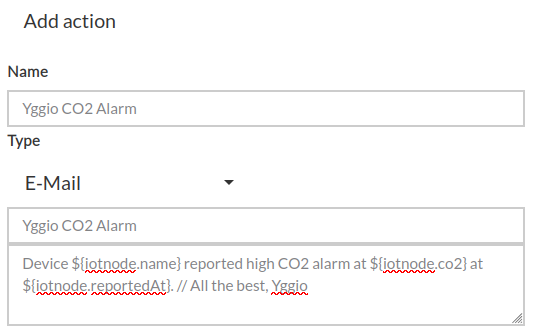
Create an Action
Now that you've created a condition, you’ll want to create an Action:
-
Go to "Actions" in the Rule Engine.
-
(Optional) Find a pre-existing action similar to what you want. You can copy the content, since editing predefined actions will cause them to revert to their original state.
-
Create a new action.
-
When creating a rule, you can choose between different types of actions. Each type supports different capabilities:
a) Email, SMS, or Log actions
- You can use dynamic data from the IoT node that triggered the rule.
- Example:
${iotnode.co2}inserts theco2value from the node. Replace"co2"with the field you want to include. - For Email actions, you can enhance the message with HTML formatting — add logos, adjust font sizes, and apply styles for professional-looking emails.
- For Log actions, you can either:
-
Directly select the log type, priority, and category, or
-
Dynamically retrieve these values from an alarm translator’s log object (if available).
Example log object:
"log": {"type": "info","priority": "severe","category": "status","message": "Log text"} -
To use the text generated by an alarm translator, reference it with:
${iotnode.log.message}.
-
b) Command actions
- Command actions also support dynamic data, but they require a Generic MQTT Connector to publish to a target MQTT broker.
- Currently only supported command is
sendDownlinkto pubish data. - The payload must be in JSON format and include both a
messagepart and anmqttTopicpart. - Important: Escape double quotes (
") inside JSON values with a backslash (\"). - Since formatting can be tricky, validate your payload with an online JSON linter before use.
Example command and payload:
sendDownlink
{"message": "{\"temperature\":${iotnode.temperature}}","mqttTopic": "${iotnode._id}"}c) LoRaWAN downlink actions
- Specify the hex-encoded payload, the port number, and whether the downlink should be confirmed.
- Keep in mind: a "confirmed" downlink only reports whether the message was successfully delivered or failed. It does not guarantee that the device executed the action as intended.
- To verify the effect of the downlink:
- Create another rule triggered with a 60-second time delay by the first rule.
- In the 2nd rule check whether the expected result did not occur in the AND part of the rule.
- If not, the rule will reach the Action step, take corrective measures — for example, re-send the downlink every 2 minutes until the effect is confirmed.
d) Rule
- This is a predefined action that allows you to directly trigger another rule without evaluating its trigger condition. It is essential for use cases that require rule chaining.
e) Report
- This is a flexible action that can generate three types of email reports:
- CSV Report – Includes timestamps and a single measurement based on a specified search criteria.
- HTML Graph Report – Generates graphs directly in the email. Each email can contain multiple graphs for different IoT nodes and measurements.
- Combined HTML Table and CSV Billing Report – Counts the number of devices per account across all available organizations.
-
When finished, press "Add Action".
Combine Condition and Action to create a Rule
Now that you’ve created a custom condition and action, it’s time to use them in a rule:
-
Navigate to "Add Rule".
-
Give your rule a name.
-
Add trigger conditions.
There’s a helpful shortcut for adding multiple devices quickly:-
Press "Select Node" and type part of the device name (e.g.,
device) -
If your devices are named
device-1,device-2, and so on, they will show up in the list -
Then, just click each device as quickly as you can until all are added. It is ok to add multiple devices in one row.

-
Note: Don’t use this shortcut if the devices require different trigger conditions.
-
You can search for
Select value, which can be your condition.
-
-
In the "Actions" section, select the action you created.
If it's an email action, make sure to also select the recipient Contact. -
Now click "Add Rule", congrats you have created a rule.
Now try creating more advanced rules.
Examples include:
-
Device Supervision Report
Notify yourself if a device does not report within the expected interval.
Hint:
a) Go to Devices → Your Device and set an Expected Report Interval.
b) Use the standard condition "Missing expected report". c) Use the standard email action "Device did not report in time" -
Turn a Light On and Off while also Logging the Event
From a rule perspective, there is no difference between controlling a single light or an entire street lighting group with hundreds of lights.
The only difference is that in the latter case, you may want to add redundancy for increased reliability.Example - Redundant Street Lighting Rule
Control street lighting with built in redundancy
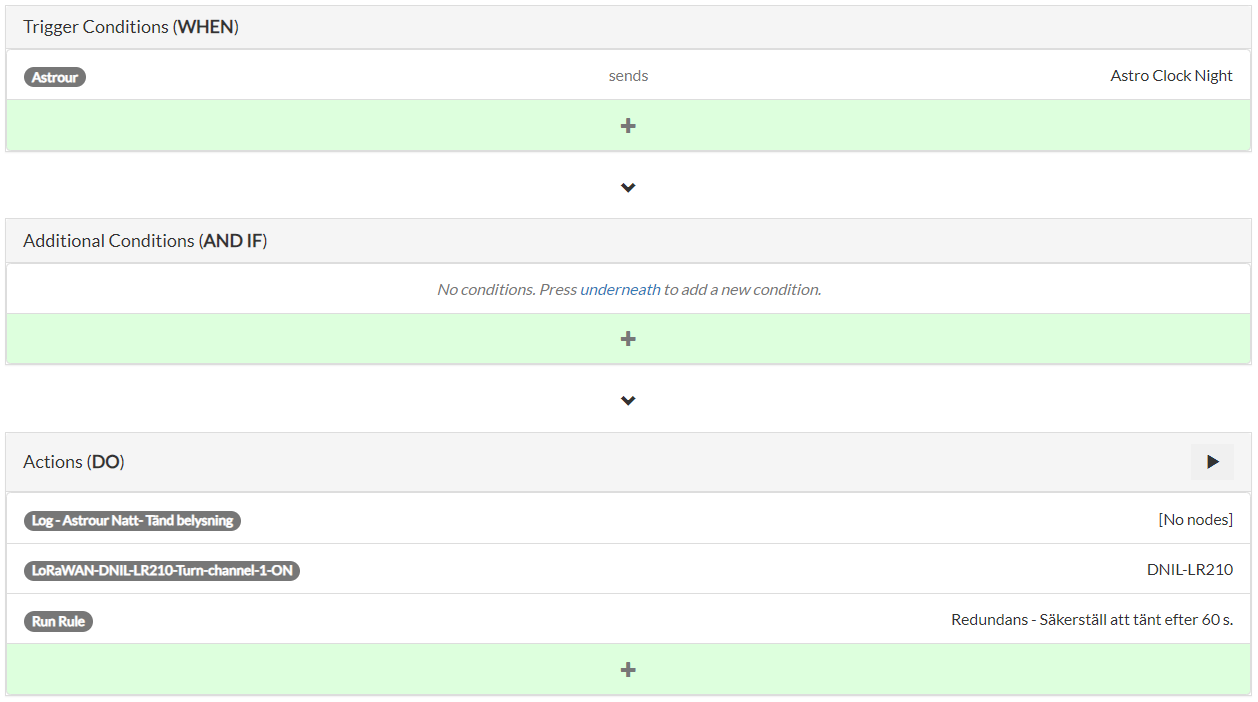 Activate street lighting when Astro Clock condition turns to night
Check that street lighting activated, if LoRaWAN downlink package was lost wait two minutes and try to turn it on again.
Activate street lighting when Astro Clock condition turns to night
Check that street lighting activated, if LoRaWAN downlink package was lost wait two minutes and try to turn it on again. -
Send a CSV and HTML graph report
Use the Report action to define your report. Try the following definition as a start:[{"query": "all","csv-column": true,"measurement": "temperature","duration": "1d","distance": "0h","fileName": "myReport.csv"}]If need more details check out the User Guide Report Generator
Q&A
- Question
- Answer
Do I need to add devices individually on separate rows in the trigger section of a rule?
No, you can add all devices that use the same trigger condition on the same row.
This is faster and easier to maintain. Use additional rows only if you need multiple trigger conditions.
- Question
- Answer
Can I add multiple actions to be executed when a rule is triggered?
Yes, you can add multiple actions and even include time delays between their execution.
A common example is: trigger an actuator, wait 30 seconds, and then trigger another rule to confirm that the actuator activated as expected. If not, take appropriate action to activate the actuator and log the event.
- Question
- Answer
My rule didnt execute as expected when an uplink was received, what should I check?
If a rule is not triggering, it is often because the condition is incorrect—using a wrong field name, wrong data type, wrong comparison value, or wrong operator. To troubleshoot, follow these steps:
-
Check the field name
Go to Devices → Your Device → Data and verify that the field name in your condition matches exactly the spelling in the device data. -
Check the data type
- In the platform, field values are color-coded:
- Blue = number
- Green = boolean
- Red = string
- Ensure that your condition uses the correct format:
- For numbers or booleans, do not use quotes.
- For strings, use single quotes around the value (e.g.,
'Day').
- In the platform, field values are color-coded:
-
Check the comparison value
If the above are correct but the rule still doesn't trigger, verify that your trigger value is accurate. Double-check that the incoming data actually passes the threshold by reviewing the time series. -
Check the action
To confirm whether the rule triggers but the action fails, add a log to the action.- If the log appears, the rule is triggering correctly and the issue lies in the action.
- Fix the action accordingly.
- Question
- Answer
Is it allowed to create looping rules, where a rule triggers another rule that eventually triggers the original rule? This can be useful in combination with time delays to confirm that an expected action actually occurred.
The IoT platform prevents the creation of direct looping rules, such as Rule A triggering Rule B, which then triggers Rule A.
However, there are workarounds:
- Use States to indirectly trigger rules.
- Use MQTT to publish data on the platform broker and then trigger rules based on normal conditions instead of directly calling another rule.
Even with these methods, the platform will throttle traffic to prevent overload, but you should still use time delays between actions to ensure reliable execution and avoid unintended loops.