Lesson 1.4 Exporting and Importing Data with CSV
One of the easiest way to export data out of Yggio is to export it as CSV. This can be done both for view and time series. This can be also be used for editing names quickly of several devices and even changing data (not recomended). You can use this for batch managment.
This lesson goes through how to export data to CSV files, modify it and then import it to update devices. The final part of the lesson is an example of how to import time series data from a CSV to an existing device.
Export view data with select many
Go to Devices:
-
Select or create a view with the data you want to export (under the Devices tab).
-
Select the devices using Select Many.
-
Click Export to File from the Select Many menu.
-
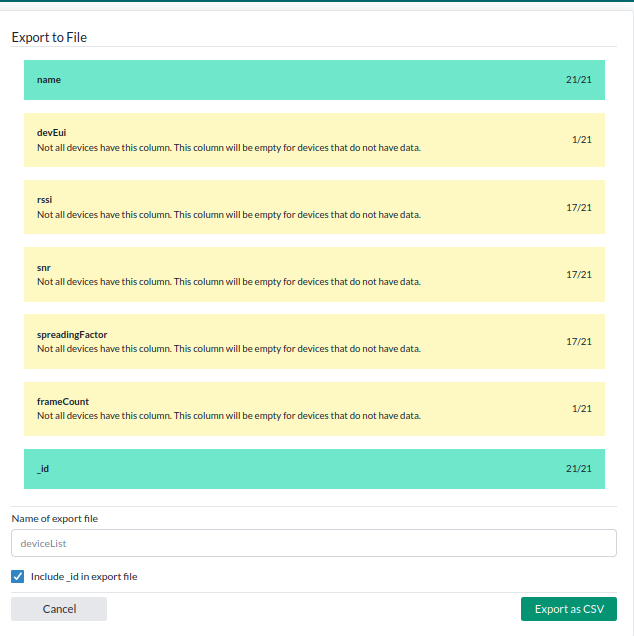
In the export dialog:
- Make sure to include the
_idfield — this is required for batch updates. - The
namefield is included automatically. - Optionally include any other fields you want to export or update.
- You can also add new fields later directly in the CSV file — the platform will create them on upload.
- Make sure to include the
-
Choose a file name and click Export as CSV.
You now have a CSV file ready for editing and re-uploading using Batch Management.
Note: The CSV file uses , as the column separator.
If your computer’s locale uses ; as the default separator, programs like Excel or Libre Office may not display the data correctly in a table.
To fix this:
- Open the CSV file in a simple text editor, such as Notepad.
- Use Replace All to replace all
,with;. - Save the file and then open it in Excel.
Modify CSV file
When you upload a CSV, the platform will either update existing fields or create new ones based on the columns:
- Columns matching existing device fields will update those values.
- New columns will automatically create those fields and assign the values.
Editing the CSV is optional but useful for changing names, metadata, or adding fields before upload. Common uses include:
- Renaming devices by editing the
namecolumn—this is the most frequent use case. - Updating metadata like:
- Installer info
- Location (building, room)
- Installation dates or tags
- Avoid editing sensor data(not recomended) manually—it’s reported automatically by the device.
- Adding new fields by simply adding columns with values; the platform creates them per device.
- Removing blacklisted fields, such as
reportedAt, which should not be included.
Always ensure your CSV stays properly formatted before uploading. The platform will accept both , and ; as column separator.
Re-add CSV into the IoT platform
Once the CSV file has been modified, go to Devices → Batch Update and drag-and-drop the CSV into the upload box.
- If you’re updating the
contextMapfield, the system will ask whether you want to add the new context maps or replace the existing ones. - Start the update. Depending on how many devices you’re updating, this process may take some time.
Export a chart
Exporting a chart in the IoT platform is really easy. This is great for exporting timeseries of for devices. The time series charts report are not meant to be readded into the platform, they are meant to export timeseries of data. There are two options on how to do this, either you do it on charts in the device or advanced view in charts in the device menu. These are not meant to be re added into the platform
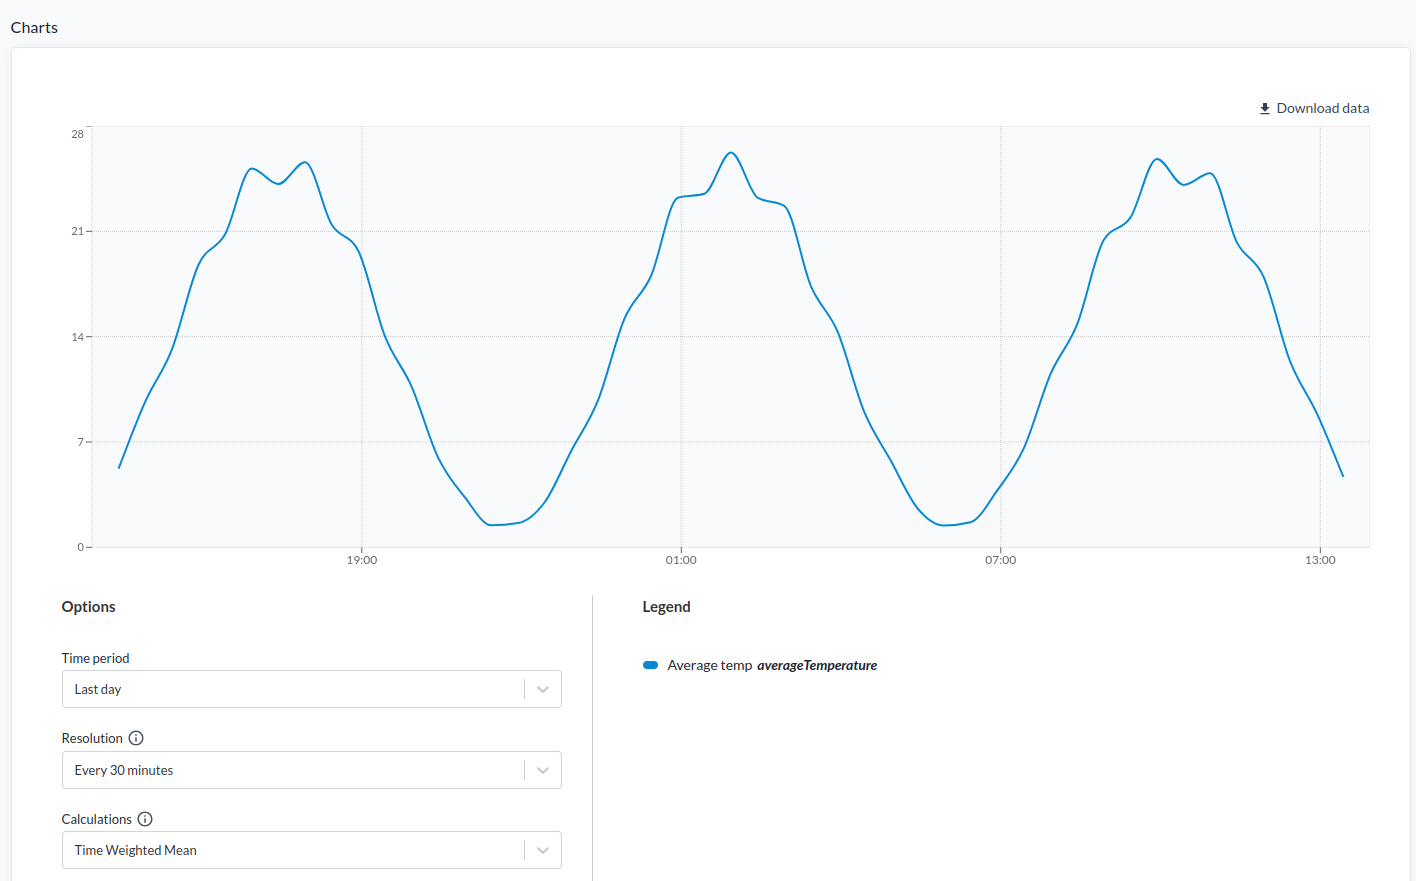
- Click on the device you want to use
- Go to "Charts"
- Use either advanced view or the defult one for charts and customize it to show the data you want to export, theen clcik "Download data"
- Select a name and press "Download as CSV"
Importing Time Series Data
It is possible to import time series data into the platform from external text files via the API. This process can also use a translator to decode incoming data. Since this is a rare use case, there is currently no UI support. Additionally, depending on the device settings, some special operation may need to be applied to remove protections for immutable historic data.
A brief overview of the process:
- Add a temporary "secret" to the IoT node via the API.
- Read the text file containing your data using a suitable tool (e.g., Postman) and convert it into a JSON.
- Ensure that each measurement value or encoded data includes a timestamp field in UTC. Eventual encoded data should be formatted as the device translator expects.
- Use HTTP POST with "secret" in the payload body to push each timestamped value one by one to the IoT platform.
- The platform will add the measurements and decode the incoming data into the time series according to the specified timestamps.
Example body after conversion to JSON:
{
   "secret": "UQBN7DRWXU65U59C2NED",
   "timestamp": "2025-09-14T13:58:04.558Z",
   "encodedData": {
      "hexEncoded": "AABE2F2C78",
      "port": 1
   },
   "rssi": -87,
   "snr": 3,
   "dr": 4,
   "spreadingFactor": 8
}
- Once the time series data has been imported, remove the temporary secret using the API:
PUT /iotnodes/[_id] Content-Type: application/json
{
   "secret": "$unset"
}
Example: Updating Device Time Series Data Using Postman
Follow the steps below to upload and decode time series data for a device using Postman.
-
Install Postman
Download and install Postman. -
Prepare Your CSV File
Create a CSV file with the following columns:
timestamp,port,hexEncoded,spreadingFactor,fCntUp,rssi,snrhexEncodedshould contain the raw hex-encoded payload from the device.- The translator in the platform will automatically decode this into measurement values.
- If you have other columns, modify the
Bodytab of the script accordingly.
-
Import the Postman Collection
Download the Import Timeseries Example Collection and import it into Postman. -
Configure the Collection
- Update the URL to match your platform server (if different).
- Use the Swagger API endpoint
PUT /iotnodes/{_id}to add a "secret" field to your target node - In the
Bodytab of the HTTP POST request, modify the "secret" field to match the target device whose time series you want to update.
-
Run the Collection
Execute the collection to send the time series data to the platform. -
Clean up
Use the Swagger API endpoint to remove the "secret" field.
⚠️ Warning: Once time series data has been imported, it cannot be changed or removed.
Proceed with caution before uploading large datasets.
This script can efficiently import and decode over 100,000 time series values within a few minutes, with each update taking approximately 10 ms.