Node Red
Introduction
Node-RED stands out as an exceptional flow-based programming tool, seamlessly connecting hardware devices, APIs, and online services. Integrated effortlessly with Yggio, Node-RED serves several key purposes:
- Acting as a software development kit for crafting and validating Yggio translators and Flow components.
- Serving as a simulation tool, facilitating the exchange of data with Yggio to explore diverse scenarios.
- Providing a verification tool to simulate different integration methods and protocols, streamlining acceptance testing for new Yggio software releases.
- Functioning as an integration tool, enabling connections with various third-party services and systems.
However, Node-RED does have its limitations. It demands proficiency in JavaScript programming and operates as a single tenant, thus lacking scalability. Additionally, it offers only basic protection against unauthorized access through a simple login screen, necessitating strict firewall protection.
Get started
To integrate Node-RED with Yggio, begin by installing Node-RED on a suitable computer or server following the instructions provided on the Node-RED website. The simplest approach involves utilizing the standard network modules "MQTT IN" and "MQTT OUT" to link with Yggio's MQTT broker for data exchange. From there, users can swiftly create flows and dashboards, as well as simulate data sets. Alternatively, employing Yggio's REST API for data interaction in Node-RED requires a more advanced level of programming proficiency.
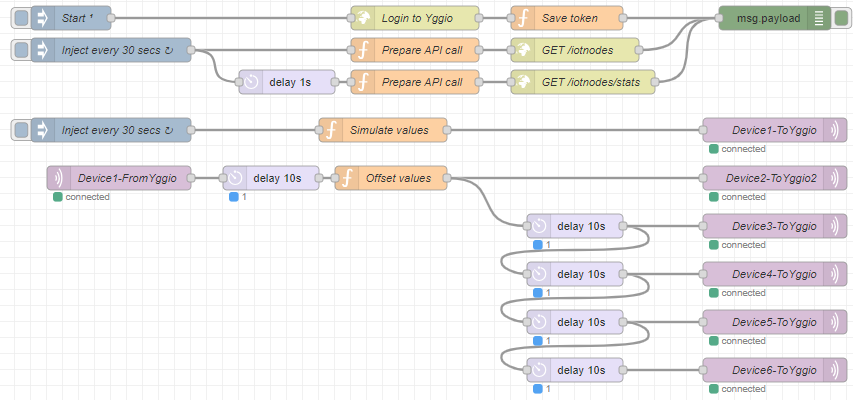
For a swift start, import the following example Node-RED flow into your Node-RED installation:
The example flow demonstrates how to use MQTT to publish simulated data and subscribe to it from Yggio's MQTT broker. Additionally, it includes an example of logging in with the Yggio REST API, saving a token, and performing a GET request to /iotnodes and a time series.
Do the following configurations in Yggio:
- Go to Yggio Swagger.
- Retrieve a valid Yggio token by navigating to the /auth/local endpoint. Click 'Try it out,' enter your Yggio username and password, click 'Execute,' and copy the response token to your clipboard.
- Click the green 'Authorize' button in the top right, paste the token into the textbox, and click 'Authorize.' You are now logged into the Yggio API in Swagger and can try out all the APIs.
- Go to the /basicCredentialSet endpoint and create a basic credential set with a suitable strong username and password.
- Go to the /reservedMqttTopic endpoint, use the basicCredentialSet, and reserve 6 different topics for 6 IoT nodes in Yggio. The topic must follow the structure
yggio/generic/v2/[youruniquedeviceid]
Do the configurations in Node-RED:
- Import the example flow.
- In the top left 'Start' node, update the username and password to match your Yggio credentials to enable the use of the REST API.
- In one of the MQTT out nodes that represent Yggio devices, add a new MQTT server with the same URL as the Yggio URL, and enter your username and password in the 'Security' section.
- Add the topic for device 1 that was created in step 5 above.
- Repeat the above steps for the remaining 5 MQTT out nodes, using the MQTT server created earlier.
You can now deploy the flow and test the REST API integration GET /iotnodes by clicking the start button in the top left. You will get an error message from the time series data but disregard it for now. If you go back to your Yggio account, there should now be one MQTT node receiving simulated data at regular intervals.
Do the final configuration to get bi-directional communication:
- Go to your Yggio account and click on the new MQTT node.
- Go to the 'Channels' tab and create a new MQTT channel. Choose the basicCredentialSet type of channel and refer to the basicCredentialSetId created earlier.
- Copy the complete topic from the MQTT channel to the clipboard.
- Return to Node-RED, locate the node named Device1-FromYggio, and click on it. This is an MQTT in node.
- Select your existing MQTT server and paste the topic copied from Yggio into the topic field.
- To get the time series API call to work, update the IoT node id in the lower of the two 'Prepare API call' to the _id in the 'General' tab in the Device list of your new MQTT node.
- The configuration is now complete, and you can deploy it. Within 1 minute, another 5 MQTT IoT nodes will be created in Yggio. You can observe the data being generated in Node-RED, sent to Yggio by publishing it on Yggio's MQTT broker, subscribed to from Yggio's MQTT broker, delayed, and then re-published on Yggio's MQTT broker. You will also see the time series API now starts to work.
To see the simulation in action, go to the Device list in Yggio. Use 'Select many' to select the new MQTT nodes, go to Charts, and examine the different fields from the simulation. With Node-RED and some technical JavaScript programming skills, you can quickly integrate Yggio with various systems, create and verify Yggio translators, and develop Yggio Flow components. You can also import this nice Device list view to see it work in real time: Node-RED Device view.txt
Create Yggio translators with Node-RED
The basics
Node-RED is an great choice for use as a Software Development Kit (SDK) to create Yggio translators and manage complex data flows. Since Node-RED is built on Node.js, just like Yggio, both platforms use the same JavaScript engine. This compatibility ensures that a translator functioning correctly in a simulated Node-RED environment, adhering to strict JavaScript syntax, will also perform well when uploaded to Yggio via the translator API in Swagger.
Start developing

Node-RED my first translator JSON
Import the flow above into Node-RED. It consists of:
- An inject node.
- A function node that generates simulated data.
- A function node that implements a translator and returns the result.
- A debug node to make the data visible.
- A flow to stringify the translator and the specification, which gets printed in the Node-RED console log.
- A specification describing the translator and it's output. The output specification of field names and data types must exactly matches the output from the translator, otherwise output validation will fail and no result will be available.
This simple example demonstrates a functional translator that can be uploaded to Yggio via API and connected to any device that provides fields called 'rssi' and 'snr'. The translator calculates a valid signal strength value, which is the sum of 'rssi' and 'snr' if 'snr' is less than zero; otherwise, it uses 'rssi' alone. The specification defining the output values from the translator must match the translator's result exactly; any deviation will cause validation to fail, and the translator's result will be discarded. The specification serves as an agreement with the end user on what data the translator provides. If a translator needs to provide dynamic results, store them in a JSON object.
Hardware decoders
With Node-RED, if the manufacturer has provided a reference JavaScript decoder, integrating and verifying a new translator decoder in Yggio is usually quick and straightforward. The same translator flow described above is used, with the manufacturer's decoder encapsulated within the translate function, and the hex data to be decoded is passed to it. The standard code structure looks like the example below, where the function 'rawTranslate' is the manufacturer's decoder:
function translate ({encodedData}) {
  const {hexEncoded, port} = encodedData;

  if (!hexEncoded || !port) {
    throw new Error('Expected fields hexEncoded and/or port are missing');
  }

  const decoded = rawTanslate({hexEncoded, port});

  return {
    result: decoded
  };
}
To verify the translator, you need real payloads and the expected results for each payload. Manufacturers usually provide examples that can be used to create simulated data for the translator. Alternatively, you can deploy a real device in Yggio and use the payloads received by Yggio as simulated data for the translator.
If no reference decoder is available from the manufacturer, writing a decoder becomes a much larger task, potentially taking anywhere from a few hours to weeks of development. This process often involves complex handling of bits and bytes, and a variety of different payloads will be needed to achieve a satisfactory level of verification.
Data Flows
The Yggio translator model enables a translator to send translation results to other IoT nodes via 'additionalDeviceUpdates', provided that all administrators of a device have write access to the targets. This feature allows for the management of very complex use cases and real-time visualization of enriched data, as target nodes can be dynamically determined depending on the translation. Yggio also supports atomic updates of aggregation nodes, ensuring that regardless of the order in which data arrives, the result will always be accurate. Since Node-RED supports the creation of flows, however not dynamically as Yggio, it is an excellent tool for developing and verifying translators that implement complex and dynamic data flows.
Principle to set up data flow simulations
- Develop the translators with 'additionalDeviceUpdates' using the standard method described above, by simulating expected input data and forwarding it to the translators.
- Once the translator is ready, upload it to Yggio via the translator API.
- Copy the original flow example described at the top of this page and add the newly developed translator to the MQTT nodes.
- Create any necessary 'Generic nodes' that can be used to share data to.
- Inject data with Node-RED into the simulation via the Yggio MQTT broker. If necessary, create multiple nodes with the translator and verify all expected behaviors.
- Subscribe to data from MQTT nodes and use it to develop any additional required translators to manage the complete data flow.
- A key item is "additionalDeviceUpdates" need the identifier of the target node, an easy way to make the identifier configureable is to use the contextMap.
Example of additionalDeviceUpdates:
function translate(iotnode) {
  const log = _.get(iotnode, 'log');
  const measurementFields = _.get(iotnode, 'contextMap.measurementFields','').split(',');
  const additionalDevice = _.get(iotnode,'contextMap.targetNodeSecret');
  const sourceDevice = _.get(iotnode,'name','unknown').replace(/\W/g, '-');
  let measurements = {};
  let result = {};

    // Transfer selected measurement fields to target node
  if (additionalDevice != undefined && measurementFields != undefined) {
    for (let i = 0; i < measurementFields.length; i++) {
      measurements[measurementFields[i]] = { [sourceDevice]: _.get(iotnode, measurementFields[i]) };
    }
    if (log != undefined && log.message != '')
      result = {
        ...result,
        'log': {
          'message': '',
          'type': '',
          'priority': '',
          'category': ''
        }
      };
  }
  else if (log == undefined || log.message == '')
    result = {
      'log': {
        'message': 'At least one of the 2 fields targetNodeSecret or measurementFields are missing in the contextMap.',
        'type': 'Error',
        'priority': 'Low',
        'category': 'Status'
      }
    }
    return {
      result,
      additionalDeviceUpdates:
        [{
          identifier: {
            secret: additionalDevice
          },
          result: { measurements }
        }],
    };
  }
Debugging
Alright, so your translator performs flawlessly in the Node-RED simulation, but once uploaded to Yggio, nothing seems to happen when the node it was added to updates. Without any clear actionable information, you might be wondering what to do next. There are three potential types of issues that could be causing this:
- Validation of Translator Output vs. Specification Fails, this is the most common reason and it's easy to overlook. Make sure to:
- Review all possible output fields and their data types, ensuring a 100% match vs the specification, including case for every single character.
- Enforce data types using functions like Number(), String(), and Array.isArray(myArray) to prevent discrepancies in data types.
- Translator Crashes During Execution: If the translator crashes, it's likely due to inaccurately handling of data input data combinations. The most common reason is trying to assign or reference an undefined variable.
- Copy the input data sent to the translator from Yggio and add it to your Node-RED simulation. This will reveal if the translator crashes or not.
- Translator Fails to Compile in Yggio: If the translator fails to compile in Yggio, the issue may be related to a missing semicolons or other code issues after stringification.
- To address this, run the code through linters to check if it's valid JavaScript and JSON. There are plenty of online Javascript validators available by searching on "Javascript online linter validation".