Commands
Through our REST-api you can send commands to your devices such as queueing LoRa downlinks and including/excluding z-wave devices. This documentation is designed to compliment our swagger documentation and the url is staging.yggio.net/api/iotnodes/command.
How a command works
A command is a message Yggio passes to the integration a device belongs to. Yggio does not talk to the device itself: it hands the command to the network server or vendor cloud, which delivers it. Two consequences follow. What a command can do depends on the integration, not on Yggio, and a command that is accepted has been queued rather than delivered.
Every command is the same request, PUT /api/iotnodes/command, with the same four fields:
{
  "command": "loraAppServerQueueDownlink",
  "integrationName": "ChirpStack",
  "iotnodeId": "5d2c6561ecb9a30aa5fc3e41",
  "data": {}
}
| Field | |
|---|---|
command | Required. Which command to run |
iotnodeId | The device it applies to |
integrationName | Which integration to send to. Optional if the device already belongs to one |
data | The command's own payload. Its shape depends on the command |
integrationName and the device's own connector both identify where to send. One of the two is
required, and integrationName wins if both are given.
The command names and the data each one expects differ per integration, which is why the sections
below are organised by integration rather than by command. Under Iotnodes in the
Swagger UI the same endpoint can be called interactively.
Sending a command needs Write access to the device, and the Device resource on your role.
LoRa
Downlink
The way you can generally use downlink is as follows:
-
Queue a downlink, when the device is scheduled to recieve a downlink (depending on class) it will disapear from the queue
-
Get the queue, this is so that you, the user, can look at what's currently in the queue
-
Flush the queue, removing any queued downlinks from the queue
How to use these three commands differ from integration to integration.
ChirpStack downlink
Queue an item
method: PUT
body:
{
  "command":"loraAppServerQueueDownlink", //string, use as is
  "integrationName":"ChirpStack", //string, use as is
  "iotnodeId":"5d2c6561ecb9a30aa5fc3e41", //string, yggioId of the device
  "data": {
    "confirmed": false, //bool, we're currently not using confirmed,
    "reference": "I sent this to configure blabla", //string, reference to the payload in plain text
    "fPort": "5", //string, port
    "data": "1111" //string, hex, payload to be sent to the device
  }
}
Get the queue
method: PUT
body:
{
  "command": "loraAppServerGetDeviceQueue", //string, use as is
  "integrationName": "ChirpStack", //string, use as is
  "iotnodeId": "5d2c6561ecb9a30aa5fc3e41", //string, yggioId of the device
}
Flush the queue
method: PUT
body:
{
  "command": "loraAppServerFlushQueue", //string, use as is
  "integrationName": "ChirpStack", //string, use as is
  "iotnodeId": "5d2c6561ecb9a30aa5fc3e41", //string, yggioId of the device
}
Netmore downlink
Queue an item
method: PUT
body:
{
  "command": "apiCall", //string, use as is
  "iotnodeId": "60a3b1fd26b01f00074aa625", //string, yggioId of the device
  "data": {
    "callName": "sendDownlink", //string, use as is
    "callData": {
      "devEui": "70B3D52C00019041", //string, devEui of the iotnode
      "payload":{
        "fPort": "2", //string, port
        "payloadHex": "aaaaa" //string, hex, payload to be sent to the device
      }
    }
  }
}
Get the queue
method: PUT
body:
{
  "command": "apiCall", //string, use as is
  "iotnodeId": "60a3b1fd26b01f00074aa625", //string, yggioId of the device
  "data":{
    "callName": "getDownlinks", //string, use as is
    "callData": {
      "devEui": "70B3D52C00019041" //string, devEui of the iotnode
    }
  }
}
Flush the queue
method: PUT
body:
{
  "command": "apiCall", //string, use as is
  "iotnodeId": "60a3b1fd26b01f00074aa625", //string, yggioId of the device
  "data": {
    "callName": "clearDownlinks", //string, use as is
    "callData": {
      "devEui": "70B3D52C00019041" //string, devEui of the iotnode
    }
  }
}
Command buttons
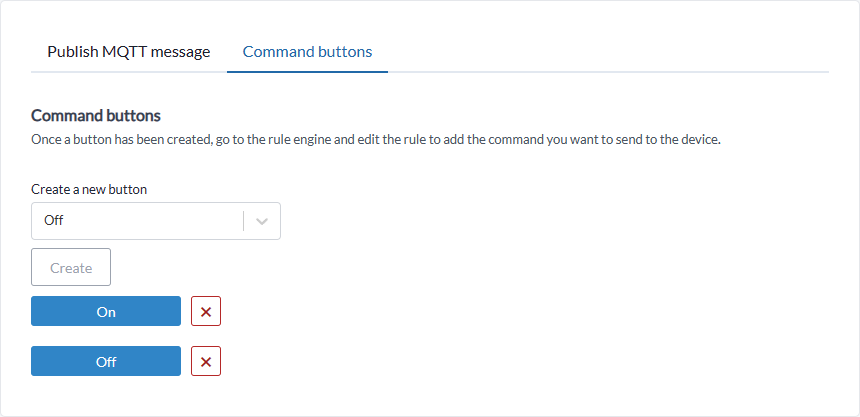
Create a button that will trigger a rule once pressed
- Select a preset in the dropdown list, or choose custom to enter your own text
- Head over to Rule Engine and go to Rules
- The rule connected to the button will have the following format:
device-name.button-namee.g.Basement-light.On - Add an action to the rule and hit Save. There is no need to add a trigger condition, since the rule is already using the button as the trigger condition.