Hubitat integration
Hubitat-Yggio-plattformsintegrationen är en omfattande lösning som kopplar samman Hubitat-hemautomationsplattformen med Yggio IoT-plattformen. Denna integration, tillämplig för Z-Wave-, Zigbee- och Matter-enheter, är byggd kring flera nyckelkomponenter:
-
Connector: Upprättar en anslutning mellan Hubitat och Yggios MQTT-broker, vilket möjliggör realtidskommunikation mellan de två plattformarna.
-
Uplink Data-interpreter: Tolkar MQTT-topics från Hubitat och skapar motsvarande noder inom Yggio, och hanterar en mängd olika MQTT-ämnen inklusive enhetshändelser, hjärtslagsmeddelanden och initialiseringsmeddelanden.
-
Downlink: Lyssnar efter specifika MQTT-topics från Yggio som representerar kommandon att utföra på Hubitat-enheter, vilket ger tvåvägssynkronisering mellan plattformarna.
-
Enhetssynkronisering: Säkerställer att alla ändringar i enhetstillstånd på Hubitat återspeglas i Yggio och vice versa, vilket möjliggör realtidskontroll och statusuppdateringar av enheter i båda systemen.
-
Hjärtslagshantering: Hanterar hjärtslagsmeddelanden och skapar och uppdaterar en specifik nod för varje mottaget hjärtslagsmeddelande.
Denna integration utnyttjar Sensatives Hubitat-app och drivrutin och ger robust, realtidssynkronisering mellan Hubitat och Yggio, vilket förbättrar användarupplevelsen och systemets prestanda.
Observera att denna guide är uppdelad i två huvuddelar: Hubitat-användargränssnittet och Yggio-användargränssnittet. Båda delarna är sammankopplade och nödvändiga för att få integrationen att fungera.
Hubitat-användargränssnitt
I. Ladda ner och ställ in kodfiler
I detta avsnitt kommer vi att ladda ner de nödvändiga kodfilerna och öppna dem i en textredigerare. Så här gör du:
-
Ladda ner app- och drivrutinskodfilerna från följande GitHub-repository:
https://github.com/Sensative/hubitat
Filer att ladda ner:
a. Sensative-Yggio-Hubitat-MQTT-App.groovy
b. Sensative-Yggio-Hubitat-MQTT-driver.groovyÖppna dessa filer i en valfri textredigerare.
II. Installera drivrutinen i Hubitat
I detta avsnitt kommer vi att installera drivrutinen i Hubitat. Drivrutinen är en kodbit som gör det möjligt för Hubitat att kommunicera med Yggio-plattformen. Så här gör du:
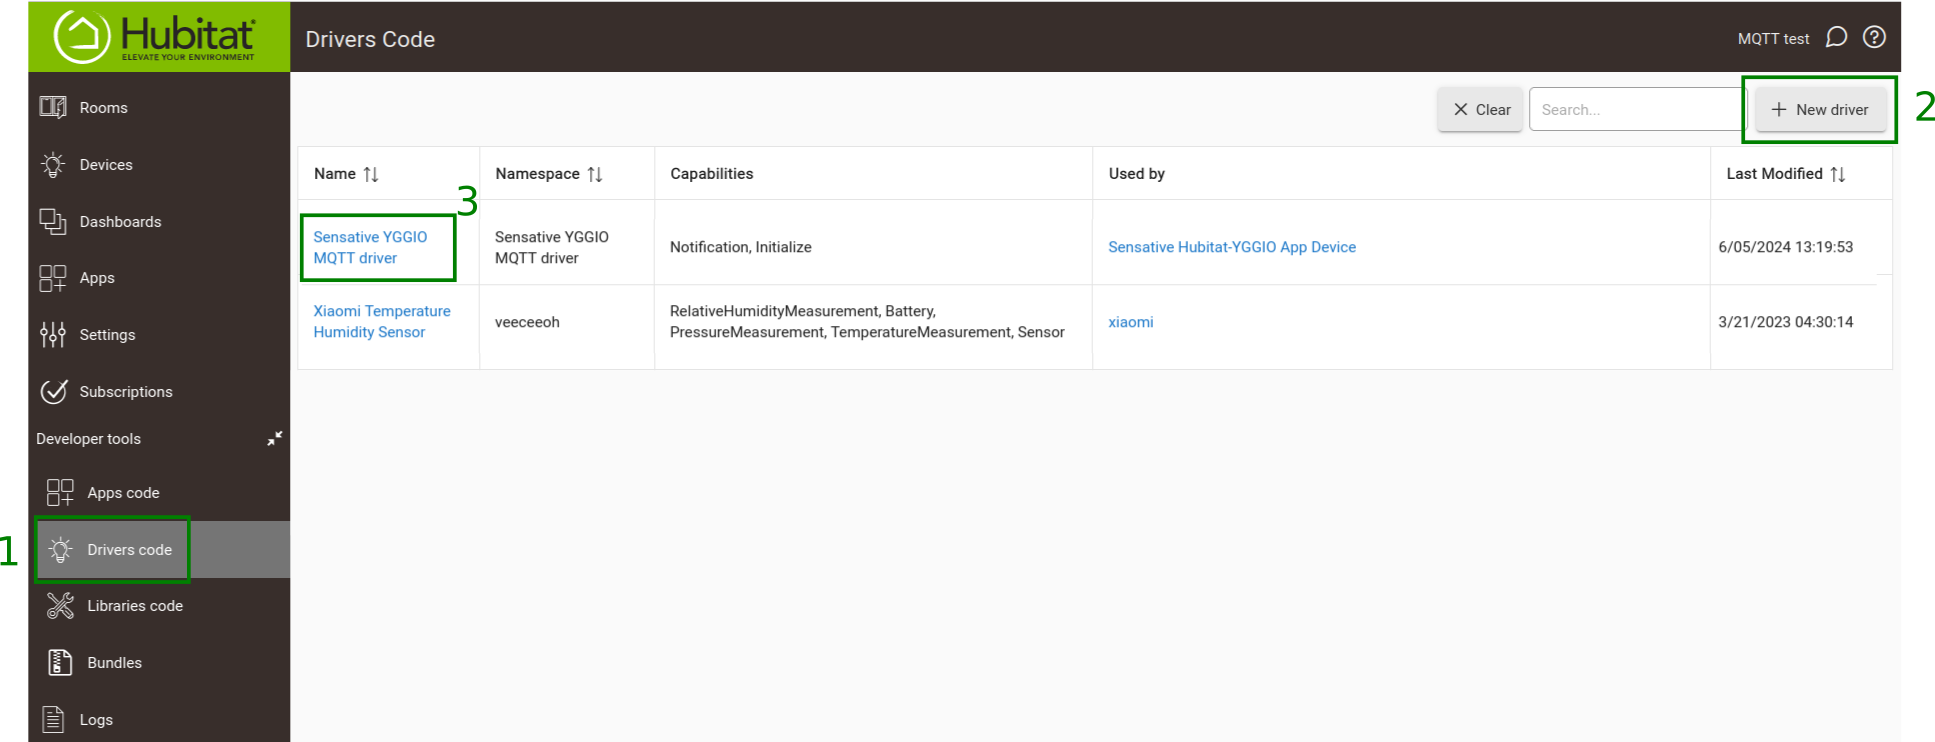
- I Hubitat-användargränssnittet, gå till Developer Tools -> Drivers Code till vänster.
- Klicka på New Driver-knappen uppe till höger.
- Öppna filen
Sensative-Yggio-Hubitat-MQTT-driver.groovysom du laddade ner tidigare. Kopiera och klistra in koden från denna fil i redigeraren i Hubitat och klicka sedan på Save. Drivrutinen kommer att sparas under namnet "Sensative Yggio MQTT Driver".
III. Installera appkoden i Hubitat
I detta avsnitt kommer vi att installera appen i Hubitat. Appen är en kodbit som gör det möjligt för Hubitat att interagera med Yggio-plattformen. Så här gör du:
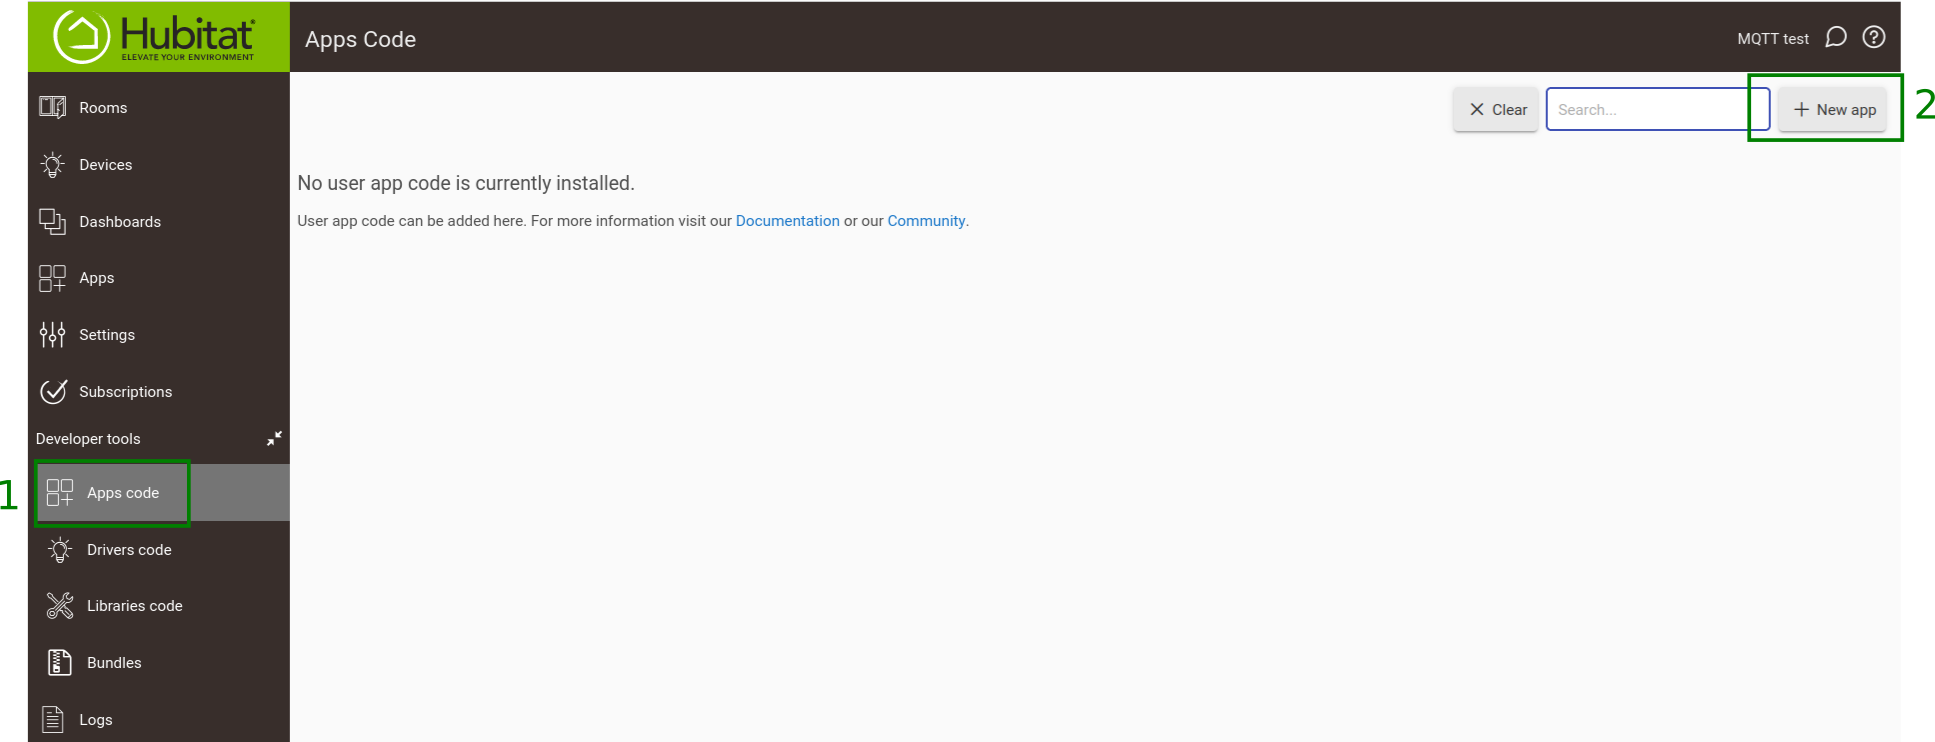
- I Hubitat-användargränssnittet, gå till Developer Tools -> Apps Code till vänster.
- Klicka på New App-knappen uppe till höger.
- Öppna filen
Sensative-Yggio-Hubitat-MQTT-App.groovysom du laddade ner tidigare. Kopiera och klistra in koden från denna fil i redigeraren i Hubitat och klicka sedan på Save. Appen kommer att sparas under namnet "Sensative Yggio MQTT App".
IV. Skapa och konfigurera den virtuella enheten
Viktigt: Innan du fortsätter med detta steg, se till att du har slutfört avsnitten VI till XI. De uppgifter som krävs i detta avsnitt tillhandahålls antingen av Yggio Admin eller erhålls från stegen i avsnitten VI till XI.
I detta avsnitt kommer vi att skapa en virtuell enhet i Hubitat och konfigurera den för att ansluta till Yggio-plattformen. Så här gör du:
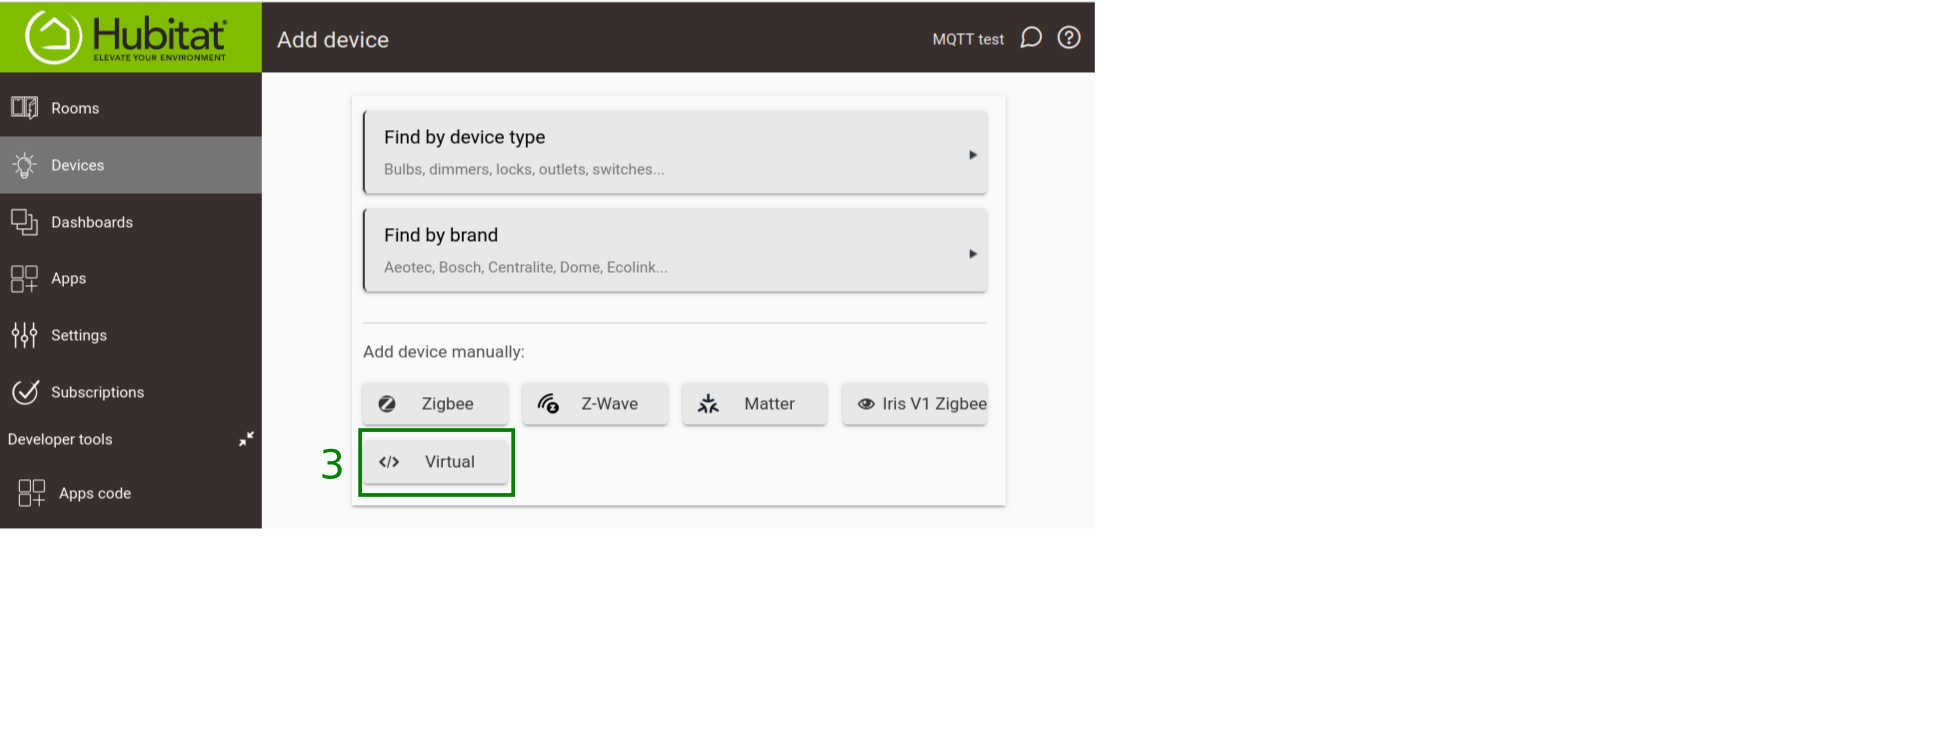
- I Hubitat-användargränssnittet, gå till Devices till vänster.
- Klicka på Add Device-knappen uppe till höger.
- Klicka på Virtual-knappen.
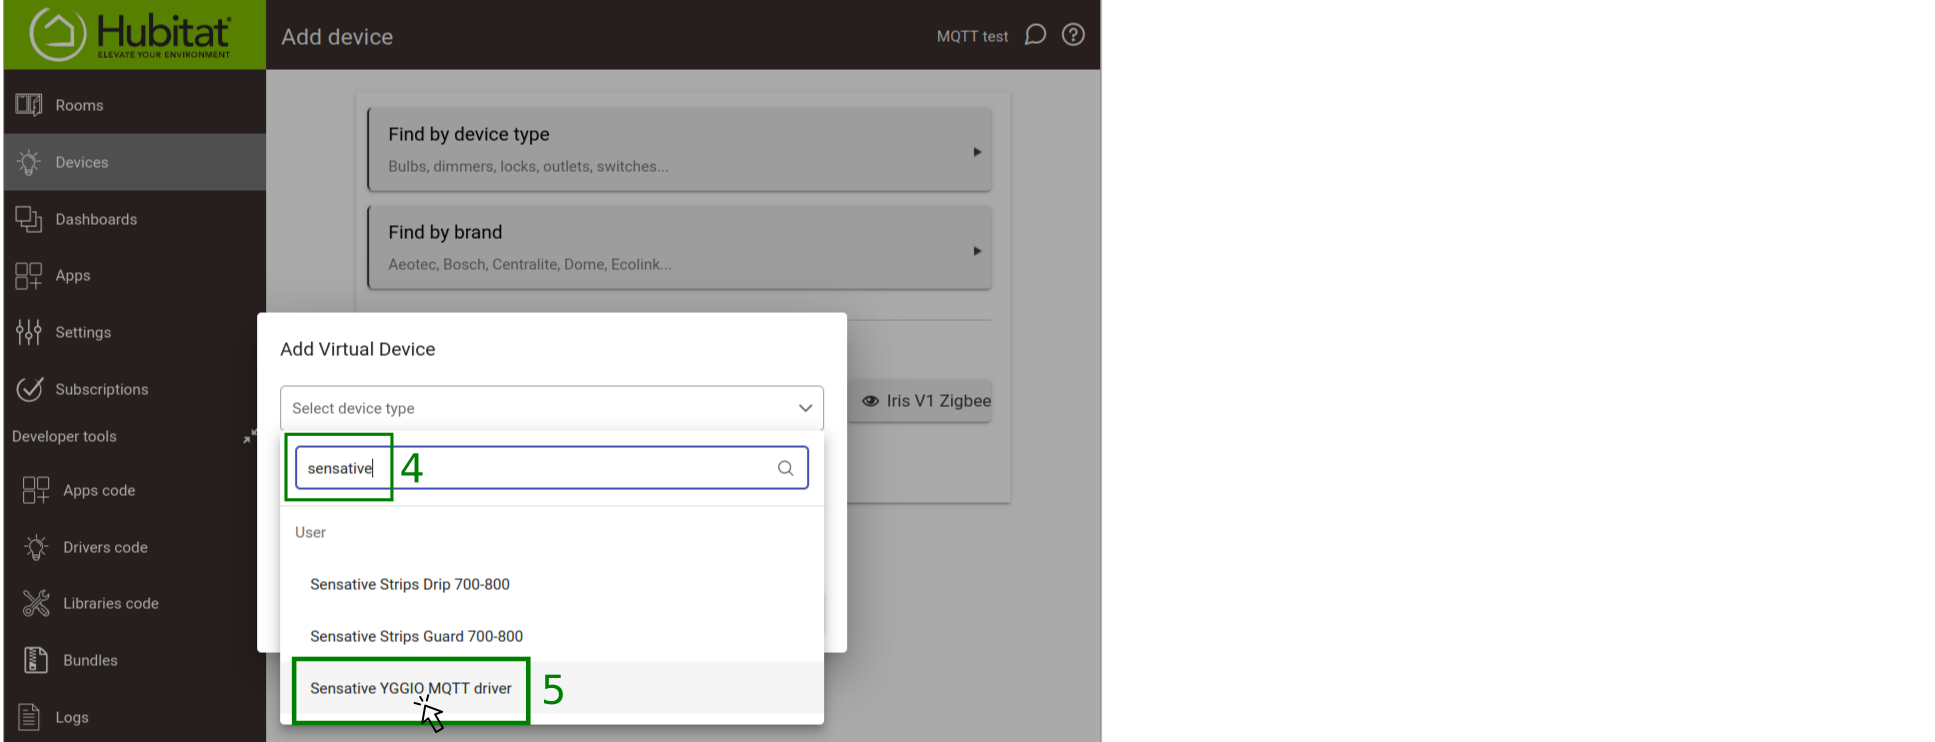
- I avsnittet Device Information, under Type-rullgardinsmenyn, skriv in "Sensative" för att filtrera drivrutiner.
- Välj Sensative Yggio MQTT Driver.
- Ge enheten ett minnesvärt namn, t.ex. "Sensative Hubitat-Yggio App Device".
- Klicka på Save Device.
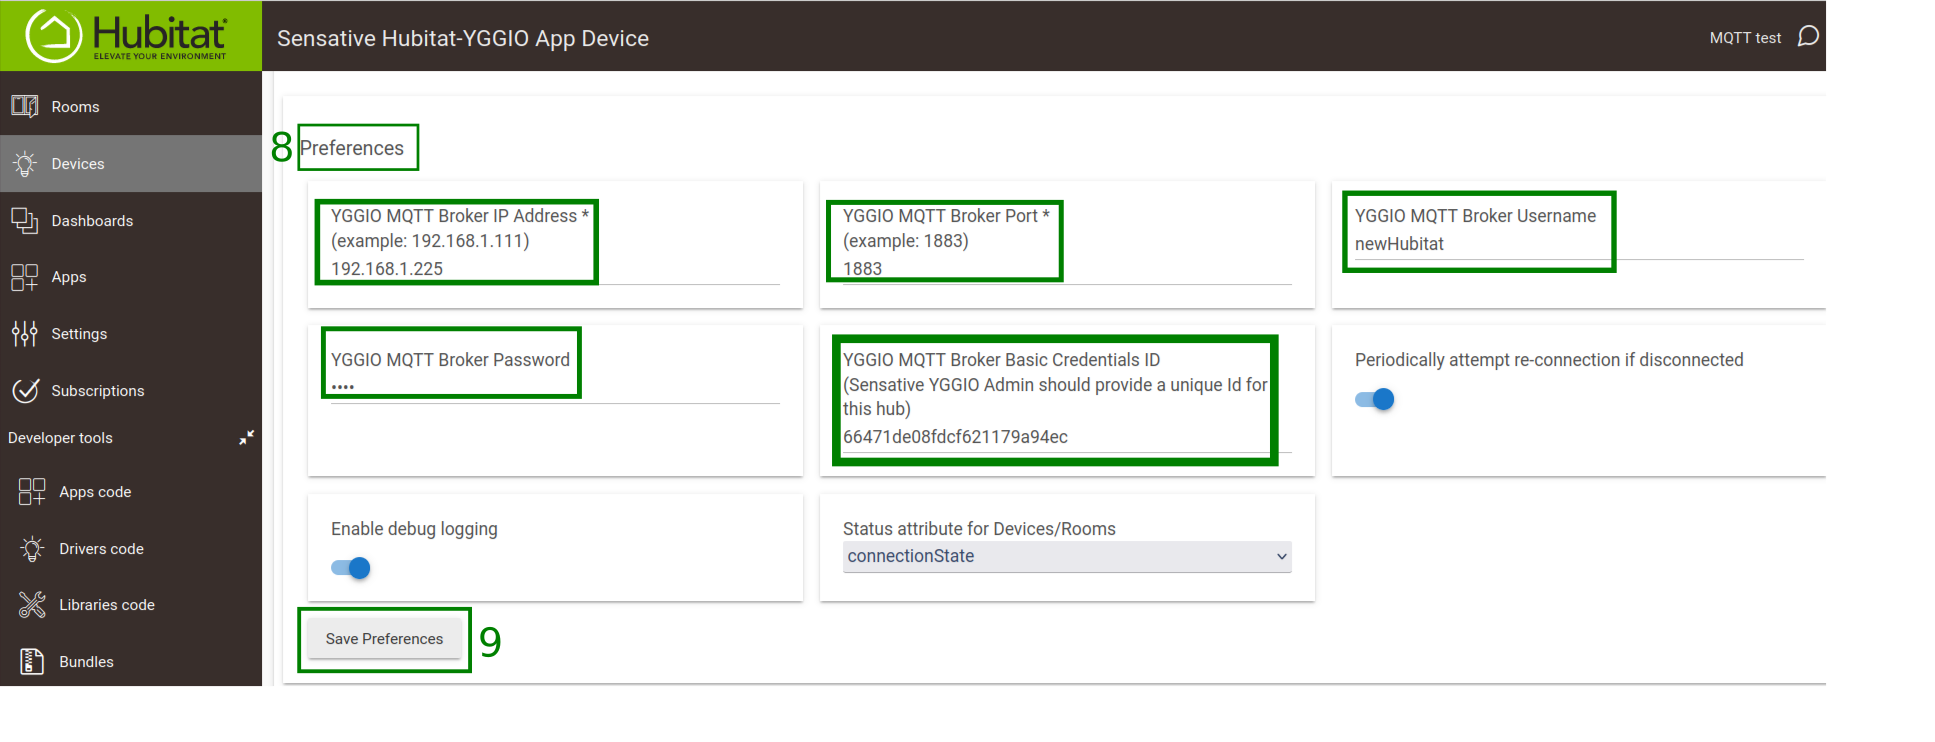
- Ange följande obligatoriska autentiseringsuppgifter i avsnittet Preferences:
- Yggio MQTT Broker IP-adress
- Yggio MQTT Broker-port
- Yggio MQTT Broker-användarnamn
- Yggio MQTT Broker-lösenord
- Yggio MQTT Broker Basic Credentials ID
- Klicka på Save Preferences.
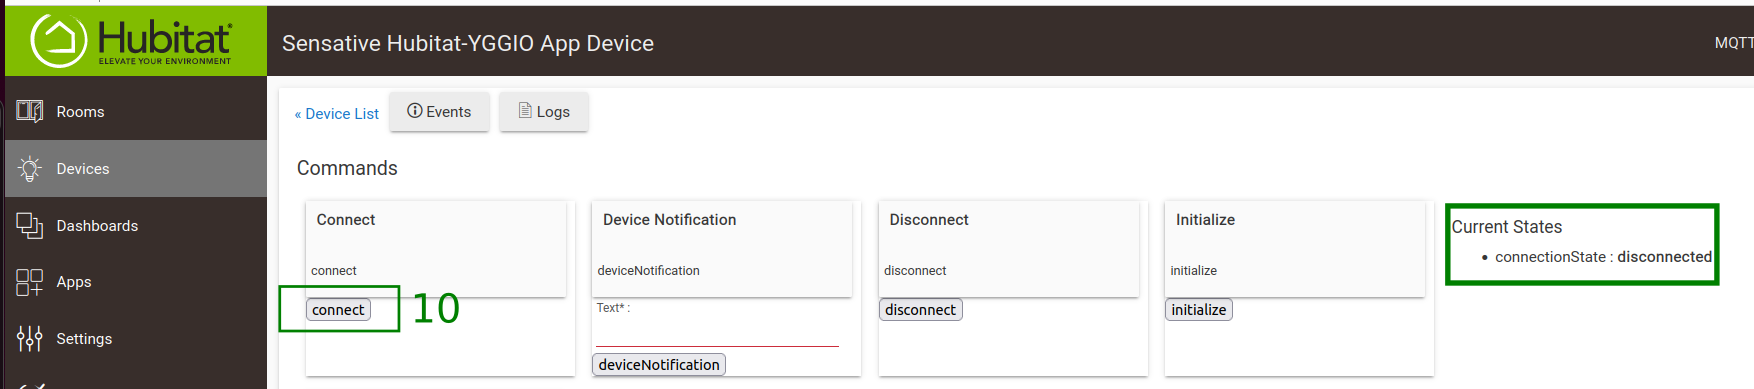
- Om den inte ansluter direkt, klicka på Connect-knappen i användargränssnittet.

V. Konfigurera Sensative Yggio MQTT App
I detta avsnitt kommer vi att konfigurera appen i Hubitat. Appen möjliggör för Hubitat att interagera med Yggio-plattformen. Så här gör du:
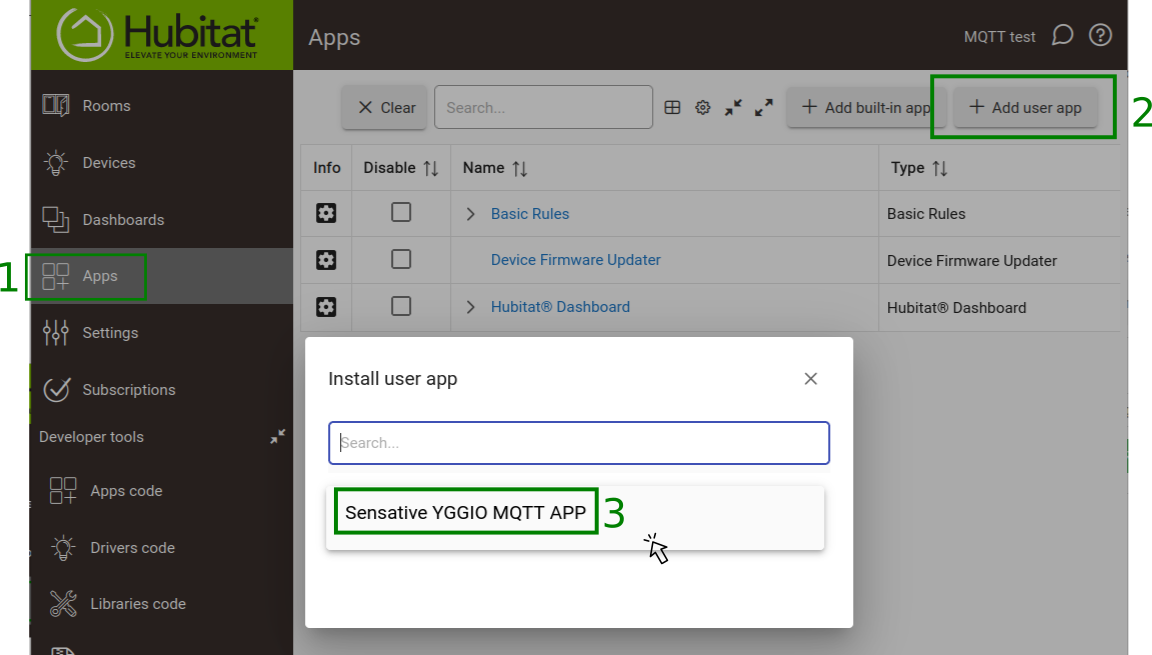
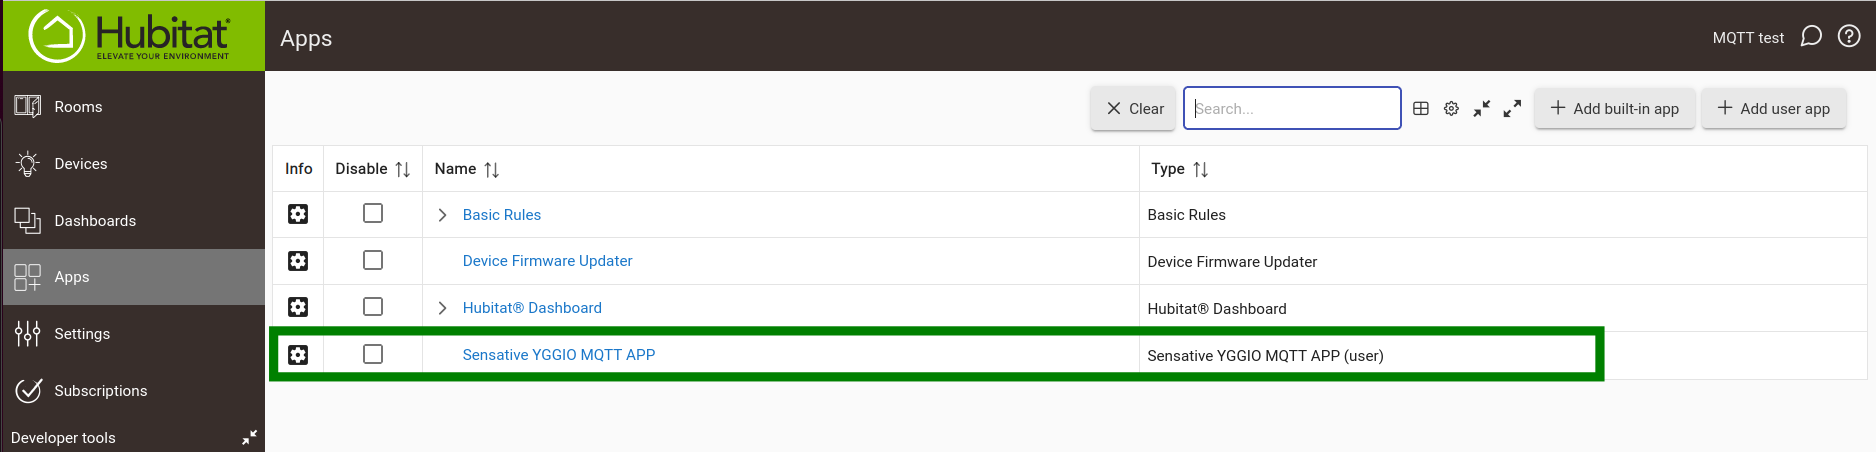
- I Hubitat-användargränssnittet, gå till Apps till vänster.
- Klicka på Add user app-knappen uppe till höger.
- Klicka på Sensative Yggio MQTT App.
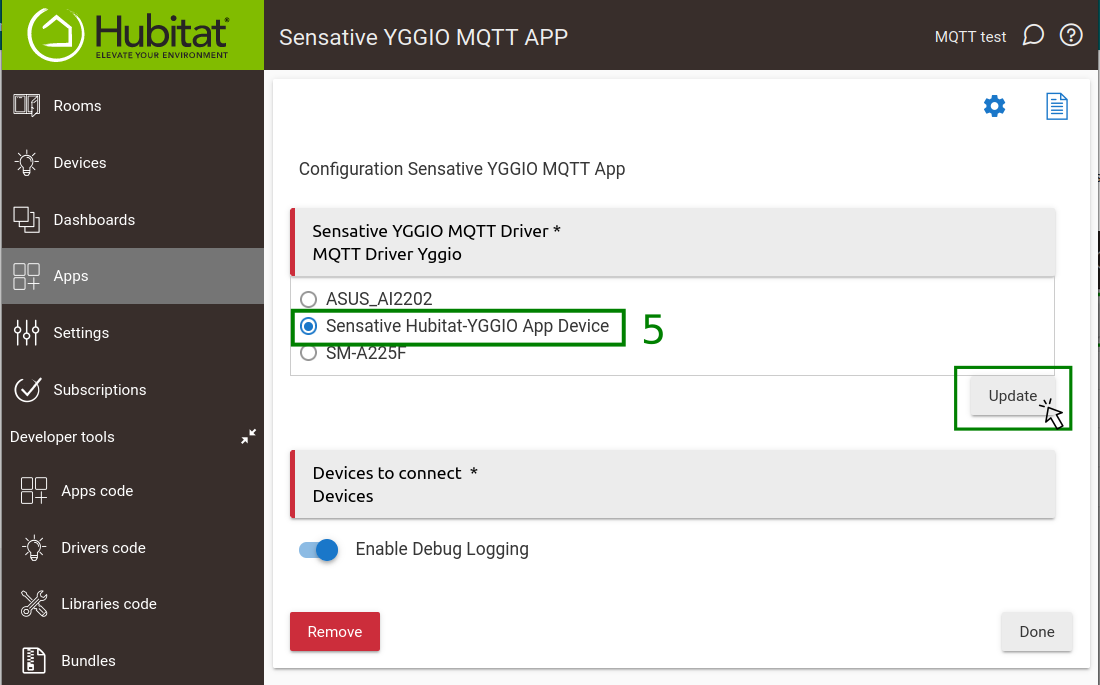
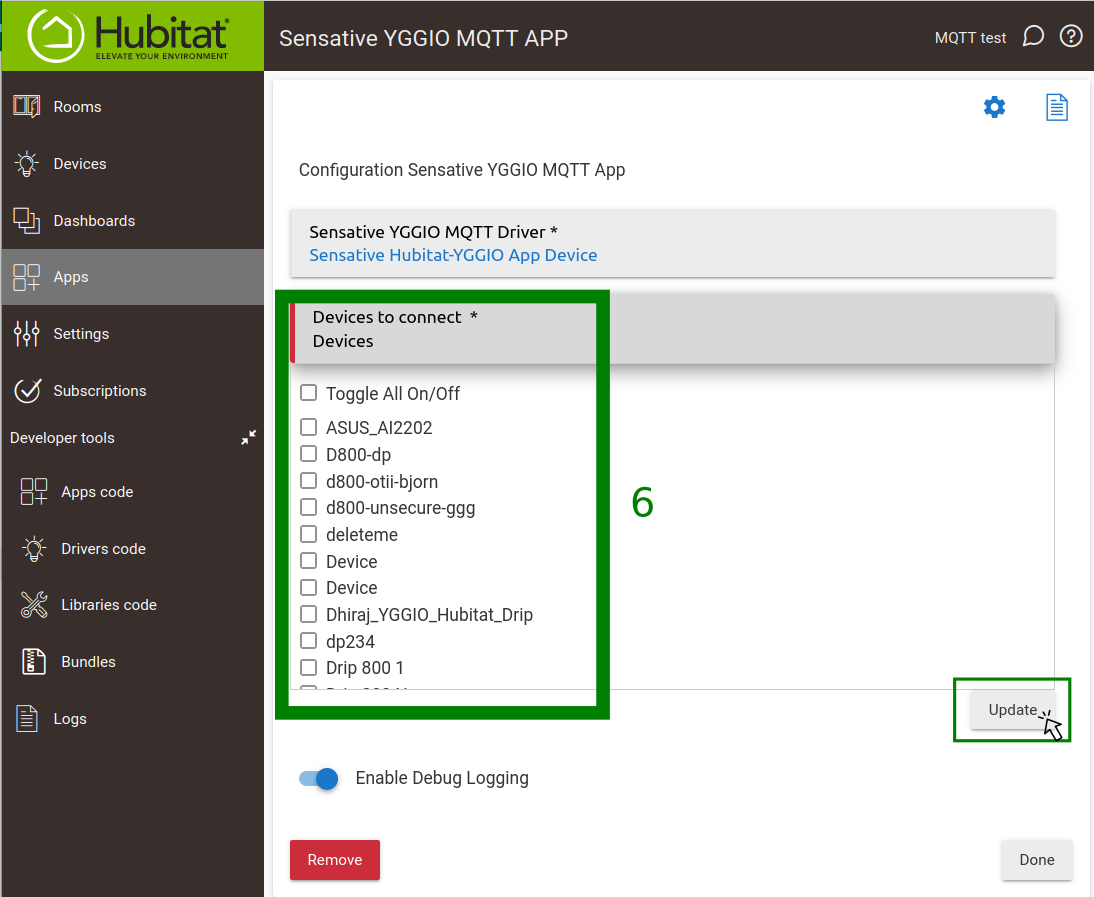
- Konfigurationssidan för Sensative Yggio MQTT App öppnas.
- På konfigurationssidan, välj enheten som du skapade tidigare i avsnittet Sensative Yggio MQTT Driver och klicka på Update-knappen.
- Välj de enheter som du vill ansluta till Yggio-plattformen och klicka på Done-knappen. Om du lägger till nya enheter senare och vill synkronisera dem med Yggio-plattformen, återvänd till detta avsnitt, välj de nya enheterna och klicka på Done-knappen.
Yggio-användargränssnitt
VI. Logga in på Yggio
I detta avsnitt kommer vi att logga in på Yggio-plattformen. Inloggning gör att du kan hantera dina enheter och interagera med plattformen. Så här gör du:
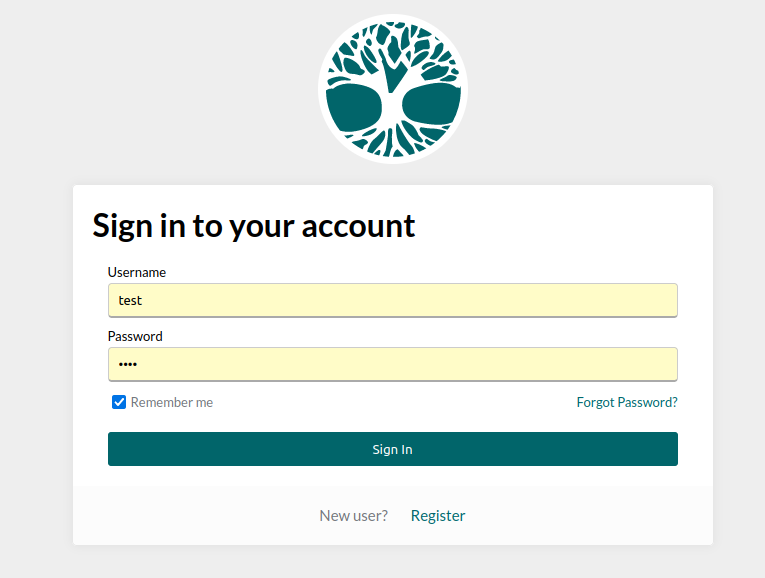
- Navigera till Yggios inloggningssida. URL:en ska ha tillhandahållits av Yggio Admin.
- Ange dina inloggningsuppgifter i de angivna fälten.
- Klicka på "Sign In"-knappen.
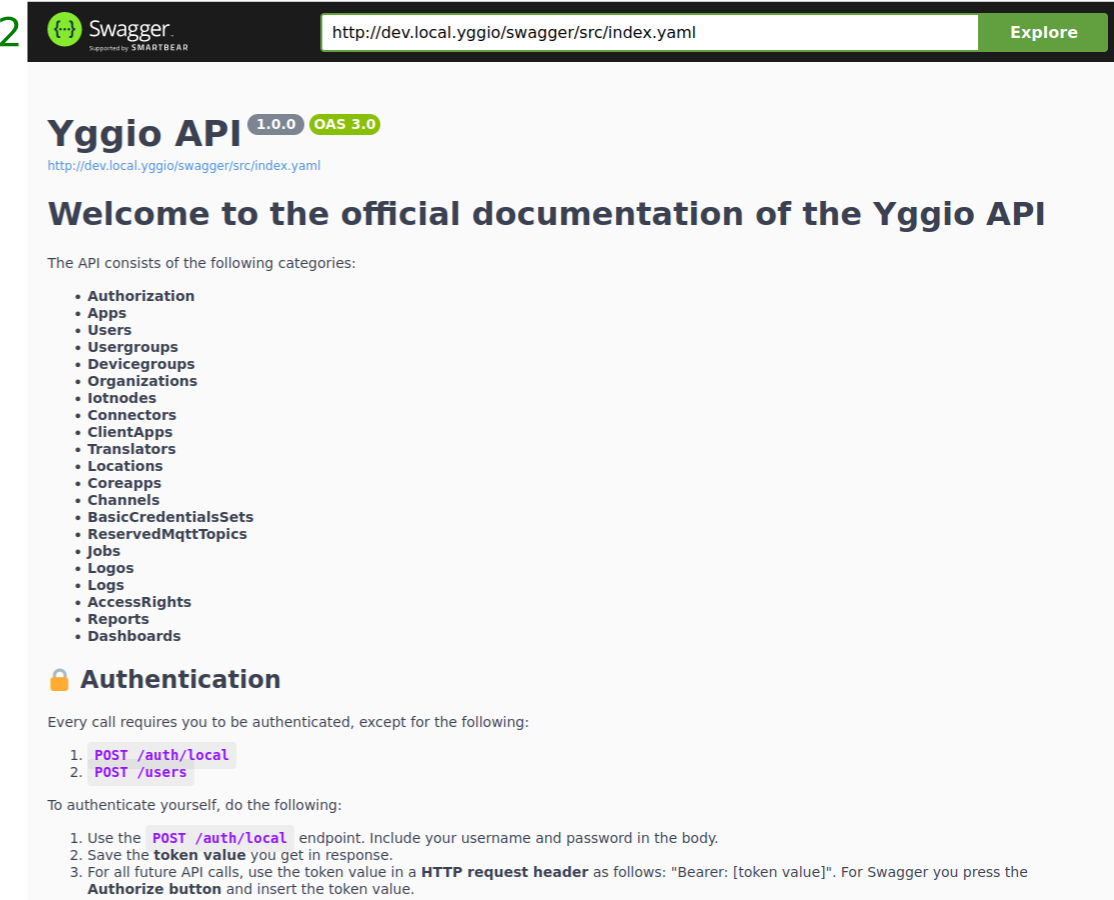
VII. Starta Swagger-applikationen för API-kommunikation
I detta avsnitt kommer vi att starta Swagger-applikationen. Swagger är ett verktyg som hjälper dig att kommunicera med Yggio-plattformen via dess API. Så här gör du:
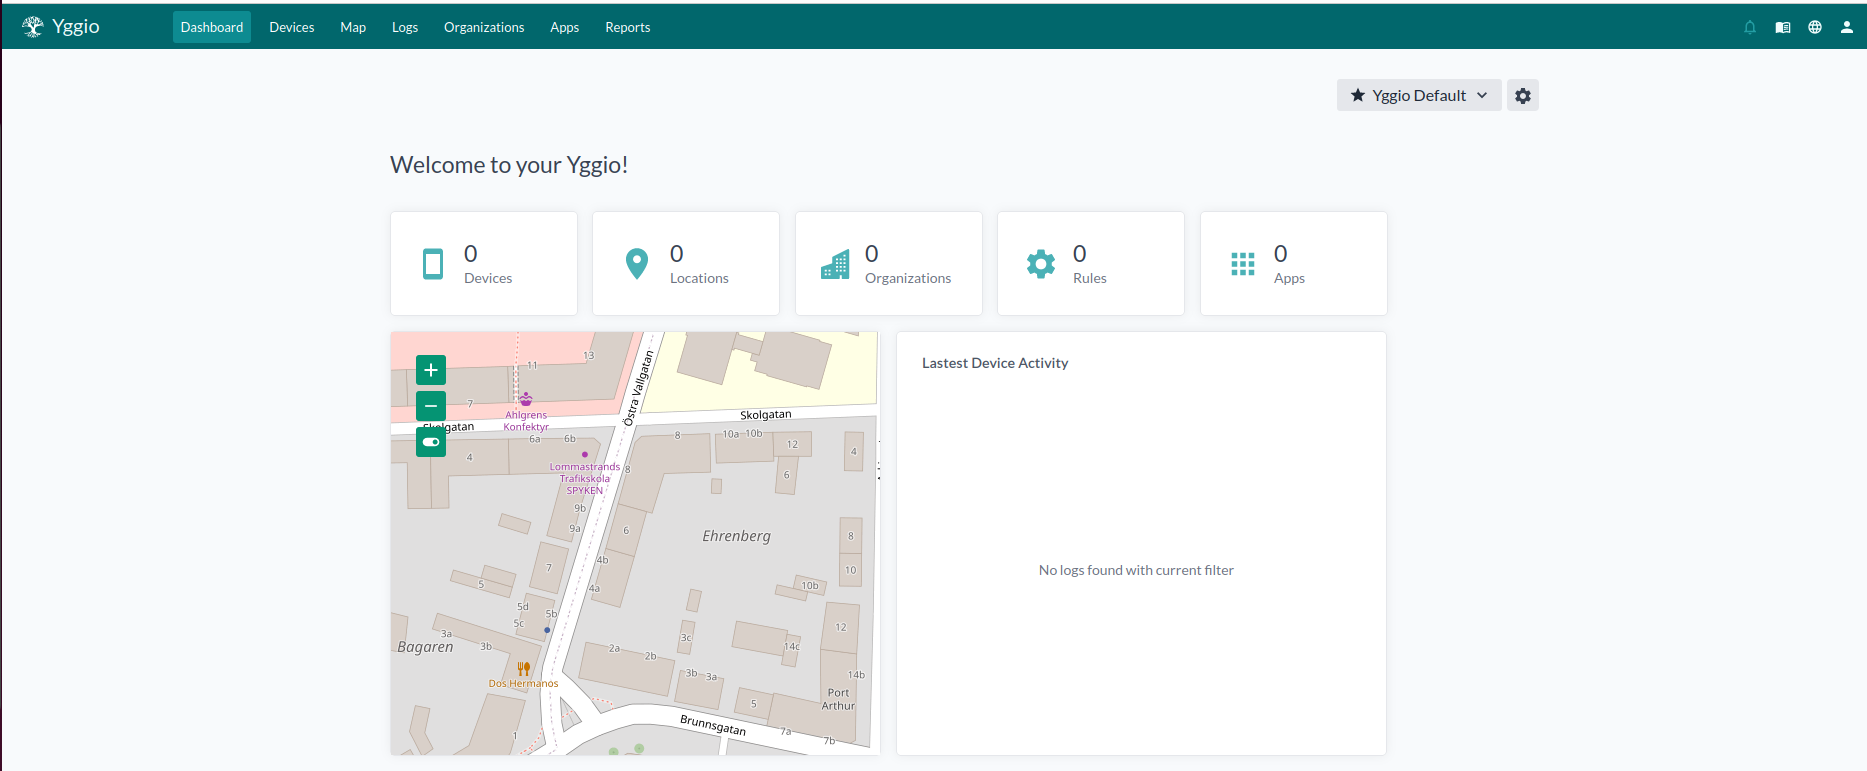
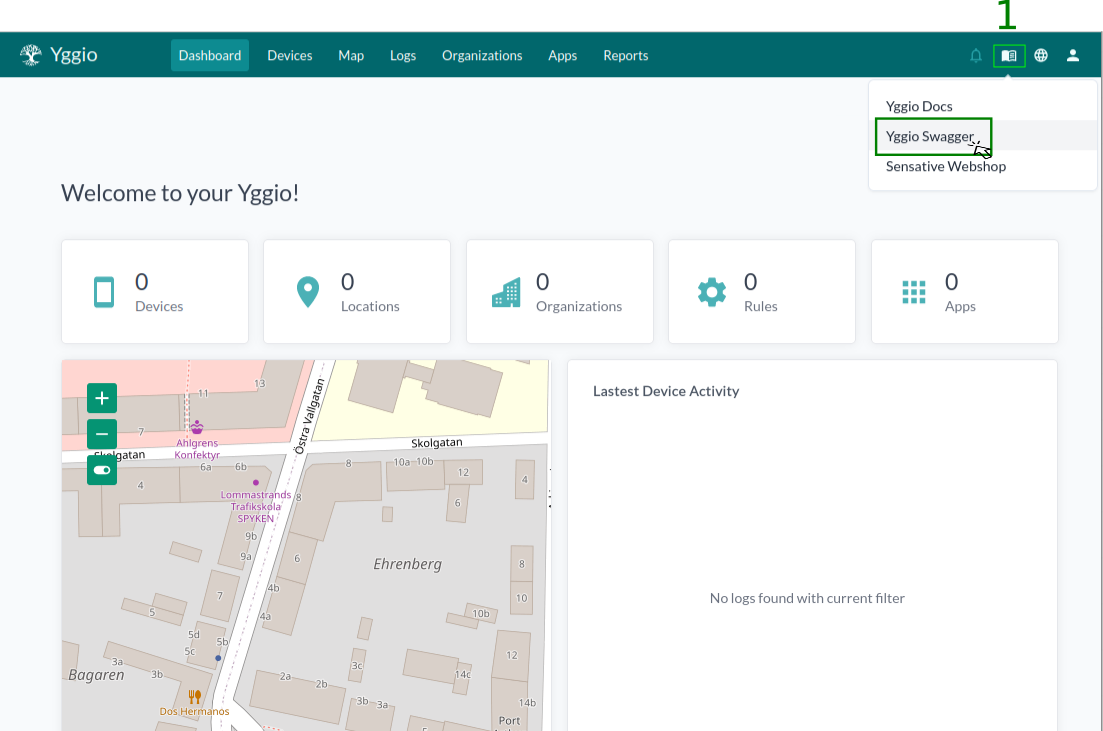
- När du är inloggad på Yggio, navigera till Swagger-applikationen.
- Du bör nu se Swagger-gränssnittet. Här kan du interagera med Yggio API.
VIII. Auktorisera Yggio-plattformen
I detta avsnitt kommer vi att säkerställa att Yggio vet vem du är och att du har behörighet att använda det. Detta kallas 'auktorisering'. Så här gör du:
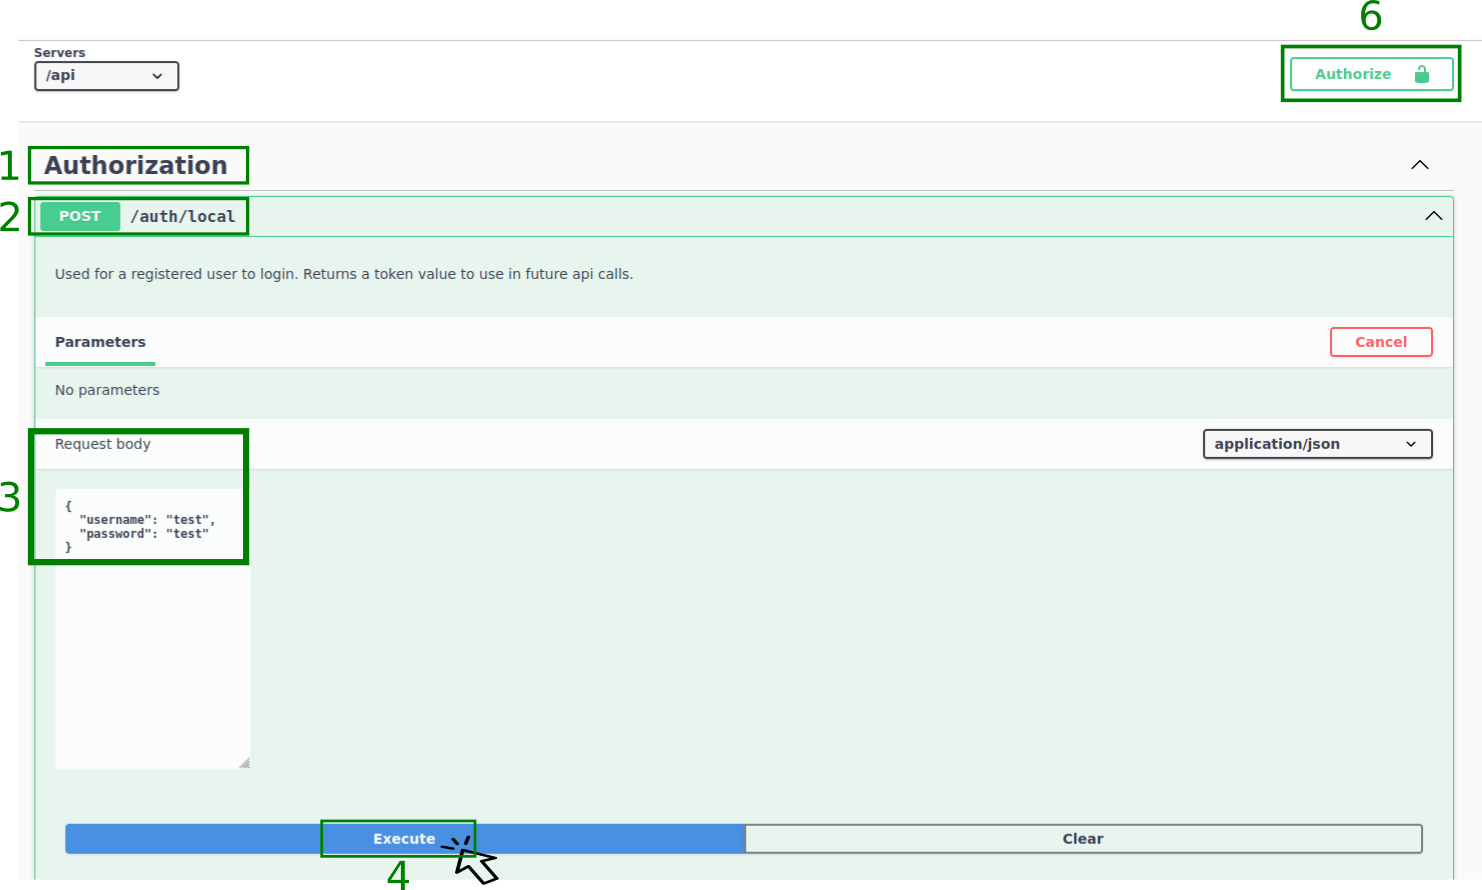
- Navigera till avsnittet Authorization på Swagger-applikationens sida.
- Klicka på
POST/auth/local-rullgardinsmenyn, klicka sedan på Try it out-knappen. - I avsnittet Request body, ersätt platshållarna markerade som
"string"med dina faktiska inloggningsuppgifter. Dessa platshållare finns i fälten märkta"username"och"password". - Klicka på Execute-knappen för att slutföra auktoriseringen.
- Du kommer att se en token (en lång sträng med bokstäver och siffror) i svaret. Välj denna token och kopiera den. Du kommer att behöva den senare.
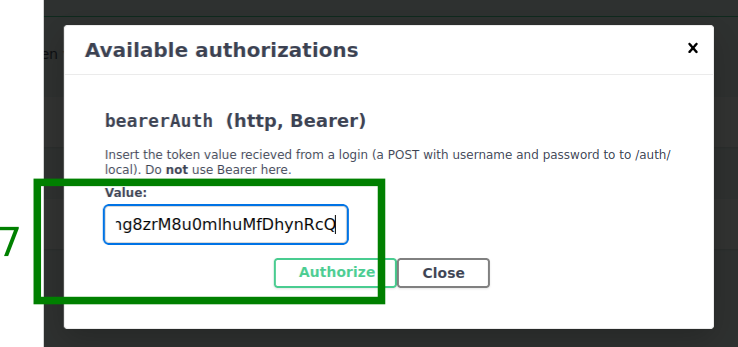
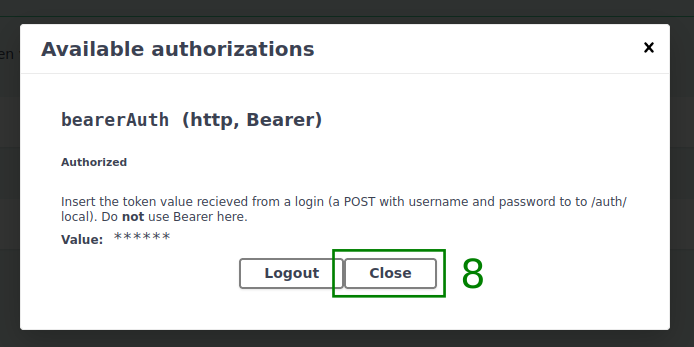
- Klicka på Authorize-knappen och en dialogruta
Available authorizationskommer att dyka upp. - Klistra in token i värdefältet och klicka på Authorize-knappen.
- Klicka på Close för att stänga dialogrutan
Available authorizations.
Authorization response...

IX. Skapa en grundläggande uppsättning av autentiseringsuppgifter (Basic Set Credentials ID)
Nästa steg är att skapa en grundläggande uppsättning av autentiseringsuppgifter (Basic Set Credentials ID). Detta ID används för autentisering och för att säkerställa integriteten hos MQTT-ämnen.
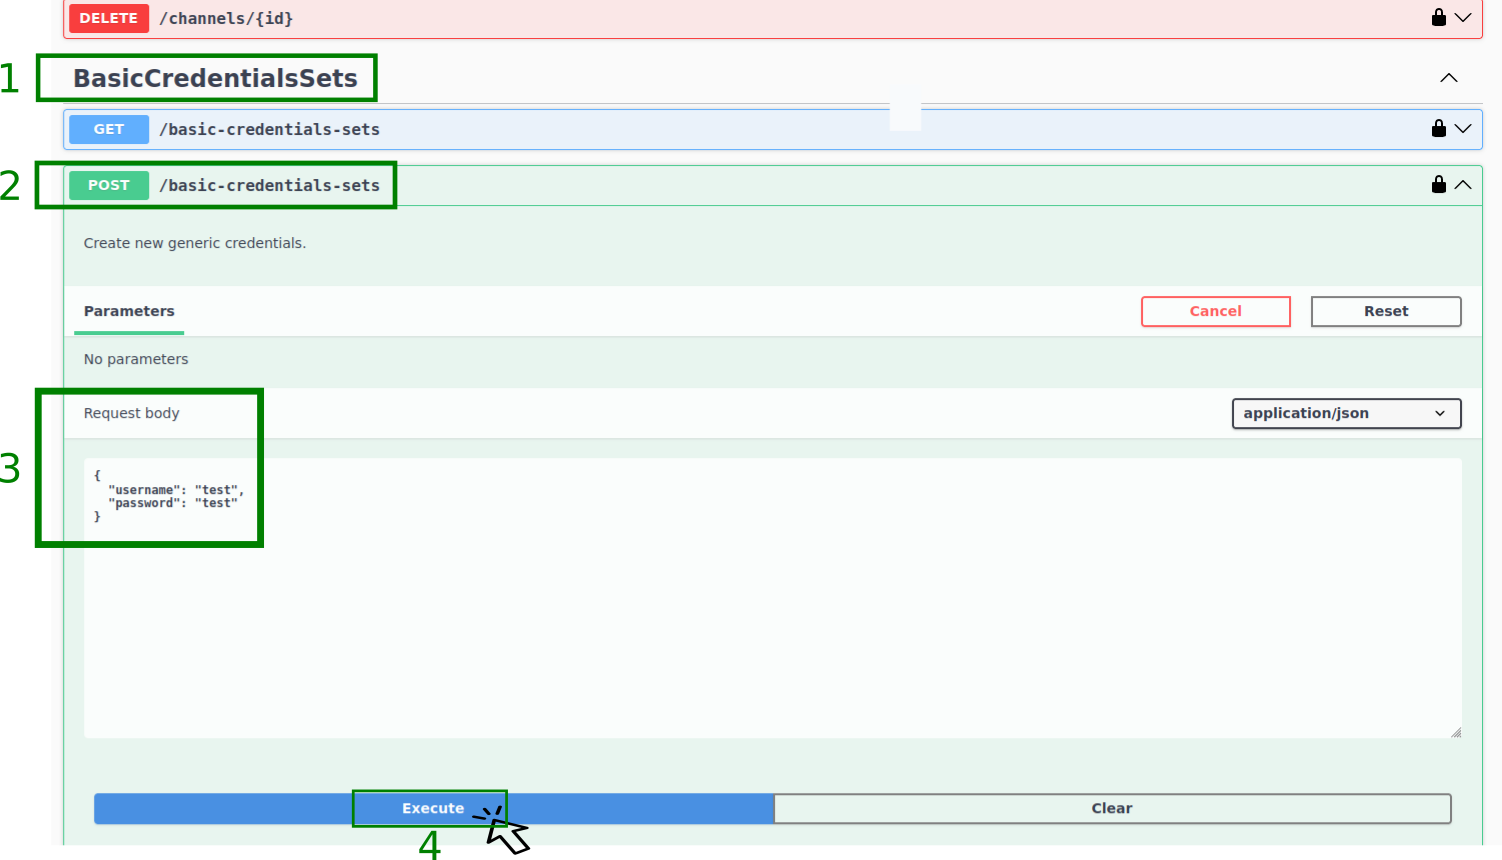
- Navigera till avsnittet BasicCredentialsSets på Swagger-applikationens sida.
- Klicka på
POST/basic-credentials-sets-rullgardinsmenyn, klicka sedan på Try it out-knappen. - I avsnittet Request body, ersätt platshållarna markerade som
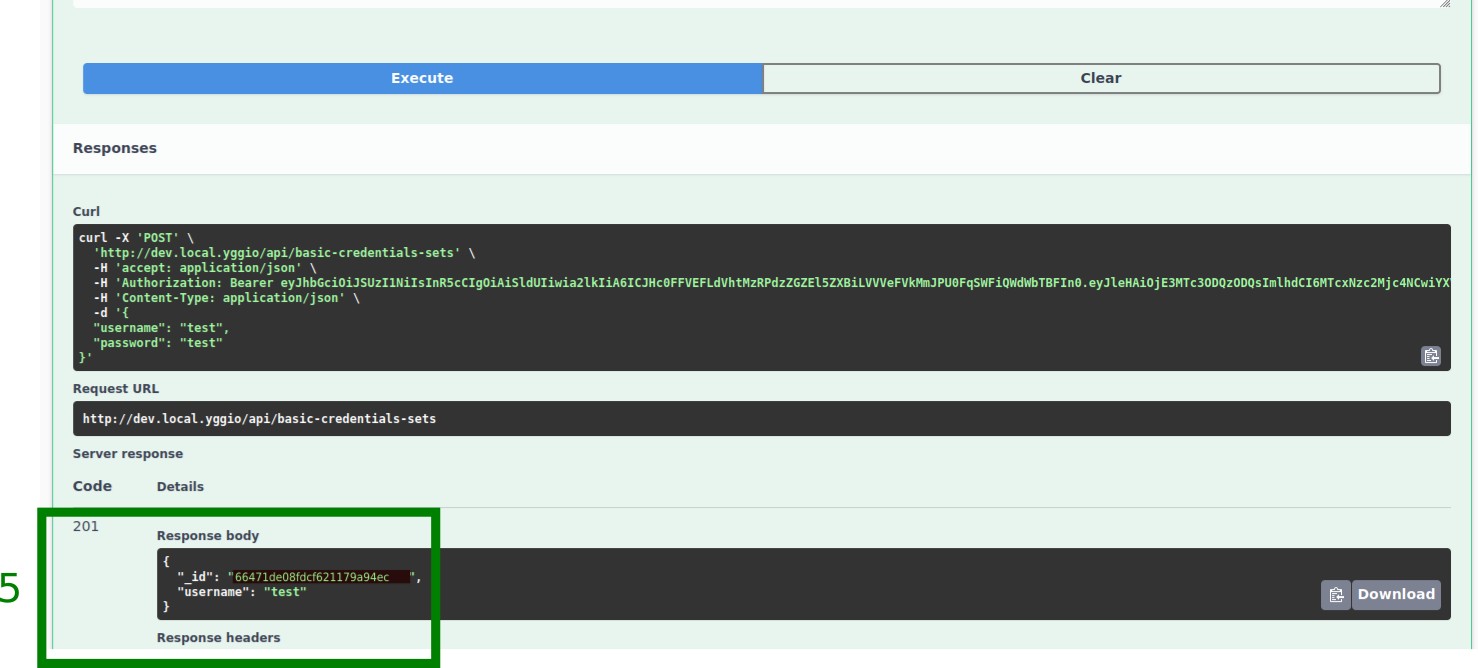
"string"med dina Yggio inloggningsuppgifter eller med en ny uppsättning autentiseringsuppgifter enligt ditt önskemål. Dessa platshållare finns i fälten märkta"username"och"password". Gör en notering av de nya autentiseringsuppgifterna eftersom dessa kommer att behövas för att konfigurera Yggio MQTT Broker Username och Yggio MQTT Broker Password. För mer information om denna konfiguration, se avsnitt IV. Skapa och konfigurera den virtuella enheten. - Klicka på Execute-knappen. Detta kommer att generera en Basic credentials sets Id.
- I avsnittet Response body, kommer du att se ett
_idoch dittusername. Spara_iddå du kommer att behöva det för senare steg och för att konfigurera Yggio MQTT Broker Basic Credentials ID. För mer information om denna konfiguration, se avsnitt IV. Skapa och konfigurera den virtuella enheten.
BasicCredentialsSets svar...
X. Etablera en reserverad MQTT-topic
Nästa steg är att skapa en reserverad MQTT-topic. Detta ämne används som ett prefix och består av integrationsversionen Yggio - Hubitat och den Basic credentials sets Id som skapades tidigare.
-
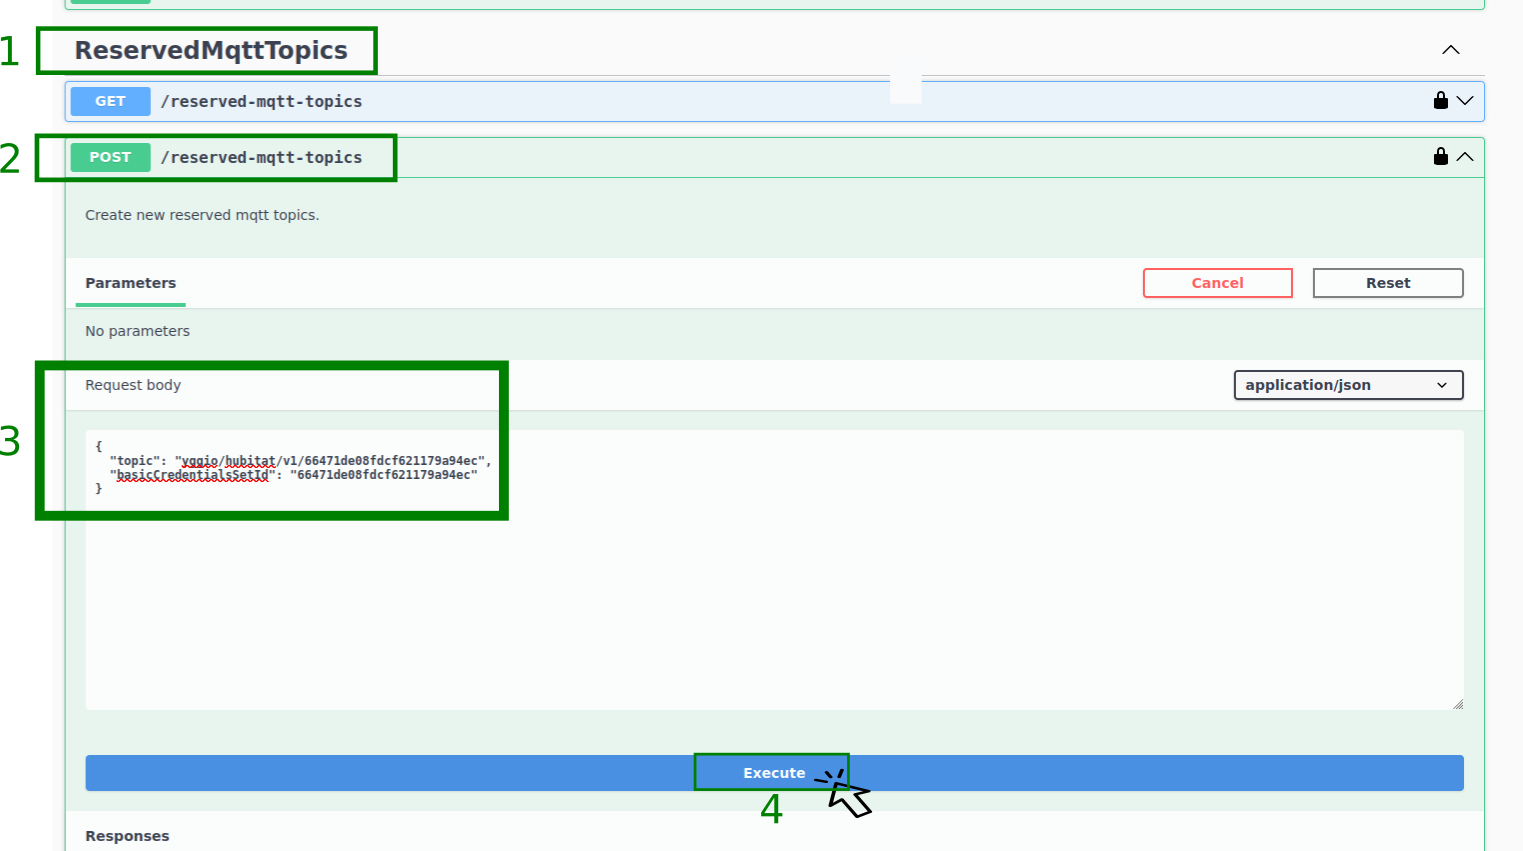
Navigera till avsnittet ReservedMqttTopics på Swagger-applikationens sida.
-
Klicka på
POST/reserved-mqtt-topics-rullgardinsmenyn, klicka sedan på Try it out-knappen. -
I avsnittet Request body, ersätt platshållarna markerade som
"string":- För fältet märkt
"topic", ersätt"string"med"yggio/hubitat/v1/<din BasicCredentialsSets _id>"(ersätt<din BasicCredentialsSets _id>med den faktiska_idsom du kopierade tidigare). - För fältet märkt
"basicCredentialsSetId", ersätt"string"med din faktiska BasicCredentialsSets_idsom du kopierade när du skapade BasicCredentialsSets Id.
- För fältet märkt
-
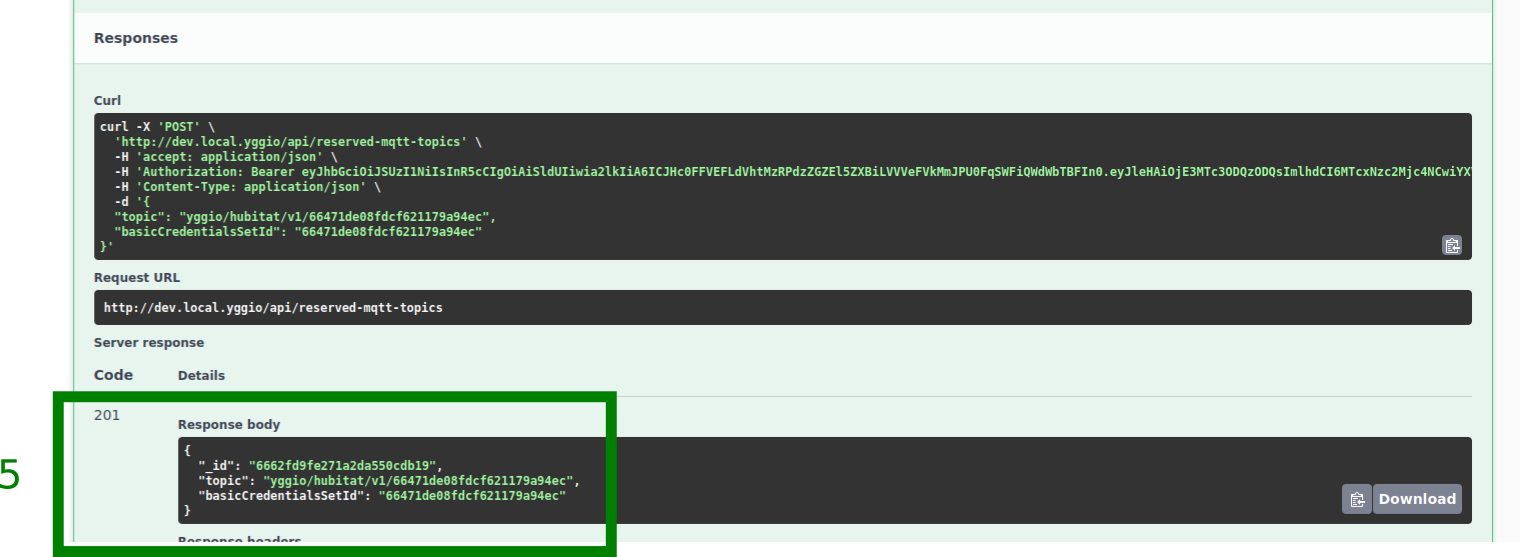
Klicka på Execute-knappen.
-
I avsnittet Response body bekräftas det om det reserverade MQTT-topic har skapats framgångsrikt.
ReservedMqttTopics response...
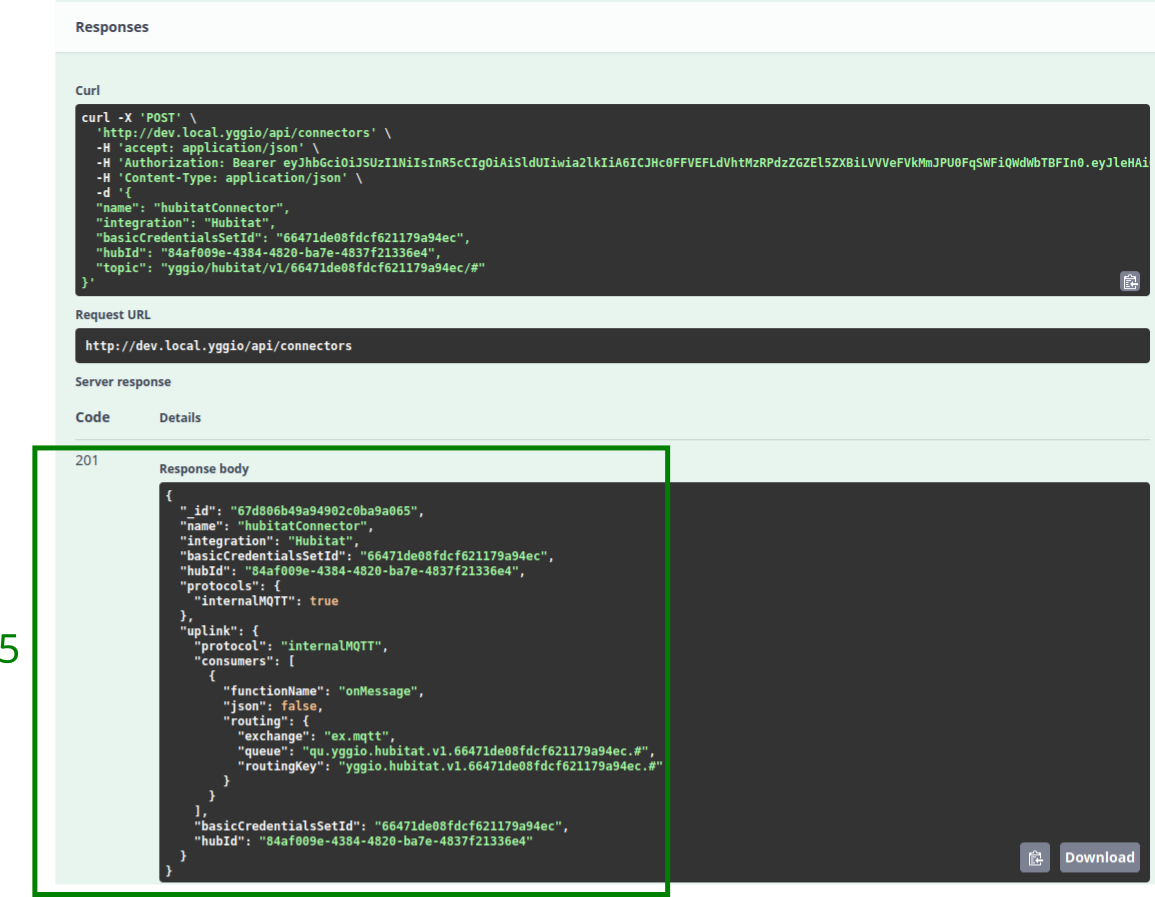
XI. Skapa en Hubitat Connector
Nästa steg är att skapa Hubitat Connector, som är den avgörande komponenten i integrationen.
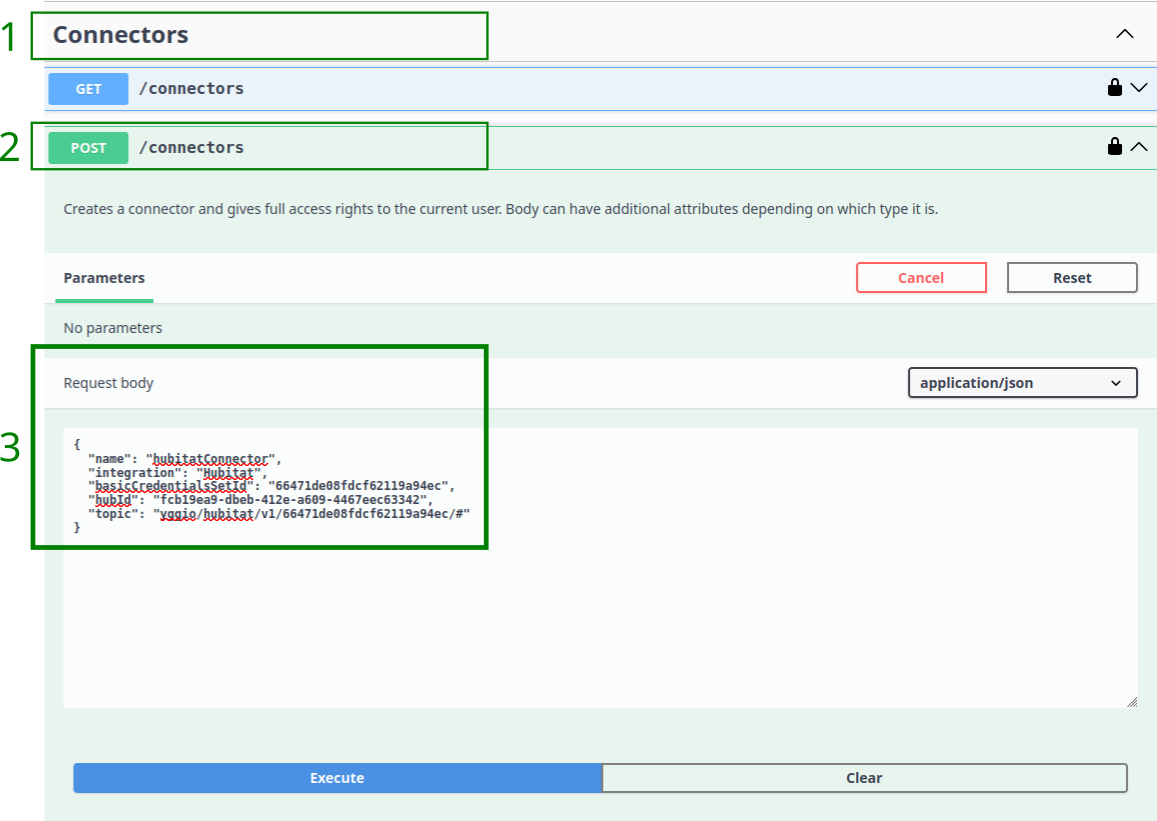
- Navigera till avsnittet Connectors på Swagger-applikationens sida.
- Klicka på
POST/connectors-rullgardinsmenyn, klicka sedan på Try it out-knappen. - I avsnittet Request body, ersätt platshållarna markerade som
"string":- För fältet märkt
"name", ersätt"string"med ett namn efter ditt önskemål. - För fältet märkt
"integration", ersätt"string"med"Hubitat". Se till att stavningen är korrekt. - För fältet märkt
"basicCredentialsSetId", ersätt"string"med din faktiska BasicCredentialsSets_idsom du kopierade när du skapade BasicCredentialsSets Id. - För fältet märkt
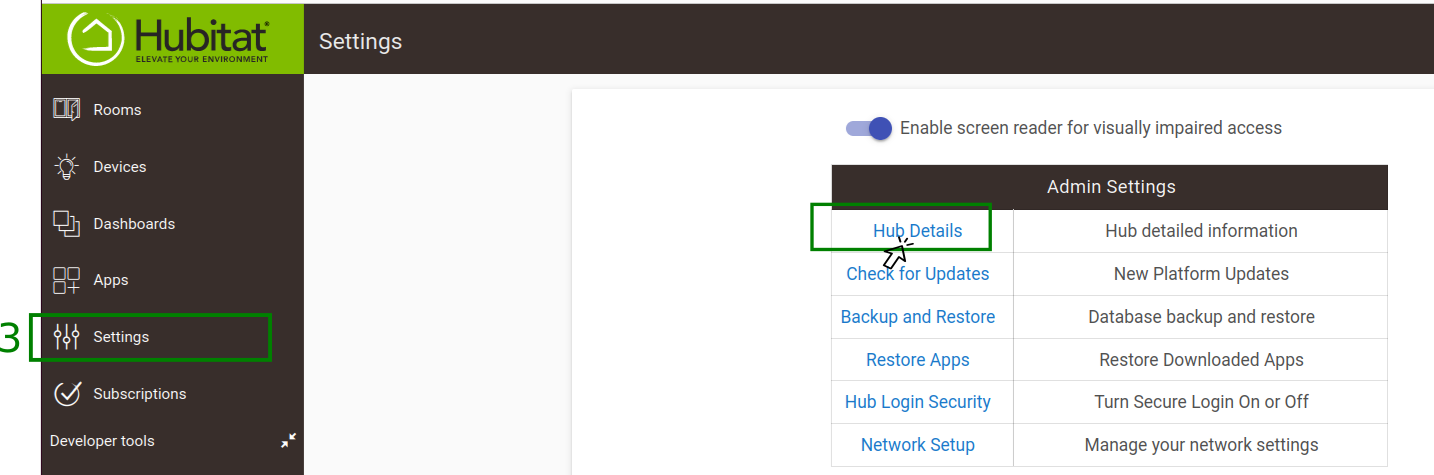
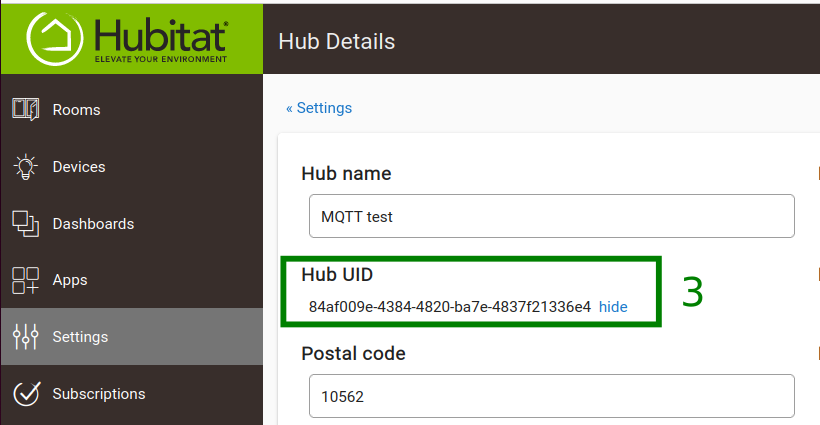
"hubId", ersätt"string"med Hub UID.
Hub UID kan hittas i Hubitats användargränssnittsinställningar enligt bilderna nedan. - För fältet märkt
"topic", ersätt"string"med"yggio/hubitat/v1/#".
- För fältet märkt
- Klicka på Execute-knappen.
- I avsnittet Response body bekräftas det om Connector har skapats framgångsrikt.
- Spara Connector
_idför användning i Downlink Kommunikation.
Observera: Denna åtgärd kommer inte längre att vara nödvändig när Yggios frontend-stöd är implementerat.
Lägg Connectors svar...
XII. Fylla i preferenser i Hubitat med autentiseringsuppgifter
När du har fått dina autentiseringsuppgifter från Yggio Admin eller efter att ha slutfört avsnitten VI till IX kan du fylla i preferenserna i Hubitat. Detta gör det möjligt för Hubitat att kommunicera med Yggio-plattformen. Följ stegen i avsnittet Skapa och konfigurera den virtuella enheten för att göra detta.
XIII. Att hävda IoT-noder: Ett arbete i framsteg
Uppdatering pågår (...Osäker på hur det görs...Swagger för att hävda noder verkar vara låst)!
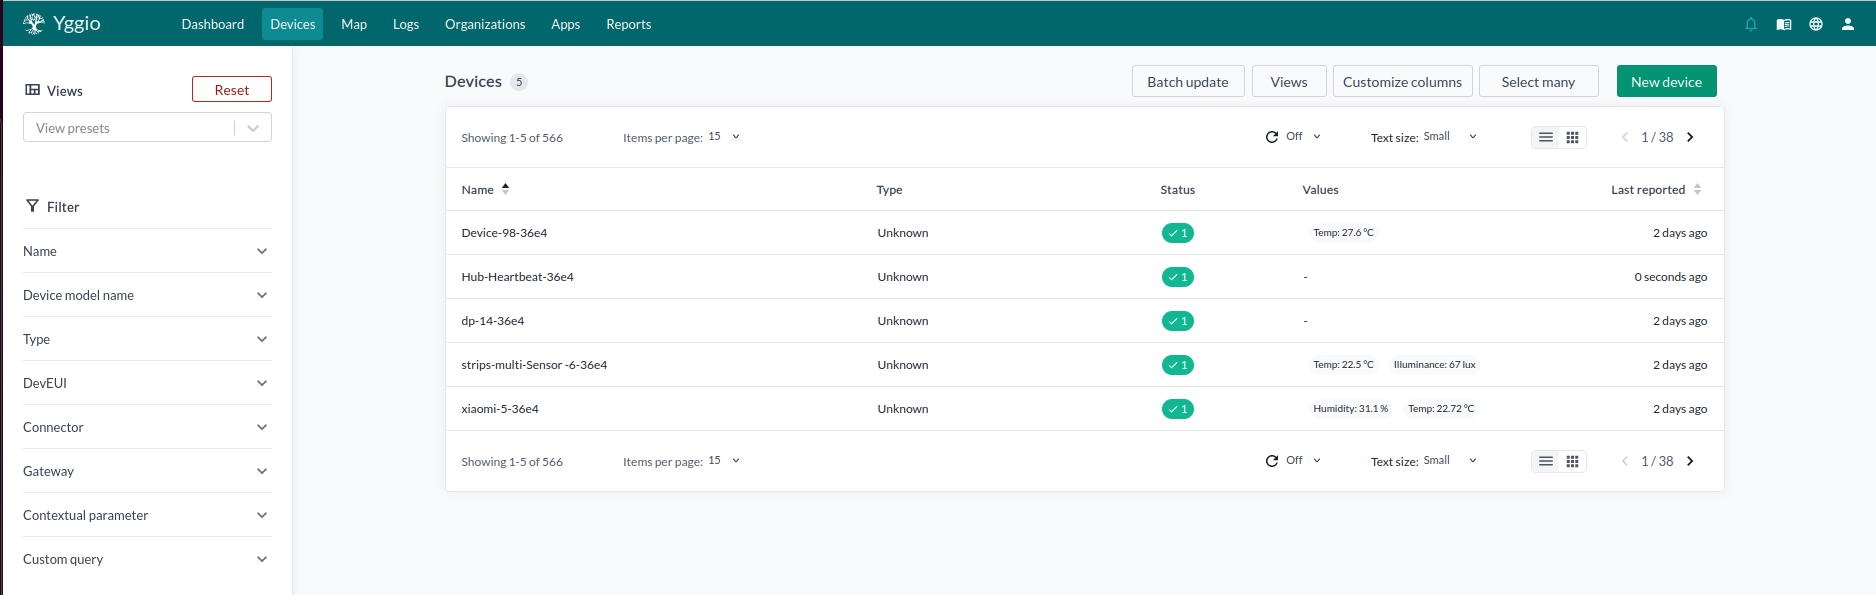
XIV. Yggio Dashboard - Visa Hubitat-enheter
Efter att ha slutfört de tidigare stegen och framgångsrikt synkroniserat dina Hubitat-enheter med Yggio med hjälp av MQTT-kommunikation kan du visa dina Hubitat-enheter på Yggio-dashboarden. Detta ger ett bekvämt sätt att övervaka och kontrollera dina enheter.
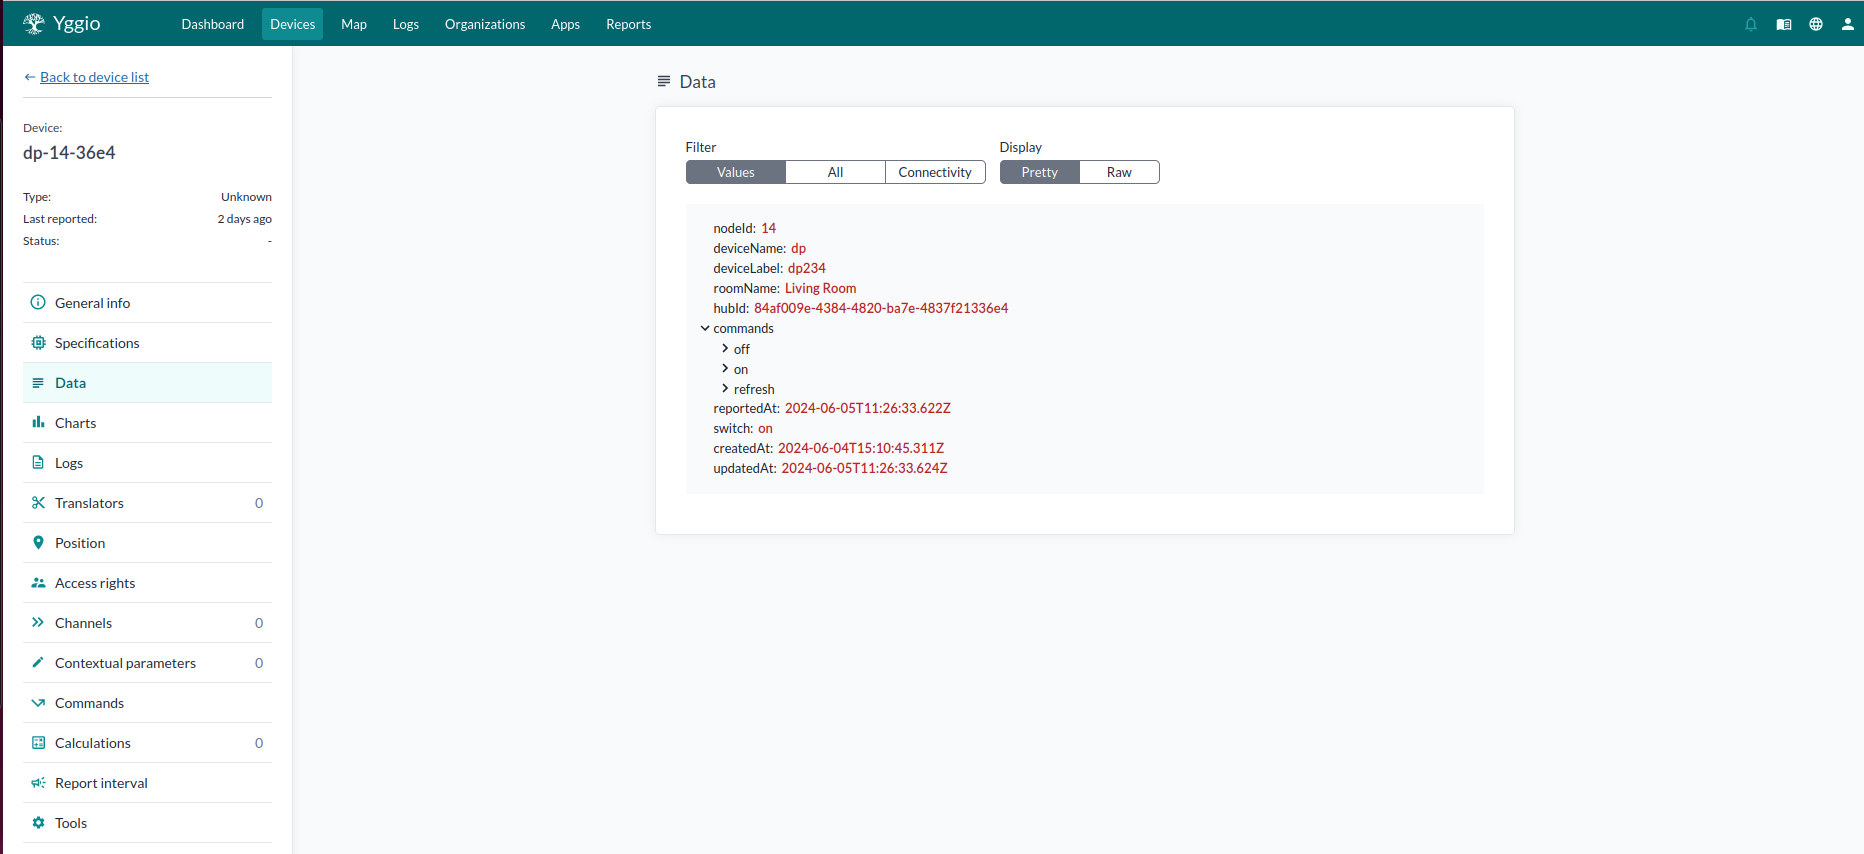
Den första bilden nedan visar Yggio-dashboarden med enheter som synkroniserats från Hubitat-navet. Den andra bilden ger en detaljerad vy av data för en virtuell Z-Wave-strömbrytare, som visar den aktuella statusen för strömbrytaren som 'on'.
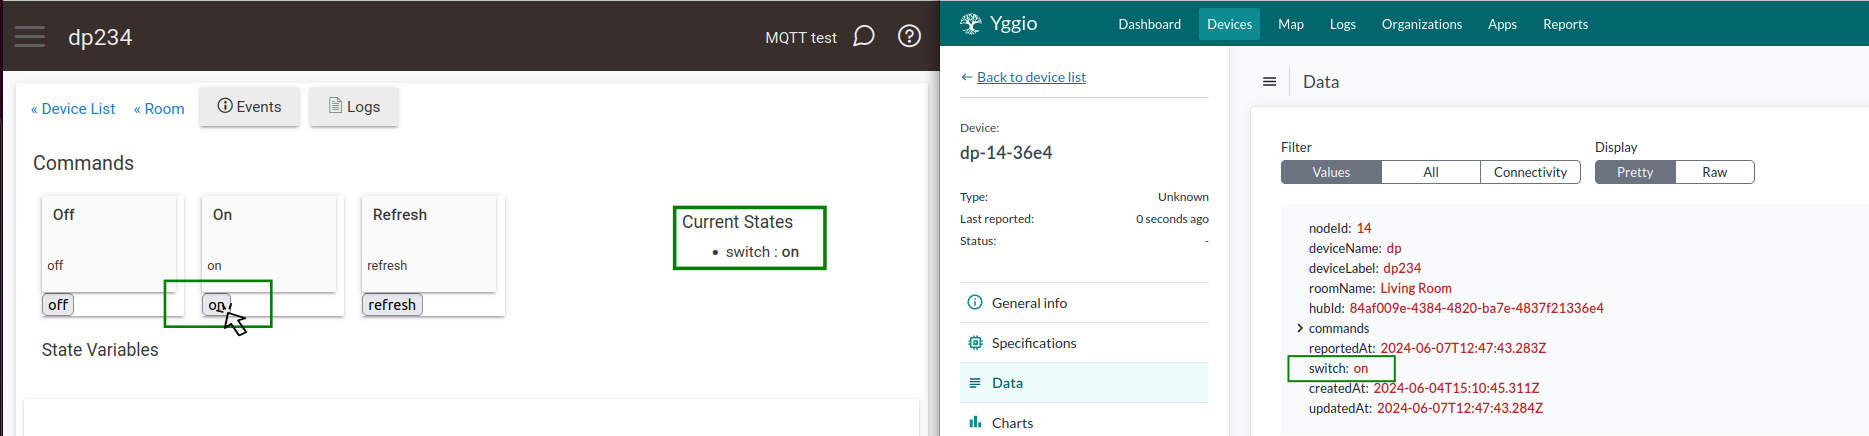
XV. Uplink Kommunikation - Exempel
Uplink-kommunikation avser kommunikationen från Hubitat till Yggio. Ett exempel på detta är en enhetsstatusuppdatering från Hubitat som skickas till Yggio.
De två bilderna nedan illustrerar denna upplänkskommunikation. Den första bilden visar statusuppdateringen när knappen 'on' klickas på den virtuella Z-Wave Switch-enheten i Hubitat-gränssnittet. Denna åtgärd återspeglas i samma enhetsdata på Yggio-sidan. Den andra bilden visar en liknande uppdatering när knappen 'off' klickas på den virtuella Z-Wave Switch-enheten i Hubitat-gränssnittet och hur denna ändring återspeglas på Yggio-sidan.
XVI. Downlink Kommunikation - Exempel
Downlink-kommunikation avser kommunikationen från Yggio till Hubitat. Ett exempel på detta är en kommando från Yggio som skickas till en enhet på Hubitat.
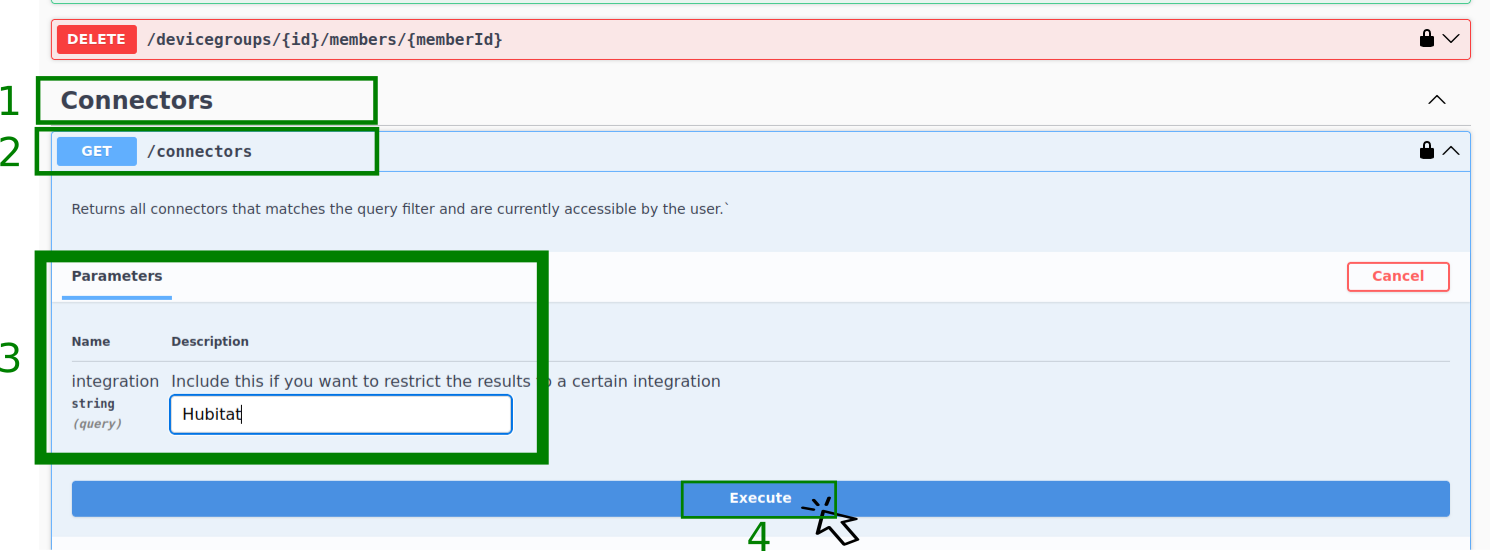
De två första bilderna nedan illustrerar hur du hämtar Connector Id från avsnittet Connectors i Swagger-applikationen. Detta kan vara nödvändigt om du inte kopierade det i avsnitt XI. Skapa en Hubitat Connector steg 6, eller om du har förlorat Connector Id. För att göra detta måste du:
- Navigera till avsnittet Connectors på Swagger-applikationens sida.
- Klicka på
GET/connectors-rullgardinsmenyn, klicka sedan på Try it out-knappen. - I avsnittet Request body, ersätt platshållarna markerade som
"string"med"Hubitat"i fältetintegration. - Klicka på Execute-knappen.
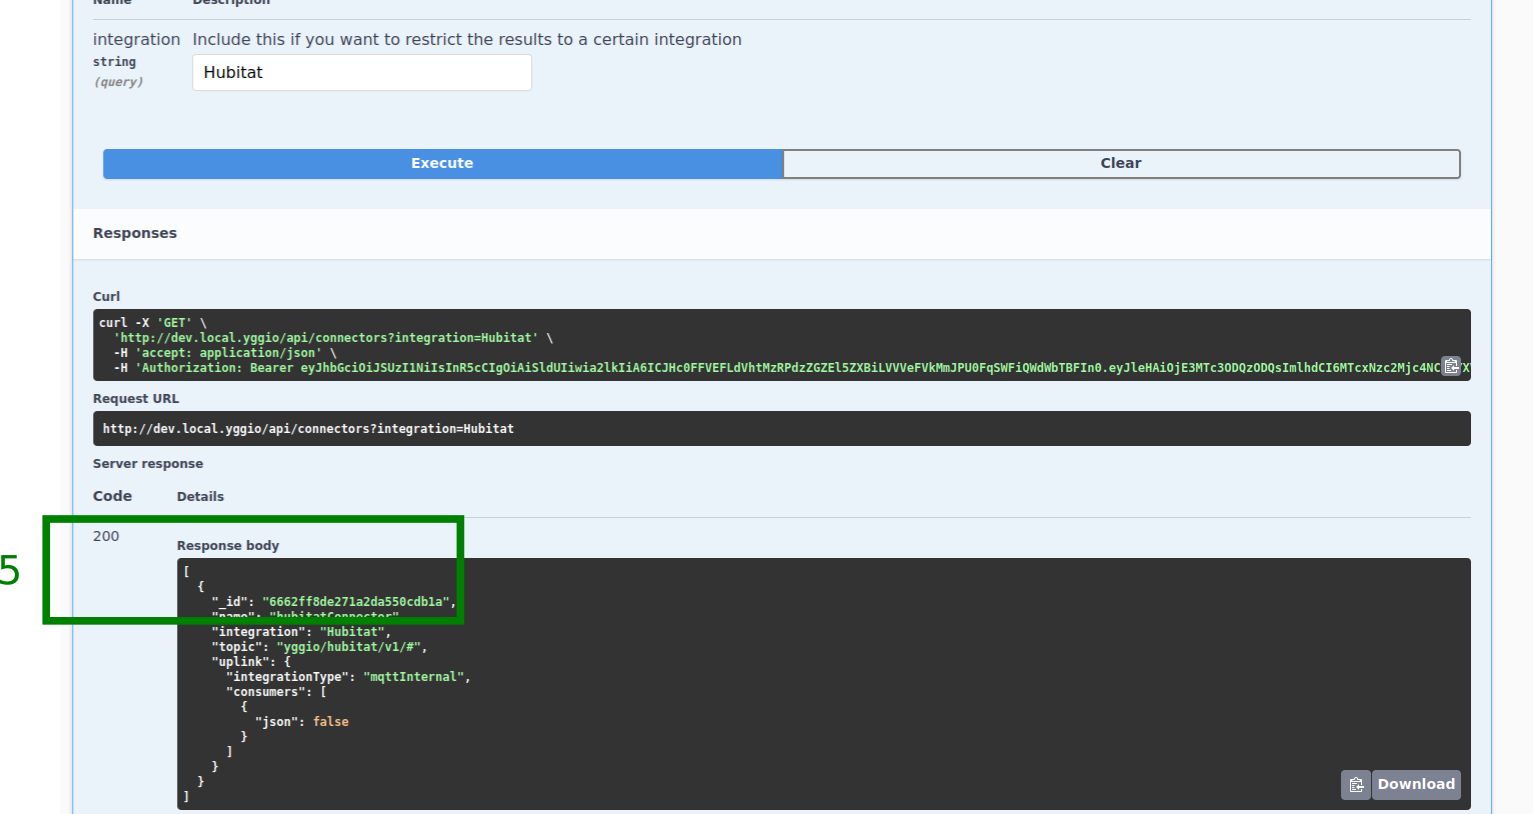
- Från avsnittet Response body, om det lyckades, kopiera Connector _id och spara det för att skicka nedlänkskommandon.
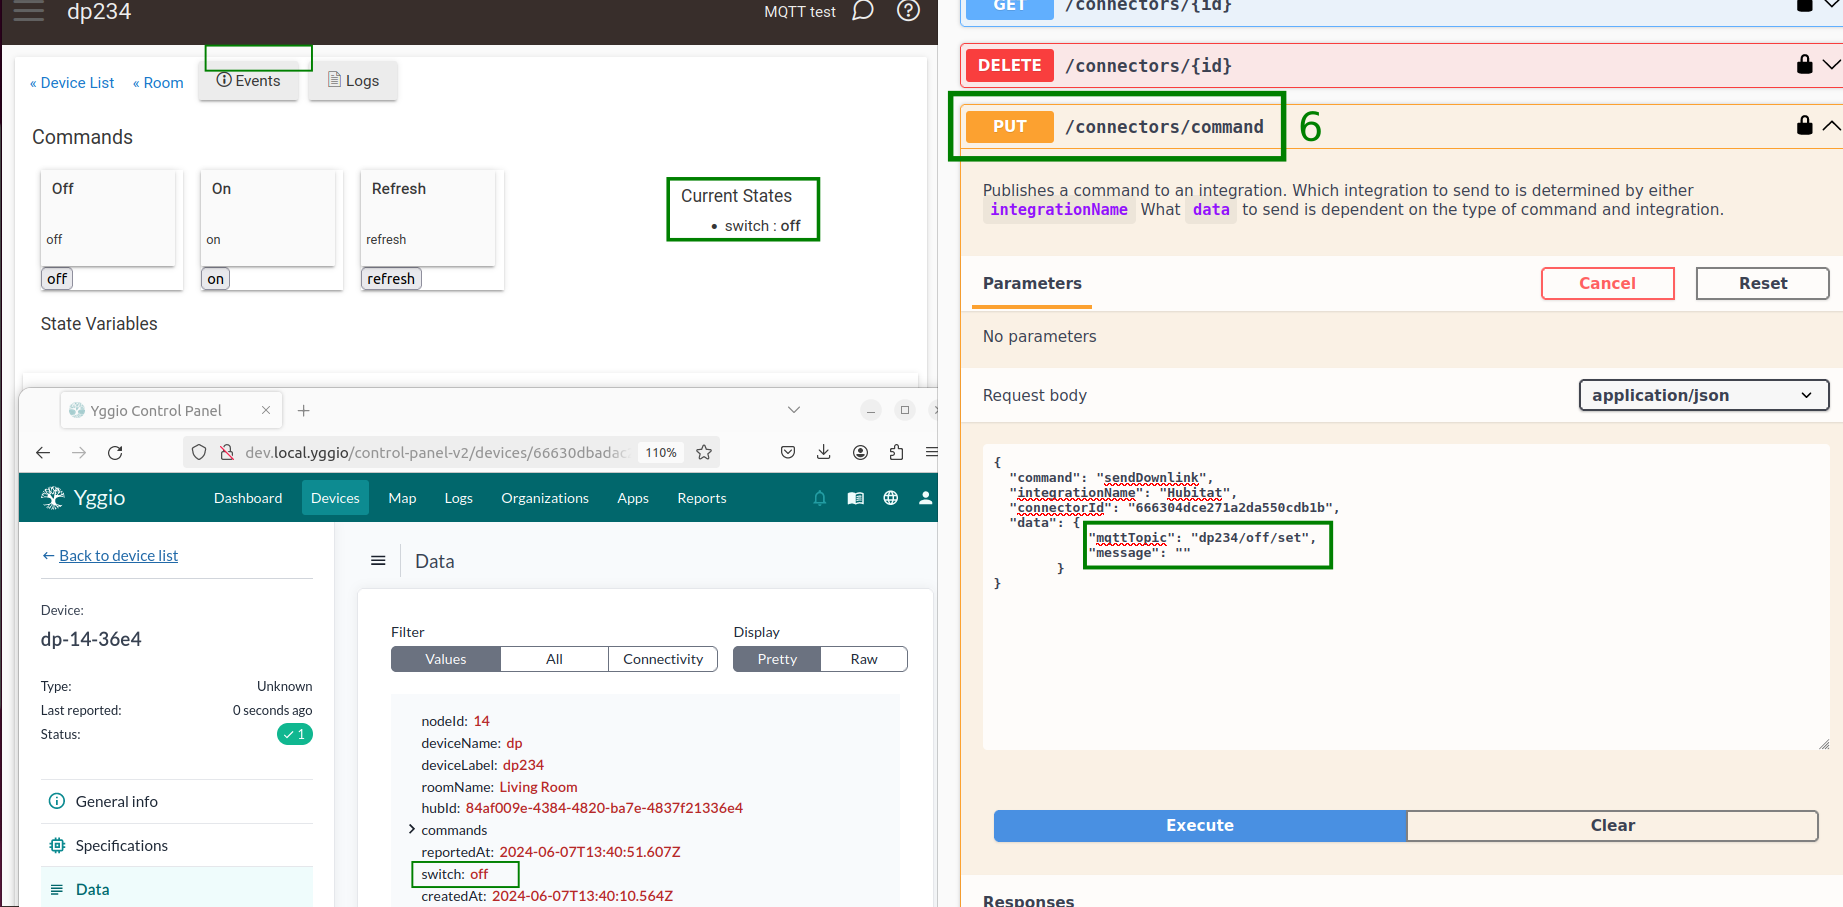
- Bilden markerad '6' visar den aktuella statusen för den virtuella Z-Wave-strömbrytaren på Hubitat och Yggio-sidan.
I Swagger-applikationen kan du konfigurera nedlänkskommandot i avsnittet PUT/connectors/command. Här är hur:
-
För fältet märkt
"command", ersätt"string"med kommandot"sendDownlink". -
För fältet märkt
"integrationName", ersätt"string"med"Hubitat". -
För fältet märkt
"connectorId", ersätt"string"med din faktiska Connector_idsom du kopierade när du skapade Hubitat Connector eller efter att ha följt steg 1 till 5 i detta avsnitt. -
För fältet märkt
"data", lägg till följande JSON:"data": {"mqttTopic": "dp234/off/set","message": ""}
där "mqttTopic" vanligtvis följer formatet "[deviceLabel]/[command name]/set"
och "message" är den faktiska datan du vill skicka.
Noteringar för datan
Not 1: För kommandon som inte kräver parametrar (som 'on' och 'off'), kan du publicera vad som helst som värdet för /set topic. Sensative Yggio MQTT App ignorerar detta värde.
Not 2: För kommandon som kräver flera parametrar bör du separera varje parameter med ett kommatecken. Till exempel '80, 25'.
Få Connectors svar...
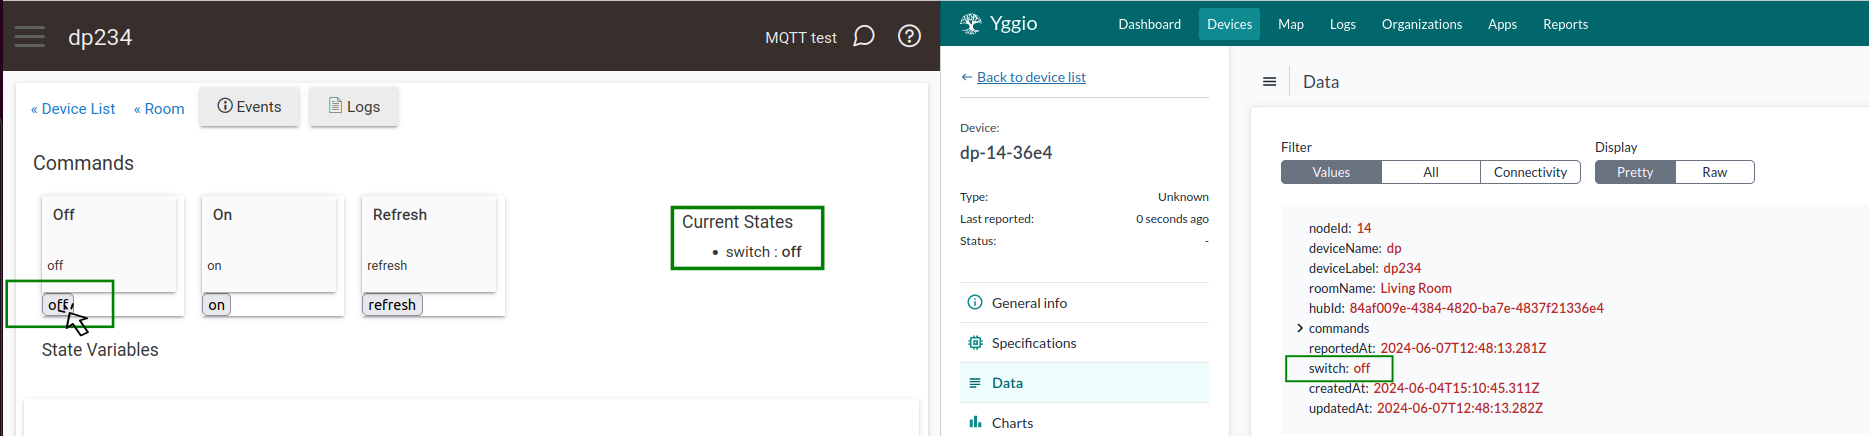
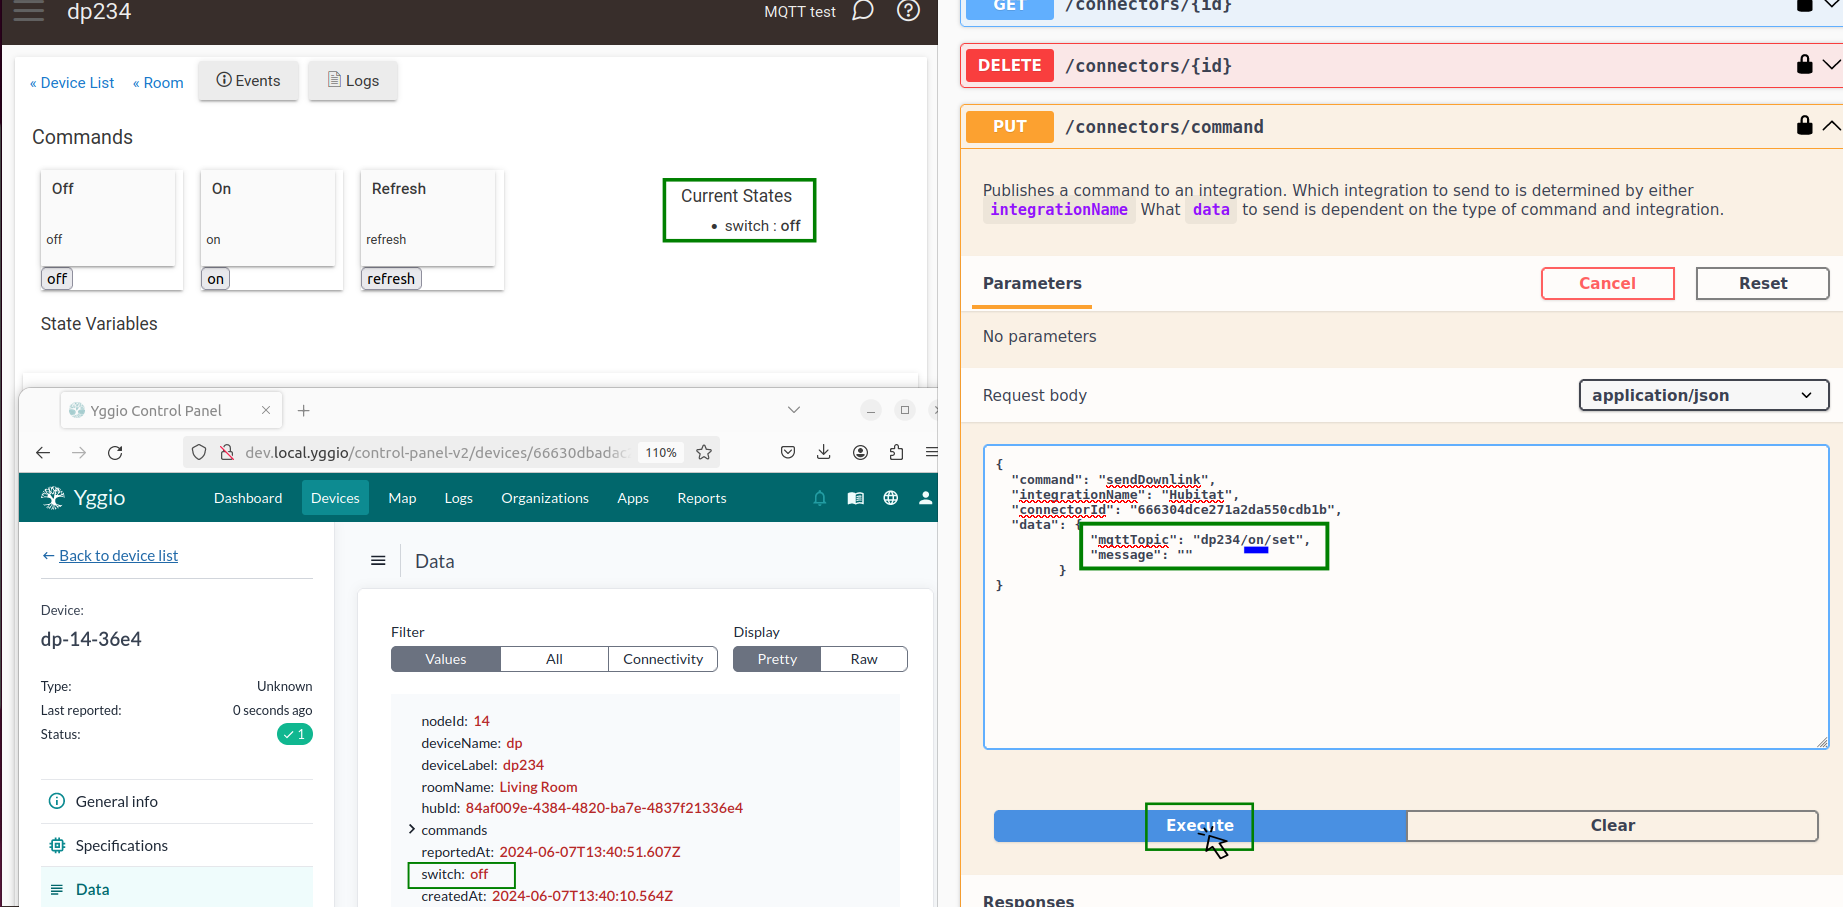
Bilden nedan visar det aktuella 'av'-tillståndet för den virtuella Z-Wave-strömbrytaren både i Hubitat och Yggio.
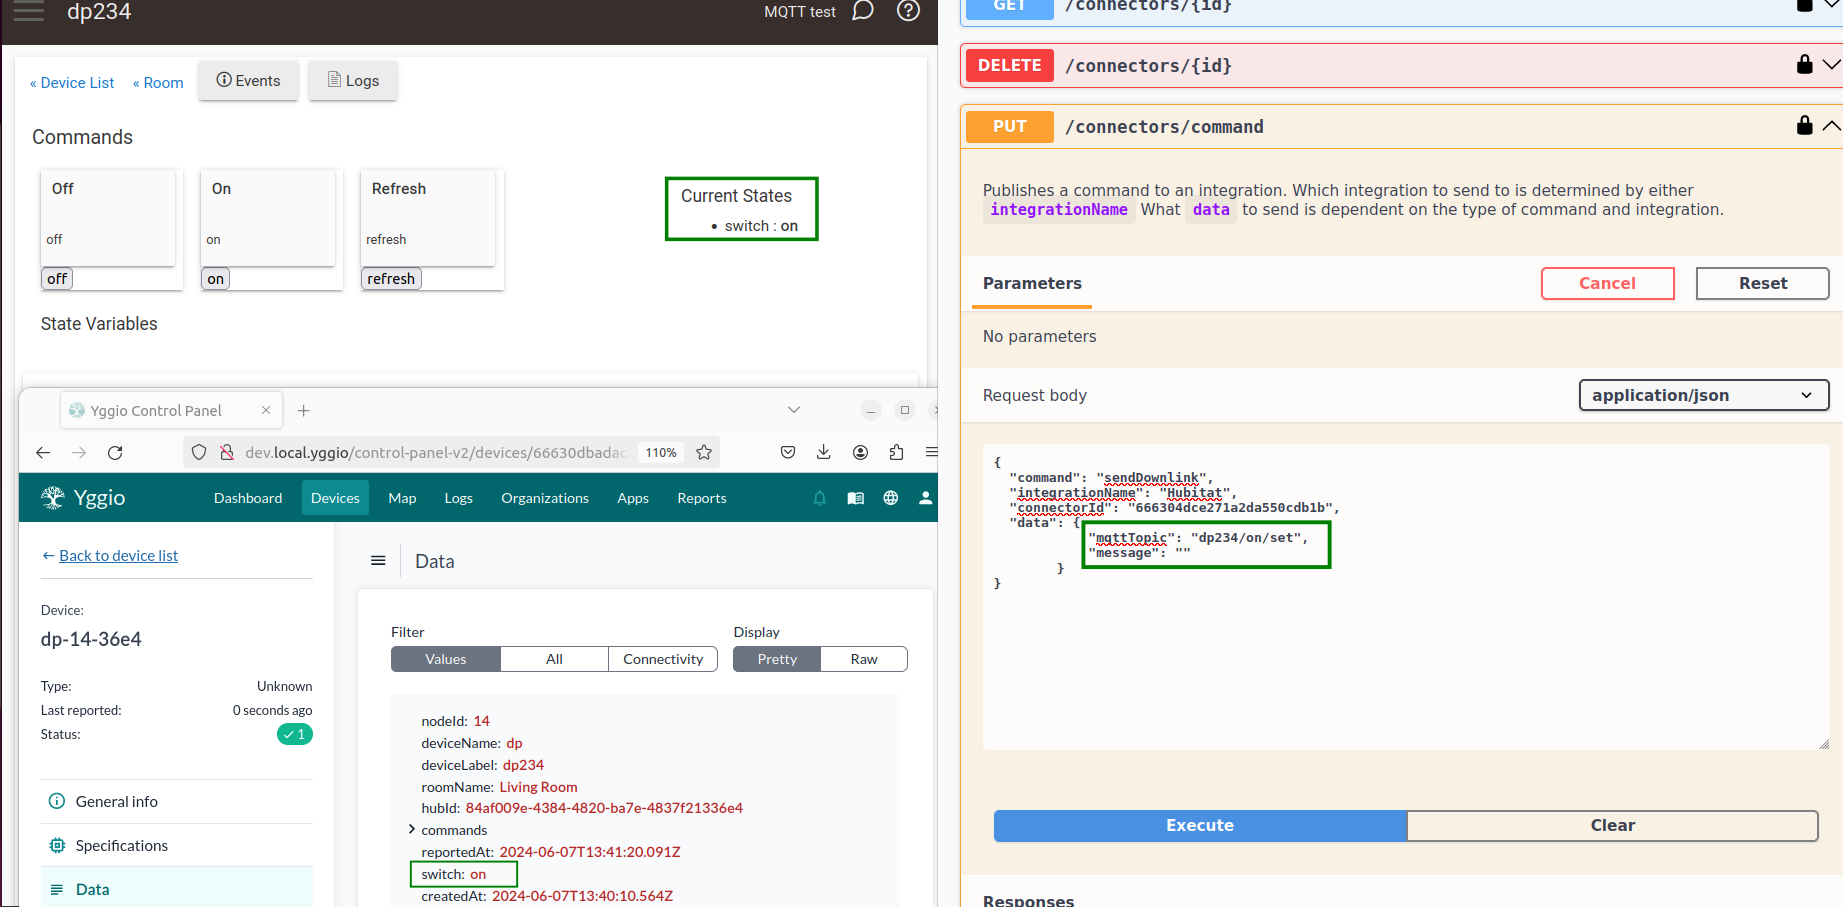
Skicka downlink-kommandot för 'on'-tillstånd från Swagger-applikationen.
Det nya tillståndet 'on' för den virtuella Z-Wave-strömbrytaren återspeglas i både Hubitat och Yggio.
Skicka downlink-kommandot för 'av'-tillstånd från Swagger-applikationen.

Det nya tillståndet 'off' för den virtuella Z-Wave-strömbrytaren återspeglas i både Hubitat och Yggio.

I den här guiden har vi gått igenom processen att integrera Hubitat med Yggio-plattformen med hjälp av MQTT-kommunikation. Vi började med att konfigurera MQTT-brokern och ställa in MQTT Bridge-appen i Hubitat. Därefter skapade vi en virtuell enhet i Hubitat och konfigurerade den för att kommunicera med Yggio.
Vi har även diskuterat begreppen upplänk och nedlänk-kommunikation, med exempel som visar hur enhetsstatusuppdateringar och kommandon skickas mellan Hubitat och Yggio.
Genom att följa dessa steg bör du nu ha en fullt fungerande integration mellan Hubitat och Yggio, vilket gör att du kan övervaka och kontrollera dina Hubitat-enheter från Yggio-dashboarden.