Strips Multi-sensor for LoRaWAN
Strips Multi-sensor
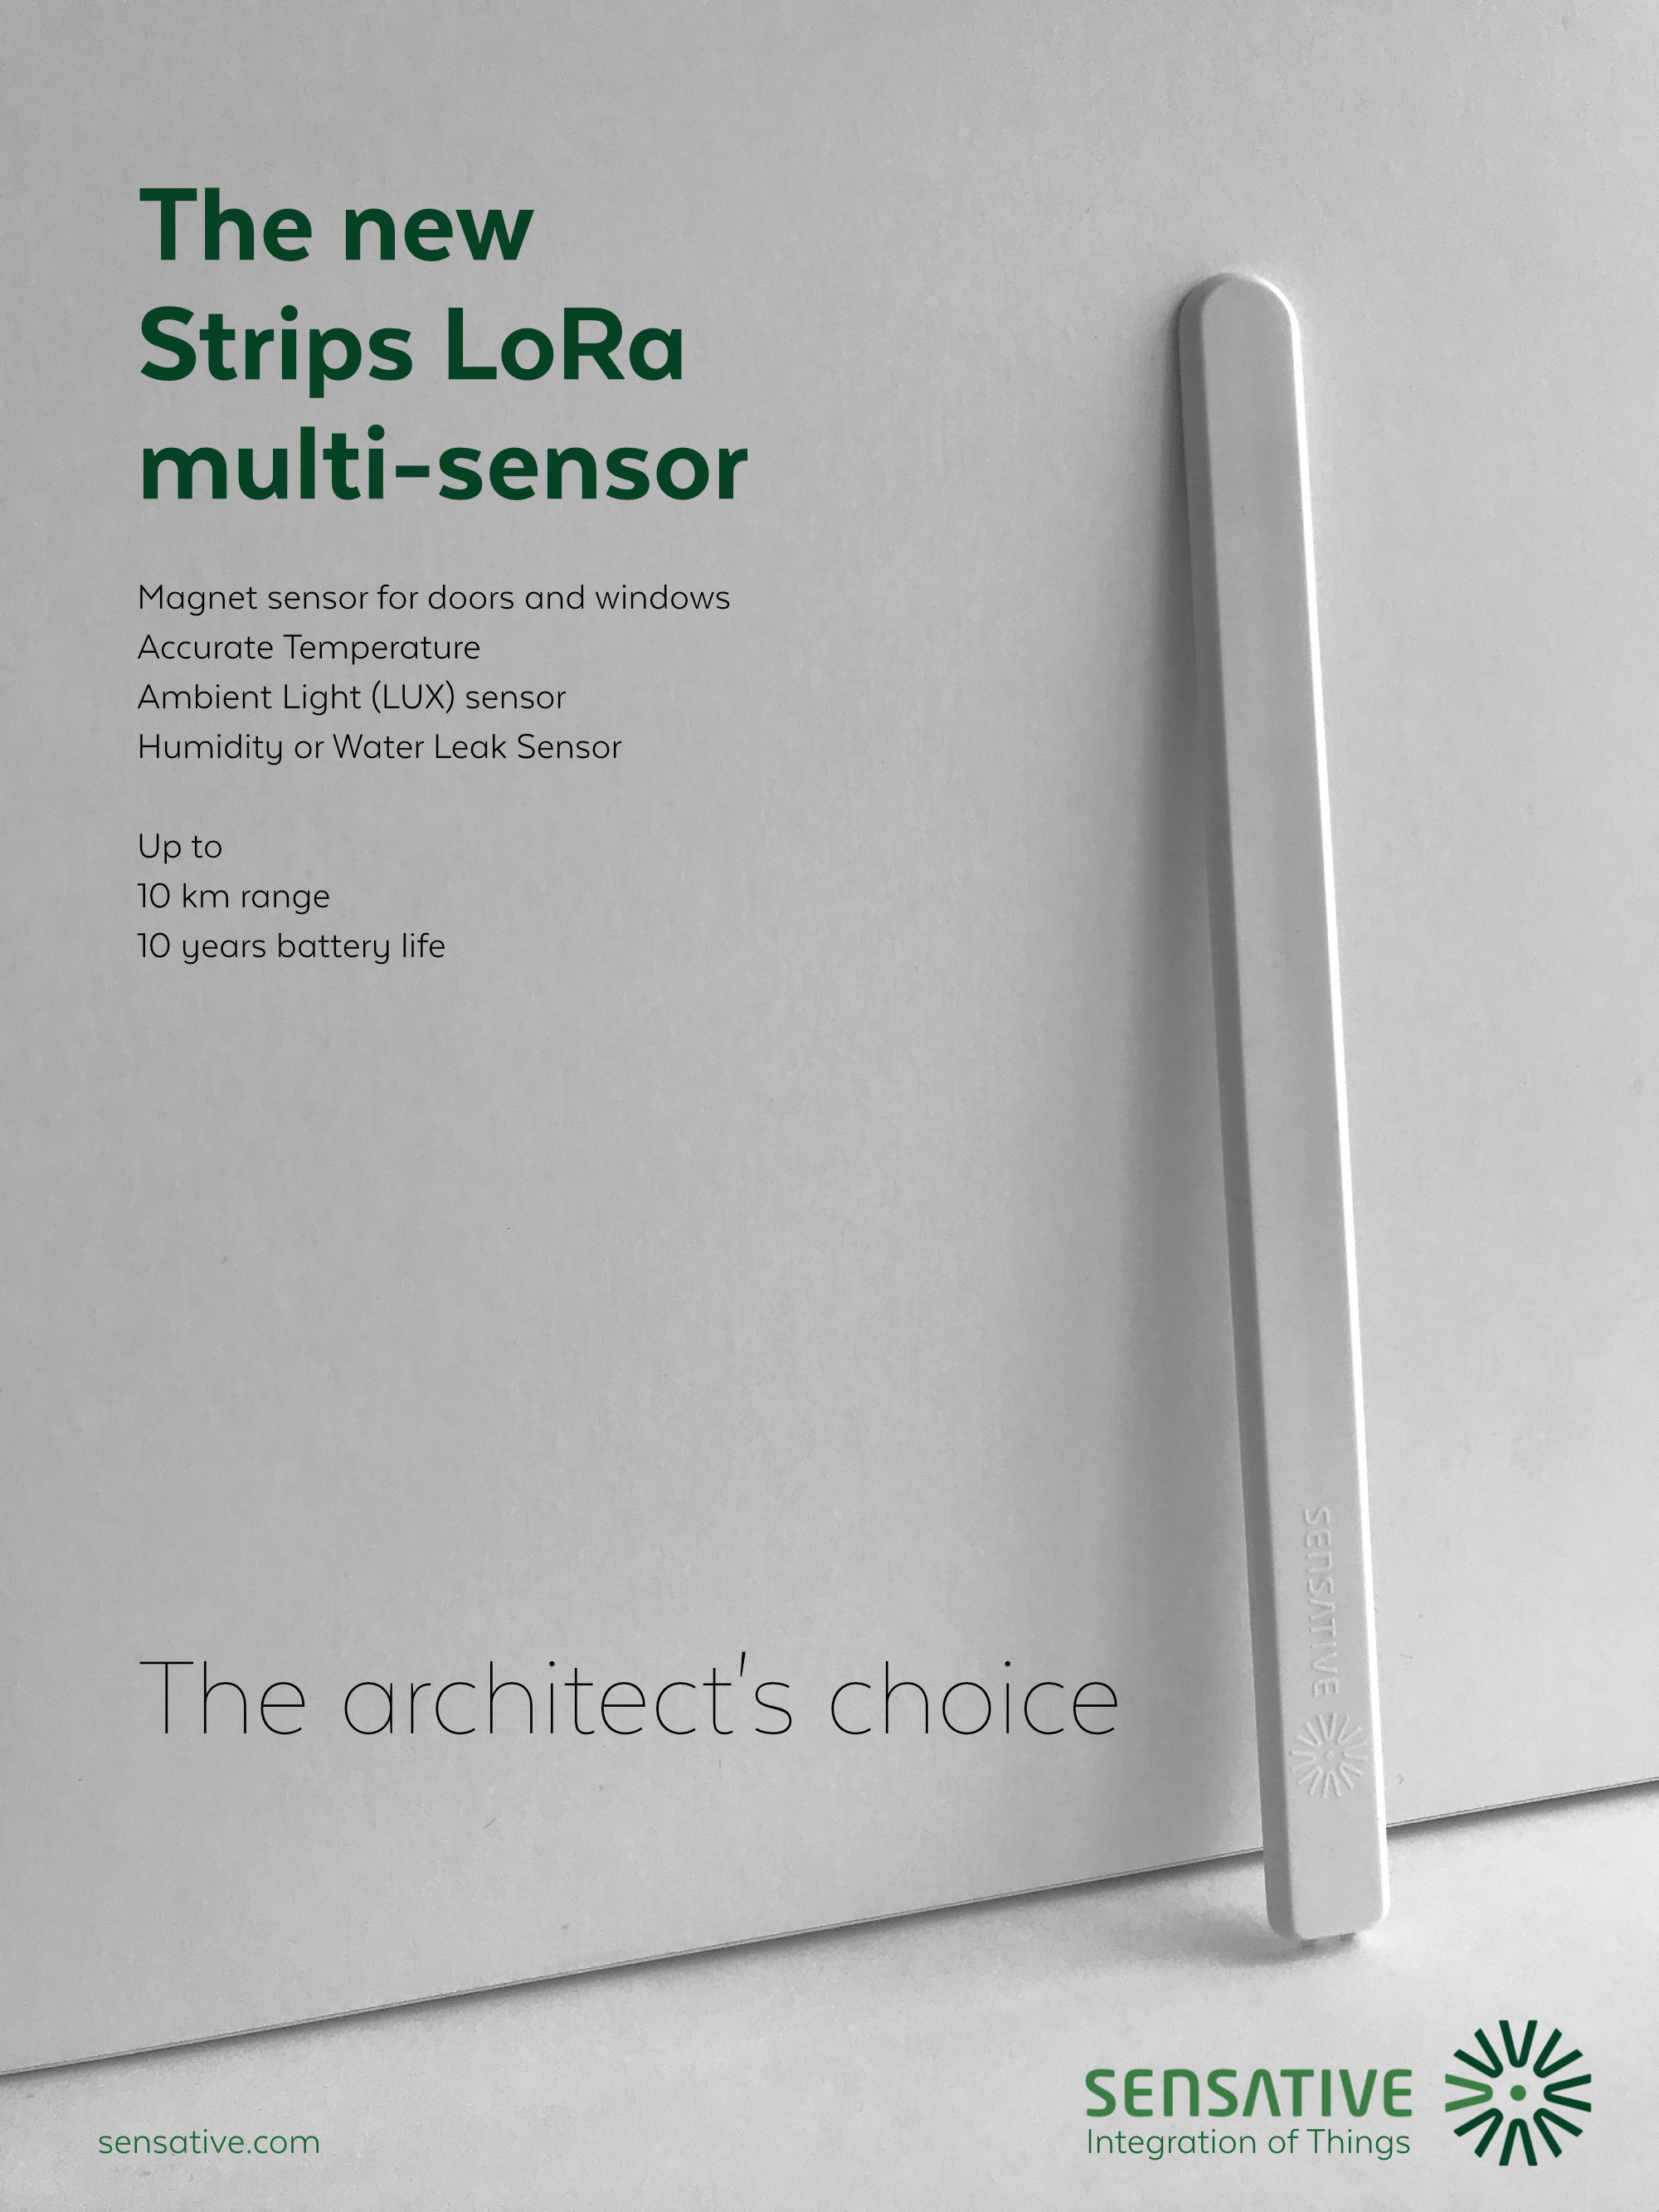
With its long battery life of up to 10 years, up to 10 km (6 miles) range, and high quality for both in & outdoor applications, it is the ideal sensor for any professional IoT application. Strips Multi-sensor have multiple features addressing different use-cases.
The multi-sensor functionality means that the more you realize your own specific needs, the more value our sensors will bring to your company and its operations.
Strips Multi-sensor and model numbers for LoRaWAN family:
Strips Multi-sensor:
- Installer pack (EU): 13 01 001_191
- Installer pack (North America): 13 01 002_191
- Installer pack (EU): 13 01 001_192
- Installer pack (North America): 13 01 002_192
- Installer pack (EU): 13 01 001_193
- Installer pack (North America): 13 01 002_193
- Installer pack (EU): TBA
- Installer pack (North America): TBA
- Installer pack (EU): 13 02 001_191
- Installer pack (North America): 13 02 002_191
Editorial note: During 2021 we updated the product naming and functionalities and changed from 1) Strips MS-WL and 2) Strips MS-H to new product names 1) Strips Multi-sensor 2) Strips MS +Guard 3) Strips MS +Drip 4) Strips MS +Comfort. This was changed due to align the Strips LoRaWAN family product names with the Z-Wave 700 series product names.
Strips Multi-sensor features
- Capacitance sensor
- Temperature sensor (+/- 1,0°C accuracy)
- Sensor memory
- Time-based reporting
- Deviation based reporting
- Alarms
- Weather protected
- Supports +Switch
- Suitable for in or outdoor use
Strips MS +Guard
With its long battery life of up to 10 years, up to 10 km (6 miles) range and high quality for both in & outdoor applications it is the ideal sensor for any professional IoT application. Strips MS +Guard is a multi purpose door and window sensor with a magnetic contact sensor that also measures temperature, along with capacitance.
The multi-sensor functionality means that the more you realize your own specific needs, the more value our sensors will bring to your company and its operations. Implementing MS +Guard sensors is a great choice for stepping into the modern world of IoT and PropTech, energy optimization, automation, convenience services, and property protection.
Strips MS +Guard profile
- Magnetic contact sensor
- Tamper alert
Also includes
- Capacitance sensor
- Temperature sensor (+/- 1,0°C accuracy)
- Sensor memory
- Time-based reporting
- Deviation based reporting
- Alarms
- Weather protected
- Supports +Switch
- Suitable for in or outdoor use
Strips MS +Drip
Strips MS +Drip is an innovative, ultra-thin, and wireless multi-sensor with water leak detection for LoRaWAN, developed for smart IoT applications such as building monitoring and operations. MS +Drip is excellent at detecting any water leakage and its slim and sturdy design makes it perfect for concealed mounting in small spaces. With a battery life of up to 10 years, you can set it and forget it.
Apart from water leakage, MS +Drip provides temperature, as well as magnetic open/close detection (suitable for applications such as windows and doors). This multi-functionality means that the more you realize your own specific needs, the more value our sensors will bring to your company and its operations.
Basic applications for MS +Drip is to alert in case of a water leak, and the temperature sensor can be used to alert if there is a risk of freezing pipes. Integrated to a smart building system and other IoT devices, MS +Drip can automatically turn on/off water flow or sound an alarm to alert the user about the water leak.
Calibration
When Strips +Drip is joined to the network, it automatically performs an initial calibration. A second calibration is performed two hours after the device is joined. During calibration, the current state is recorded as the dry state. Therefore, it is advisable not to grip Strips +Drip with your hand or touch the backside during the join process, as this may interfere with accurate calibration.
Important:
Do not test the device with water during the first two hours after joining. Doing so will interfere with the second calibration and may result in incorrect operation, preventing the device from detecting and reporting future leakage alarms.
If needed, Strips +Drip can be manually re-calibrated any time after the second calibration by sending the command 011900000000 to port 11.
To verify a successful calibration, check the flood value reported by the device.
Strips MS +Drip profile
- Water leak (capacitance)
- Temperature (+/- 1,0°C accuracy)
Also includes
- Magnetic contact sensor
- Sensor memory
- Time-based reporting
- Deviation based reporting
- Alarms
- Weather protected
- Supports +Switch
- Suitable for in or outdoor use
- Includes Strips +Drip baseplate for water-leak detection
Strips MS +Oil
Introduction
The Oil Sensor is based on +Drip but can both detect liquids that are water-based and hydro-carbon based, and in short term differentiate between the two using two different measurement methods. The sensor includes a use-once metal+oil absorbing membrane which once exposed to liquids requires replacement.
How it Works
The sensor has two sets of capacitive sensors, measuring electromagnetic conductivity and permittivity of their immediate surroundings. The sensors in the first set are located on the edges of the device and will react to liquids near the device edges (even touch may cause it to react). This change triggers a Flood alarm.
The second set of sensors are located near the center of the device where it is protected by an oil absorbing material and a metal foil which does not permit water or touch to interfere with the sensor. Should this material soak up oil or other carbon based liquids it will change the electromagnetic permittivity of the absorbent material and thus trigger the Oil alarm.
Installation Requirements
The sensor has a temperature operating range of -20C to +60C. Exceeding these temperature limits may cause it to temporarily or permanently malfunction. This means that care should be taken to not expose it to very hot or cold liquids and surfaces when considering where to place it.
Physical placement
The sensor is intended to be mounted with an accompanying installation bracket. The round edge contains the LoRaWan antenna and it should preferably not be mounted directly on metallic surfaces (doing so will decrease the range of the antenna).
The device has oil absorbing material along the long edges and once oil or water reaches these edges the oil will be soaked into the material or water will collect along the edges and will set of the respective alarms. Hence place the unit so that a potential oil leakage will soak in along the edges of the unit.
Activating (Joining) the Device
Once installed and in dry conditions the device can be activated. First, follow the manual on joining the unit to the LoRaWAN network.
Once the physical installation is concluded the device needs to be calibrated and oil sensing activated.
Calibration
- Mount Strips +Oil on its intended surface
- Send the downlink 030030 (hex) / AwAw (base 64) to LoRaWan port 11. This step is optional but should be performed every time the unit has been moved to a new environment.
Activating oil sensing
This can be done by following instructions and downlink data on the Sensative Strips Configuration Tool. The pre-configured and lab-tested profiles are:
- Oil and liquid detection
- Oil, liquid and temperature detection
Oil and liquid detection
This profile enables the device to detect and report presence of liquid and oil.
Oil, liquid and temperature detection
This profile enables the device to detect and report presence of liquid, oil or abnormal operating temperatures.
Operation
In normal operation without detecting deviations on liquids, oil or temperature the device will only send one uplink message per 24 hour period in order to inform that it is online and to determine that it has network connectivity..
Once an alarm is triggered and is active either an Oil alarm or a Flood alarm will be sent depending on the measured condition over the LoRaWan network. The alarm is confirmed meaning it will resend the alarm until it gets an acknowledgement from the server.
As a visual cue, the unit will blink its LED on a regular interval in an orange color should the Oil alarm be triggered.
The uplink data for the Oil Alarm is one of the following values
| Ch (Decimal) | Decimal | Change alarm (Bits 1-2) | Calibrated alarm (Bit 0) | Interpretation |
|---|---|---|---|---|
| 0x0f | 0 | 00 | 0 | No alarm and stable vs calibration |
| 0x0f | 4 | 10 | 0 | Measure increasing value but not exceeding calibrated value |
| 0x0f | 2 | 01 | 0 | Measure decreasing value but not exceeding calibrated value |
| 0x0f | 5 | 10 | 1 | Exceeding calibrated value and increasing measure |
| 0x0f | 3 | 01 | 1 | Exceeding calibrated value and decreasing measure |
| 0x0f | 1 | 00 | 1 | Exceeding calibrated value and stable measure |
Replacing Strips Exposed to Liquids, Aggressive Chemicals, or Extreme Temperatures
If a Strips has been exposed to aggressive chemicals or extreme temperatures, replace the entire Strips to ensure reliable operation. If the Strips has only been exposed to non-aggressive liquids or surface contamination, it can be cleaned and fitted with a new adhesive foil instead of being replaced. In environments with unusually high levels of airborne contaminants, such as gasoline fumes, oil mist, or moisture, regular inspection and replacement may be necessary. These substances can be absorbed into the sensor assembly over time and may affect sensor sensitivity.
Replace oil adhesive
- Carefully remove the adhesive strips from the mounting surface. Take care not to cause the plastic housing to separate from the PCB during removal. We recommend using dental floss and sawing gently between the mounting surface and the PCB to release the adhesive.
- Ensure that all residue from the previous oil-based adhesive has been removed, then clean the device using soap and water.
- Verify that the device is completely dry before continuing.
- Follow the instructions provided in the Strips Oil adhesive mounting guide
- Reinstall the device and carry out a new calibration.
Strips MS +Comfort
With its low power consumption and long battery life of up to 10 years, it is the ideal choice for any professional indoor IoT application. With the MS +Comfort’s precise measuring, you can get a great overview of the climate in your property. Maybe you want to keep the climate in your office optimal or want to keep a close eye on any changes in temperature and humidity in vulnerable areas such as cellars or attics.
Strips is a multi-sensor with multi-purposes, with humidity, temperature, and light (LUX) measuring, as well as magnetic open/close sensor (suitable for applications such as window or door monitoring). This multi-functionality means that the more you realize your own specific needs, the more value our sensors will bring to your company and its operations. Implementing MS +Comfort sensors is a great choice for stepping into the modern world of IoT and PropTech, energy optimization, automation, convenience services, and property protection.
The discreet design and easy mounting makes it the sensor of choice for architects and design conscious tenants.
Strips MS +Comfort profile
- Temperature (+/- 0,5°C accuracy)
- Light (LUX)
- Air humidity
Also includes
- Magnetic contact sensor
- Capacitance sensor
- Sensor memory
- Time-based reporting
- Deviation based reporting
- Alarms
- Supports +Switch
- Suitable for indoor use
- Includes Strips MS +Comfort mounting plate
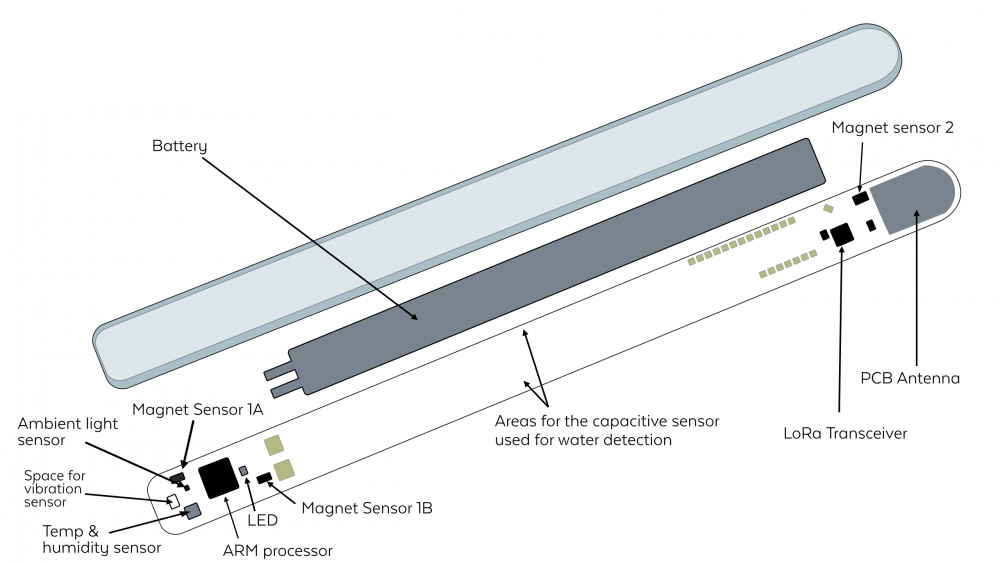
Hardware Description
Set up your Strips
Adding Strips to a LoRaWAN network
Joining Strips to your network
Joining Strips to your network automatically - Step 1A:
Strips comes in “transport mode”, when both of the magnets are attached the device is idle. When removing the magnets for the first time, the device will automatically send a join request.
Tip : Make sure the device is set up on your server before removing the magnets for the first time.
Joining Strips to your network manually - Step 1B:
If you have previously removed the magnets and would like to perform a “manual join”, take one of the magnets and touch it to the rounded edge 3 times, for 3 green LED blinks.
When the device has sent the join request, you will see an additional short green LED blink. After a few seconds, one long green LED blink confirms the add was succesful. Red blinks indicate a failed join request. See LED Behavior for more information.
After Strips is included in your network, the device is in default mode, and is only set up as a magnetic contact sensor. In order to configure the device and activate the sensor profile please see the Sensor Configuration instructions.
Configuration Strips
After joining your Strips to the LoRaWAN network, your device will be in default mode, and requires you to configure the device with your desired settings and reports, or use one of our pre-defined sensor “profiles”. Please follow the steps below, if you are having trouble or would like help configuring the device to behave the way you want, please submit a support request here
Configuration Strips - Step 1
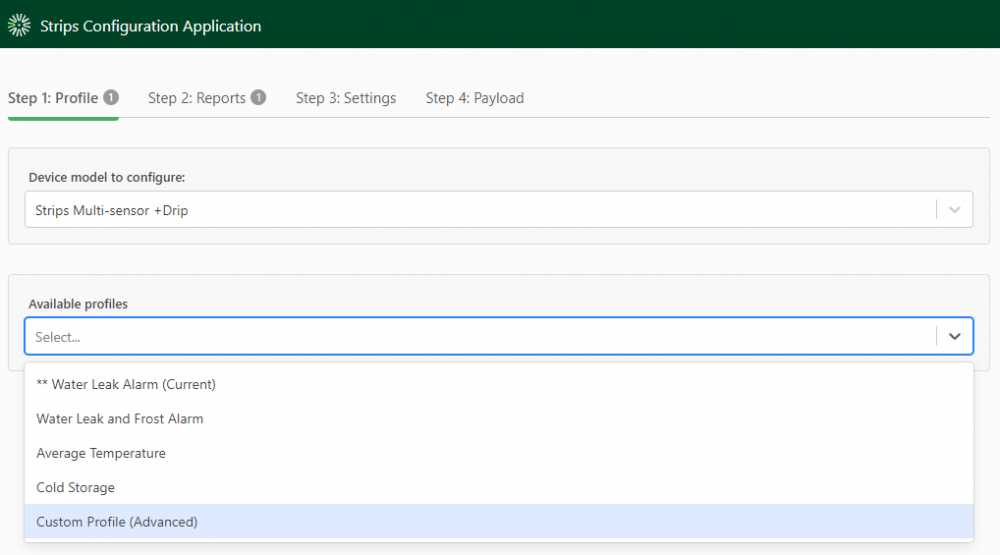
a) First, select the product you wish to configure.
b) Then, under “available profiles” select Custom Profile (Advanced), then click Select.
Configuration Strips - Step 2
In this step, we will review and select the available reports we want the sensor to send. To enable enable a report, check the box under “Enable”.

Configuration Strips - Step 3
In step 3, we will assign values to settings that relate to the reports we enabled in the previous step. The selected reports will automatically be set to default values unless otherwise changed.
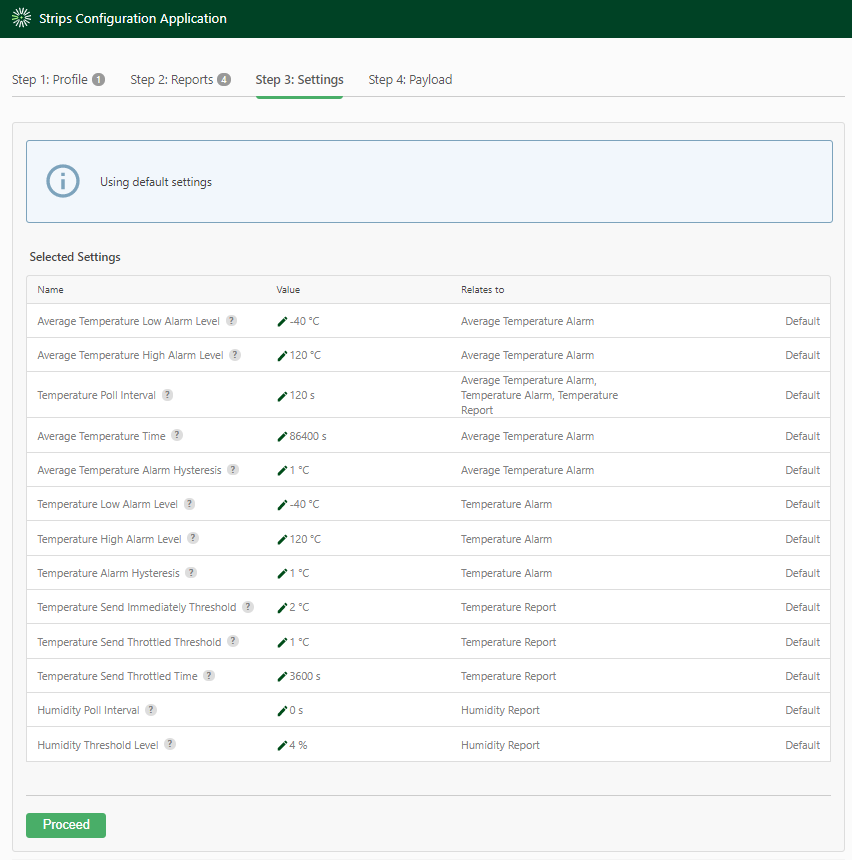
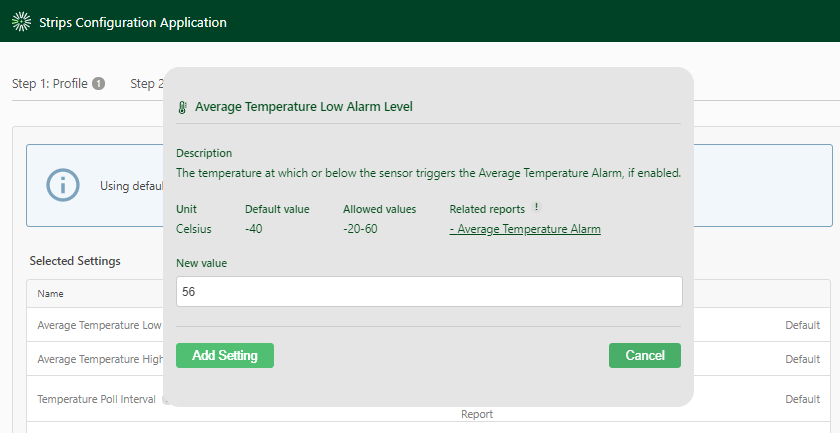
By clicking the pencil icon, you will be given a description of what the setting does, and have the option to change the value based on the allowed values. If you wish to change the setting, simply enter the new value and click “add setting”. After changing the desired setting values, click proceed.
Configuration Strips - Step 4
In this last step, we will be have an overview of the enabled reports, and which settings we have changed versus the default values, if you are using default values for certain settings, they will not be displayed in this step, only changed setting values.
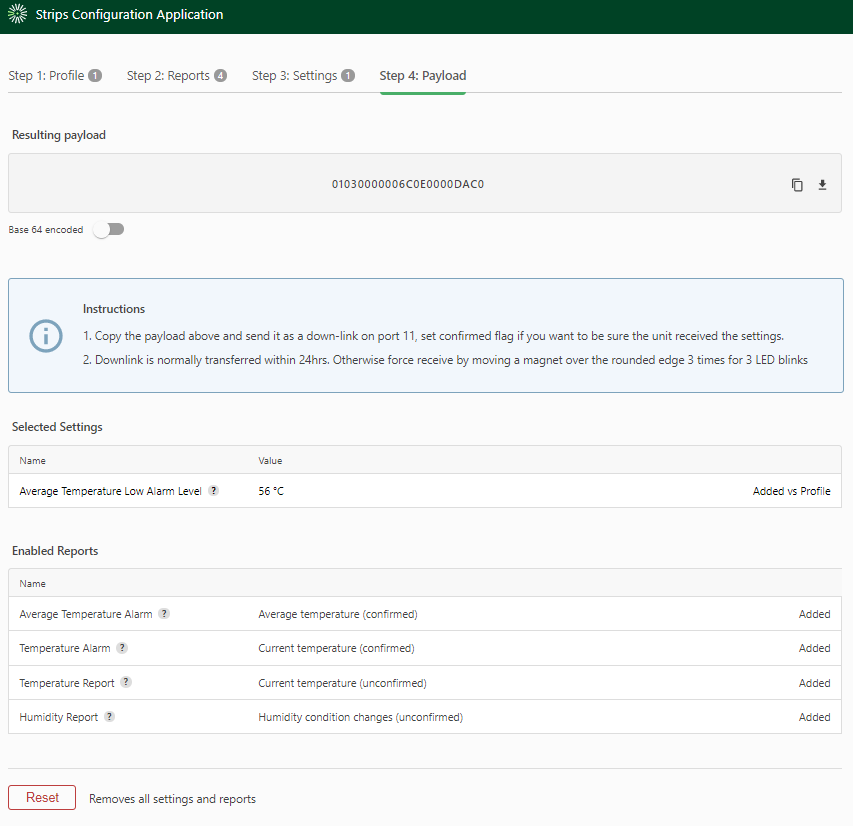
Once all settings and reports have been reviewed, simply copy the resulting payload and send a downlink via your Lora application server on port 11.
Strips is a type A device, so an uplink must be sent in order for the device to receive the new payload. To do this, take the magnet and touch it to the rounded edge 3 times for 3 green LED blinks. You can see a video example here. Strips does send a “keep alive” message every 24 hours (configurable) that can be used to accept new downlinks if you are not able to manually interact with the sensor.
Click here to go to Configuration Strips
Please follow the steps below, if you are having trouble or would like help configuring the device to behave the way you want, please submit a support request here
Configuring Strips with “Profiles”
Configuring Strips via the Configuration Tool
After joining your Strips to the LoRaWAN network, your device will be in default mode, and requires you to configure the device with your custom settings and reports, or use one of our pre-defined sensor “profiles”.
*Our sensor profiles are pre-defined and lab tested configurations that have been built with particular use cases in mind. If you wish to easily apply a sensor profile to Strips, please follow the instructions below.
Click here to go to Configuration Strips
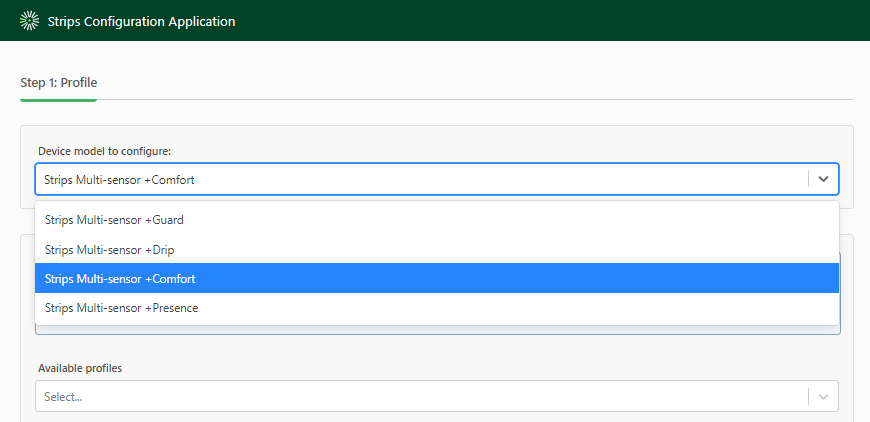
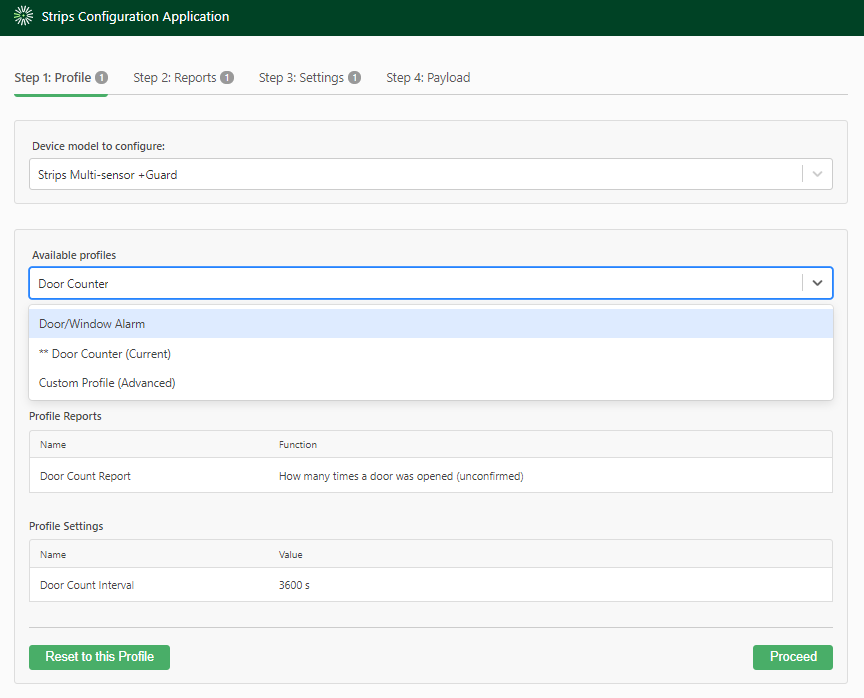
Configuring Strips with “Profiles” - Step 1.
First, select the product you wish to configure
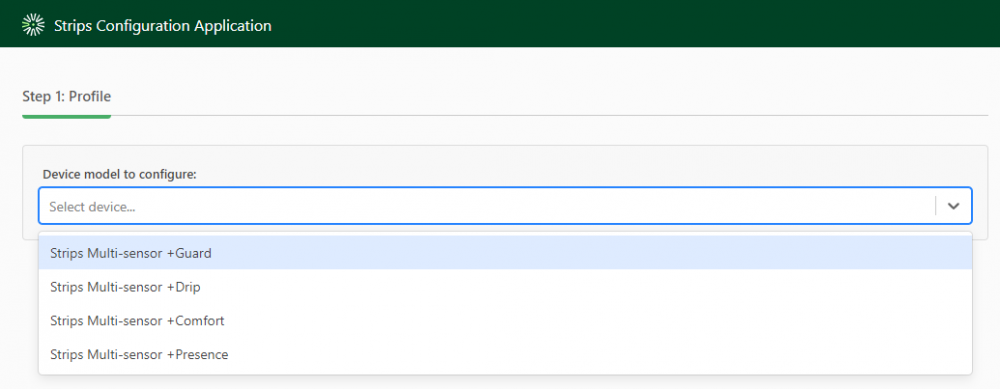
In the next step, you have the option to select a device “profile”. Profiles are pre-configured settings that can be used for particular use cases.

When clicking on a profile, you will see what settings will be used below.
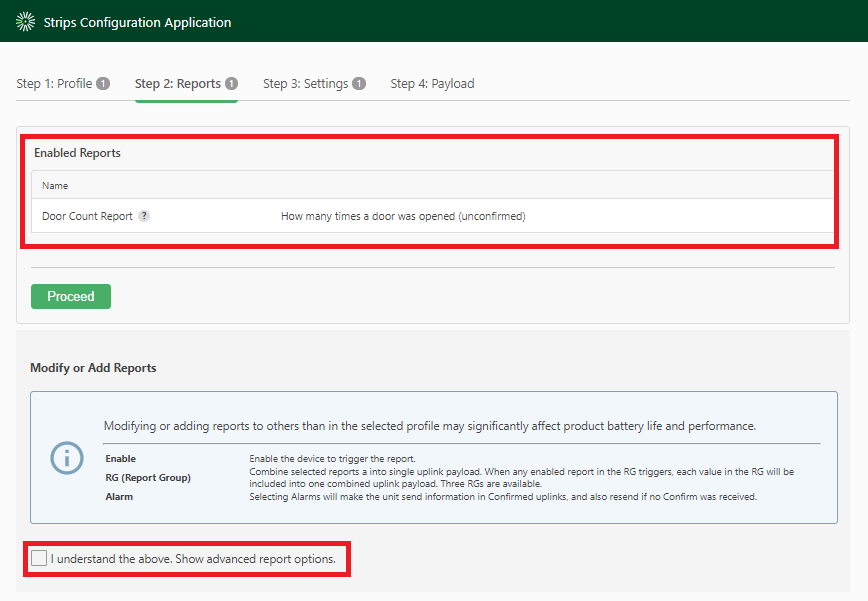
Configuring Strips with “Profiles” - Step 2
In step 2 we will review the profiles enabled reports. If you wish to add additional reports to your profile, check the box at the bottom of the screen and follow the steps 2 and 3 of Configuring Strips.
Click here to go to Configuration Strips
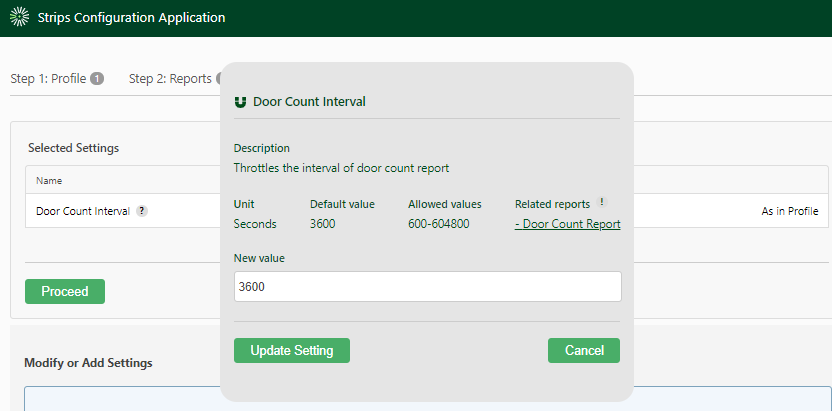
Configuring Strips with “Profiles” - Step 3
In step 3, we will have the option to change the values of settings that are a part of our profile. The selected reports will automatically be set to default values unless otherwise changed.
By clicking the pencil icon, you will be given a description of what the setting does, and have the option to change the value based on the allowed values. If you wish to change the setting, simply enter the new value and click “add setting”. After changing the desired setting values, click proceed.
Configuring Strips with “Profiles” - Step 4
*In this last step, we will be have an overview of the enabled reports, and which settings we have changed versus the default values, if you are using default values for certain settings, they will not be displayed in this step, only changed setting values.
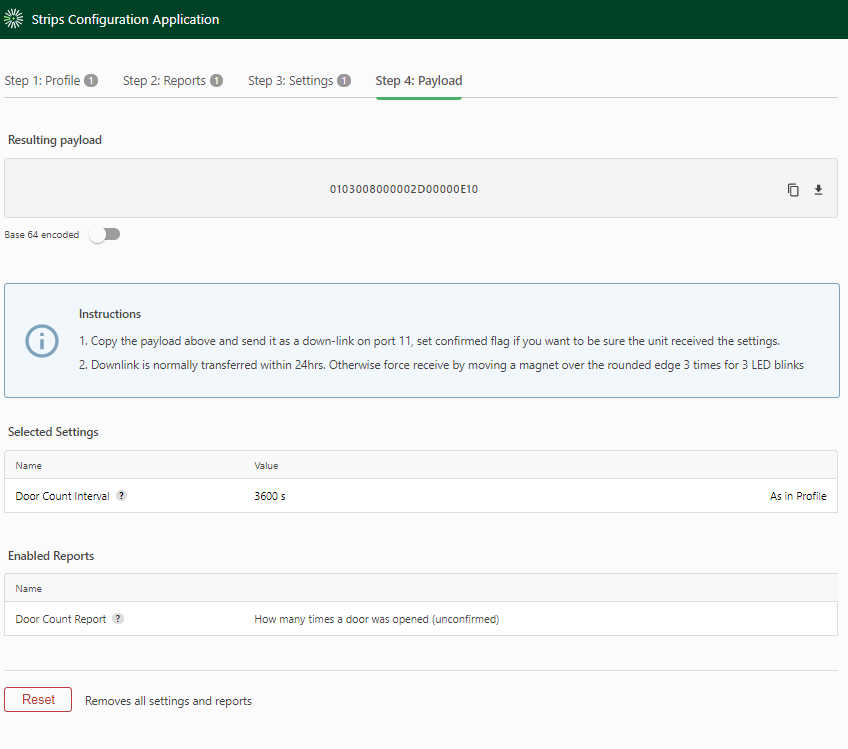
Once all settings and reports have been reviewed, simply copy the resulting payload and send a downlink via your Lora application server on port 11.
Strips is a type A device, so an uplink must be sent in order for the device to receive the new payload. To do this, take the magnet and touch it to the rounded edge 3 times for 3 green LED blinks. You can see a video example here. Strips does send a “keep alive” message every 24 hours (configurable) that can be used to accept new downlinks if you are not able to manually interact with the sensor.
Installation and mounting Guide
*Strips can be used in various installations and environments, please use this guide when installing Strips and its various components.
Pre-installation
When its time to install Strips, depending on your application, some measurements/alignments could be needed before permanent mounting with our adhesive backing.
Go to Permanent Mounting
First mark an area to install the sensor, then remove the brown pre-mounting tape on the back of the device :
Tip
Using regular tape also works great.
Permanent Mounting
Mounting Strips in its final location
Once the desired measurements/markings have been applied, its time to mount Strips in its final location. This step is easy as cleaning the application area, then removing the adhesive backing on Strips.
Installing the white mounting plate
Using and installing Strips wall-mount plate.
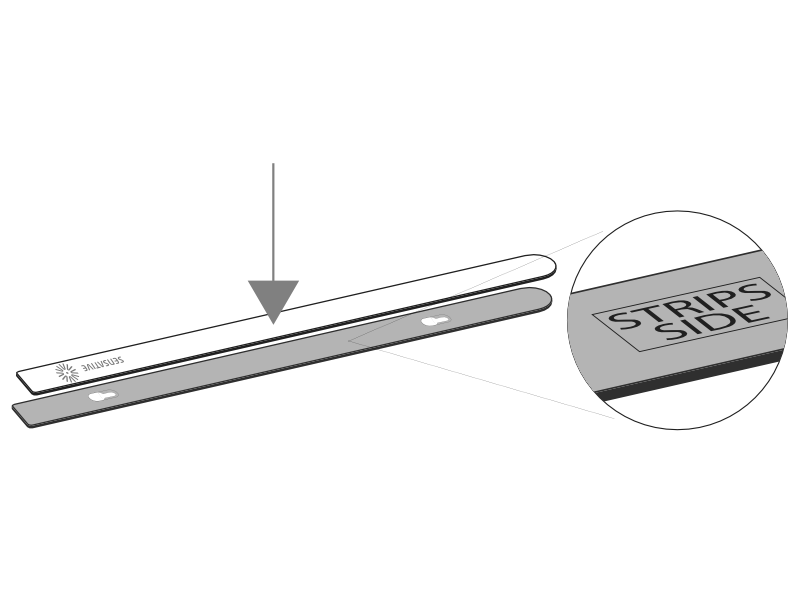
*Strips products can be used with our white “mounting plate”, this plate is used for different applications : Mounting Strips to the mounting plate allows the Strip to be moved to different locations, without having to remove it from its adhesive backing, you can also use the mounting plate when you need to raise Strips from a surface. Strips +Comfort comes with the white mounting plate included, however it is available upon request for any other Strips sensors.
*Just peel back the first layer of the adhesive backing, and place Strips on the side of the plate marked “Strips side”.
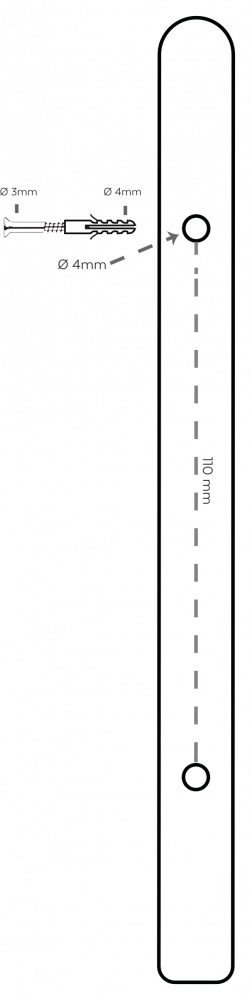
*If you are mounting the plate with screws, please see guide and measurements below.
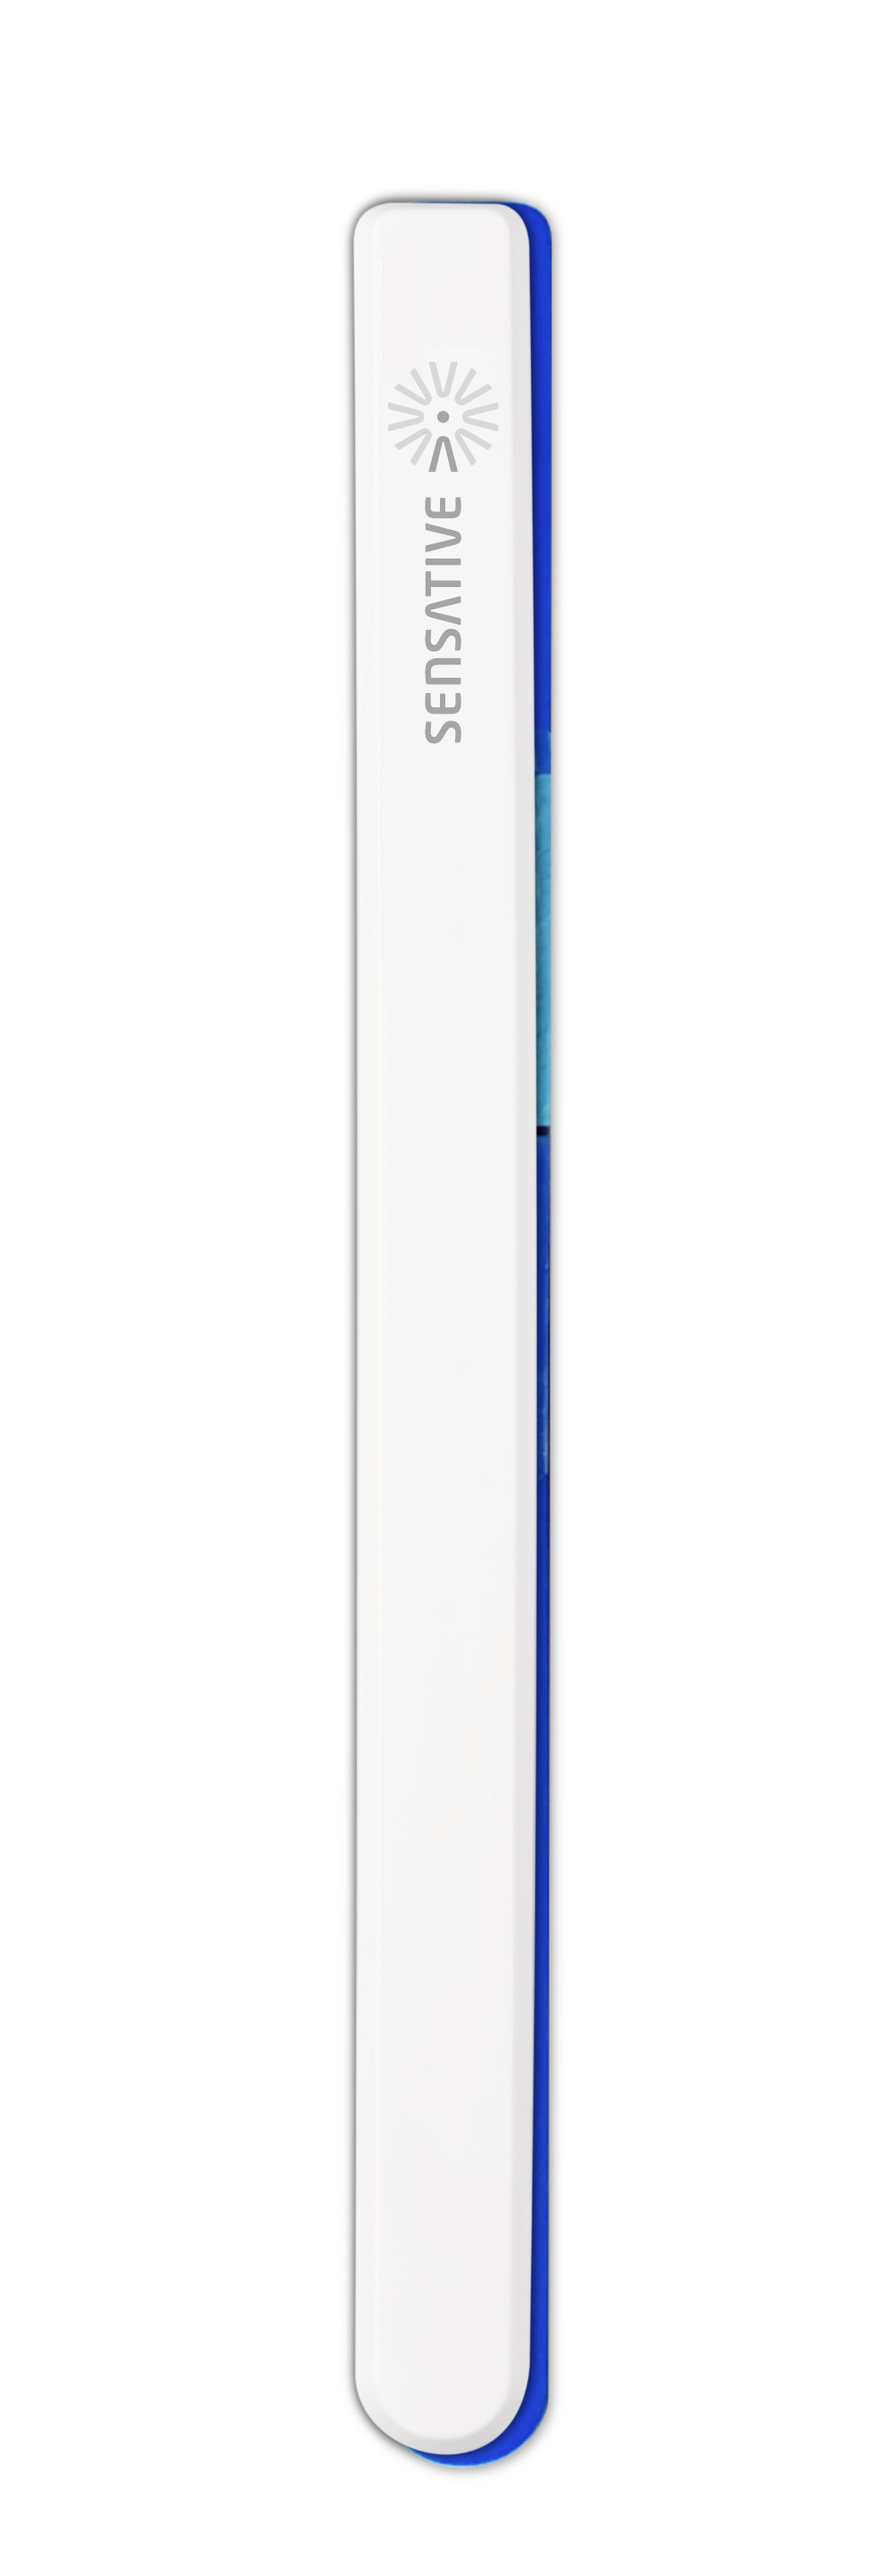
Strips MS +Drip leakage plate
Using the +Drip leakage plate
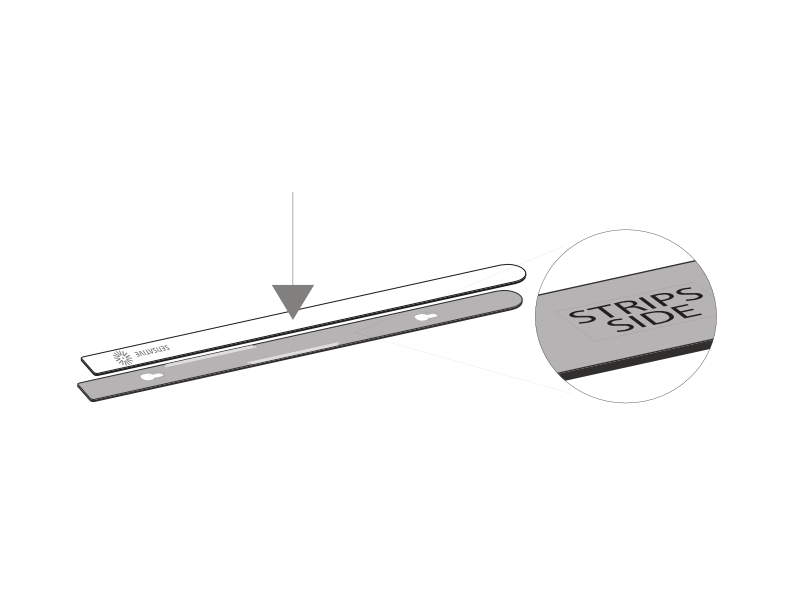
The water leakage functionality in Strips +Drip is achieved by two capacitance pads at the bottom of the sensor. For best results, +Drip comes with a blue mounting plate with 2 Wettex pads, in order to absorb water, making it easy for the capacitance pads to register any change.
Applying Strips to the leakage plate is as easy as removing the adhesive backing on Strips and placing it on the “Strips side” of the blue mounting plate.
Tip
When the sensor is mounted on the leakage plate, install it where the blue Wettex pads have the best chance to absorb water.
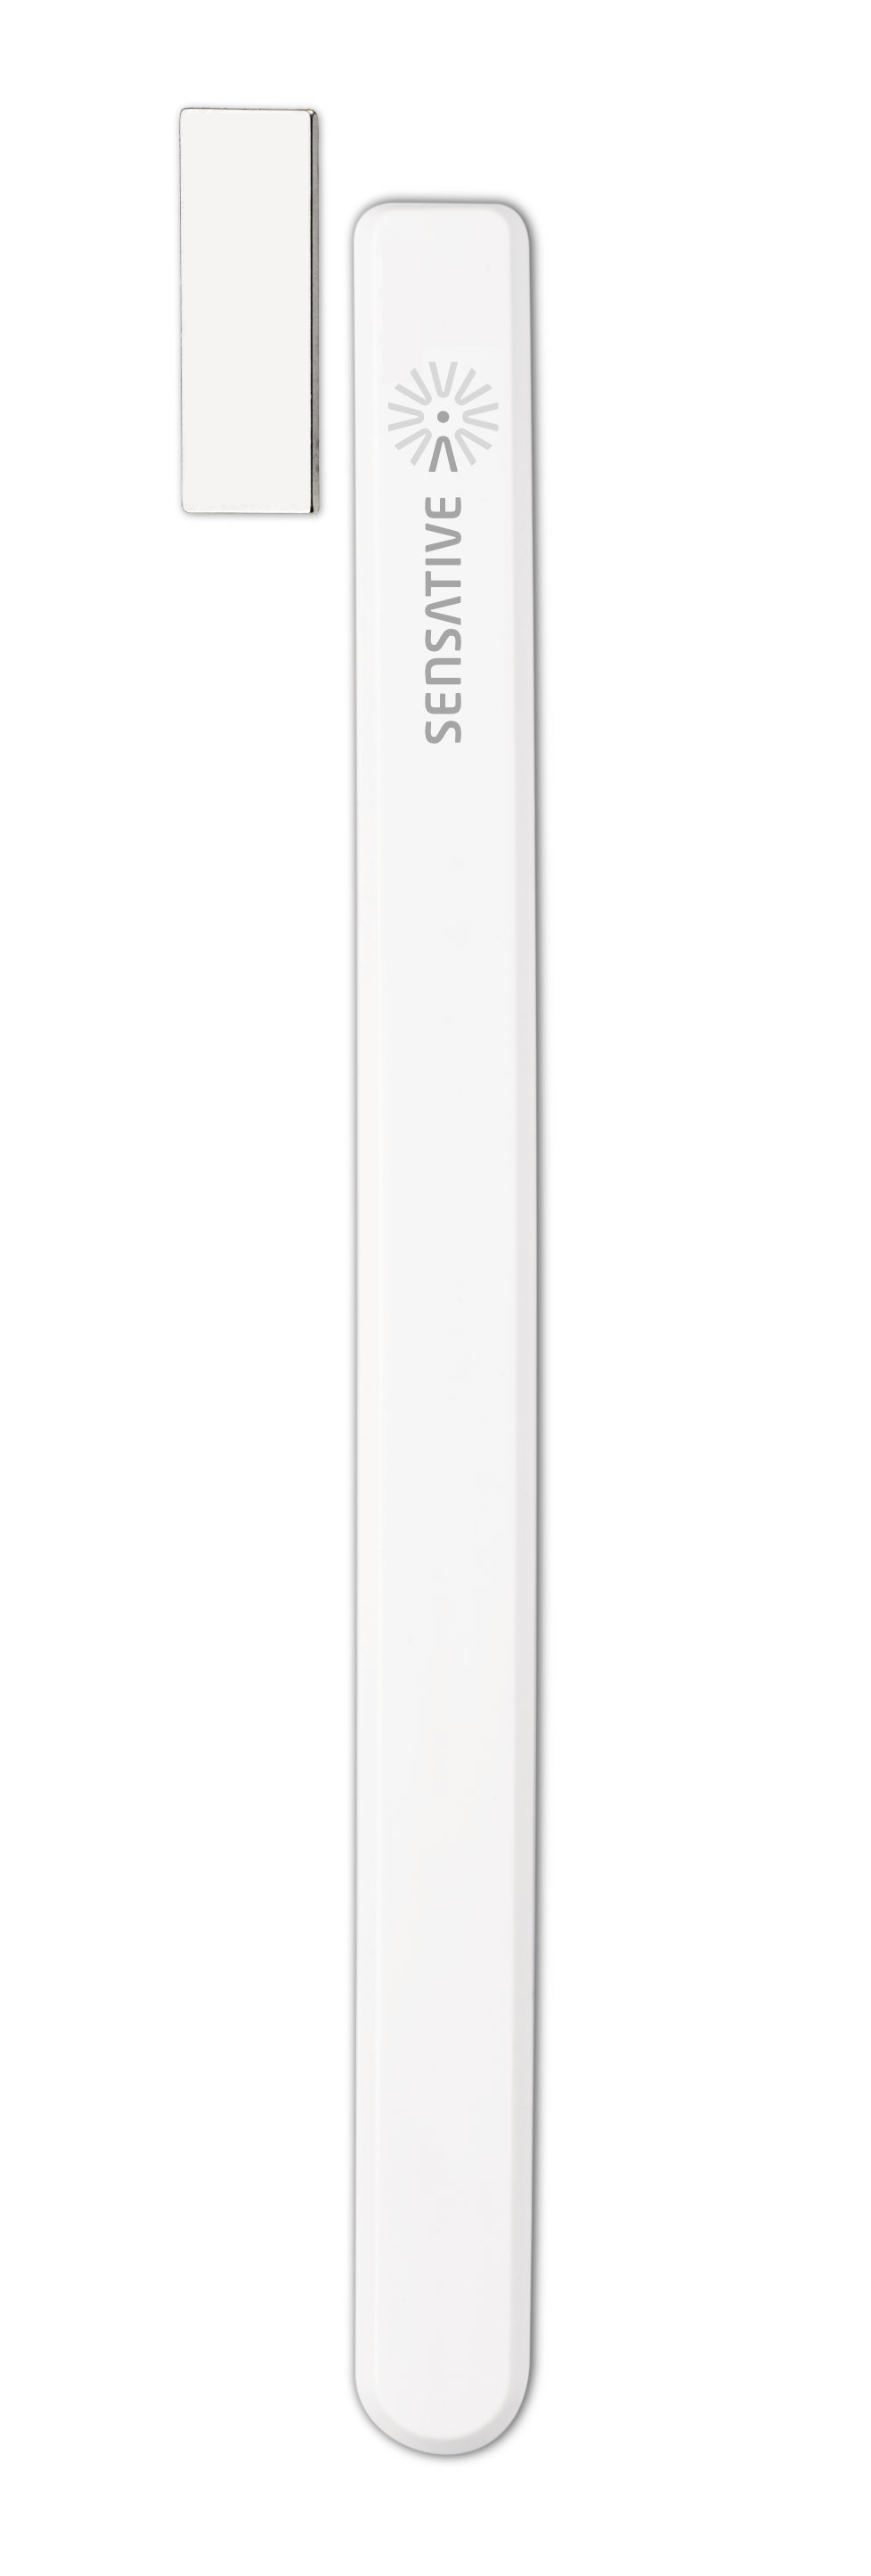
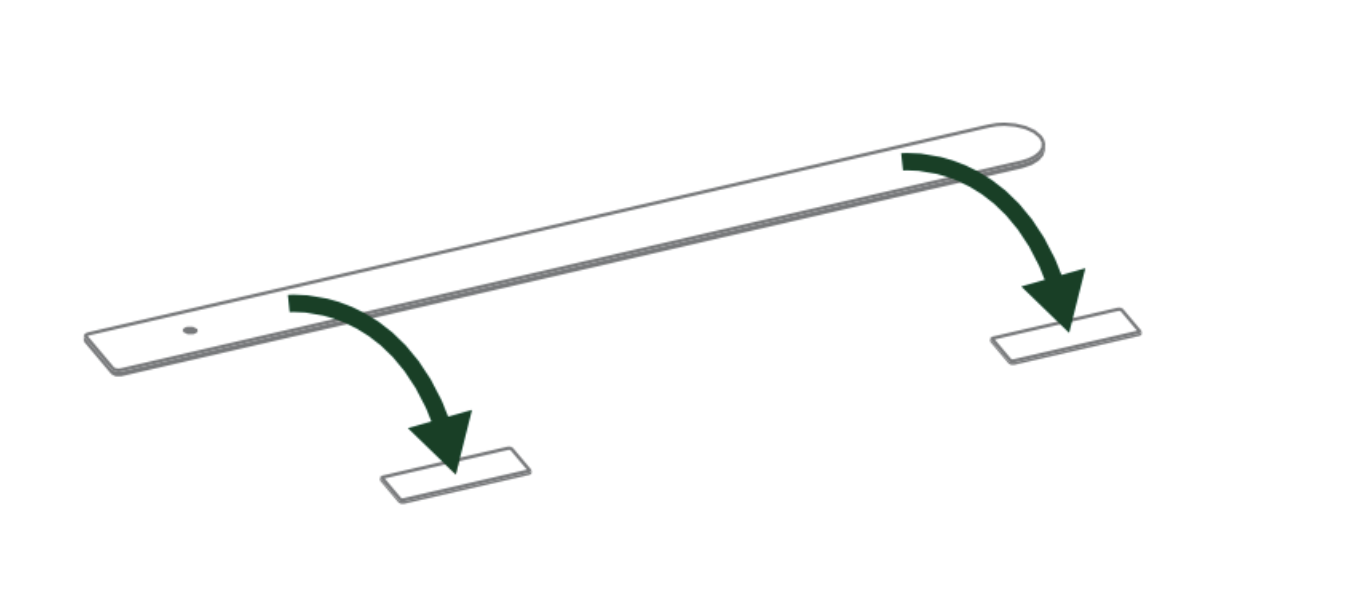
Mounting the magnet
Mounting magnet guideline
When using Strips’ magnet contact sensor, aligning the magnet in the correct manner is crucial. Please see below guide to ensure the correct positioning of the magnet when mounting.
*The Strips magnet can be mounted no more than 10mm from the top of the squared edge, above the logo.
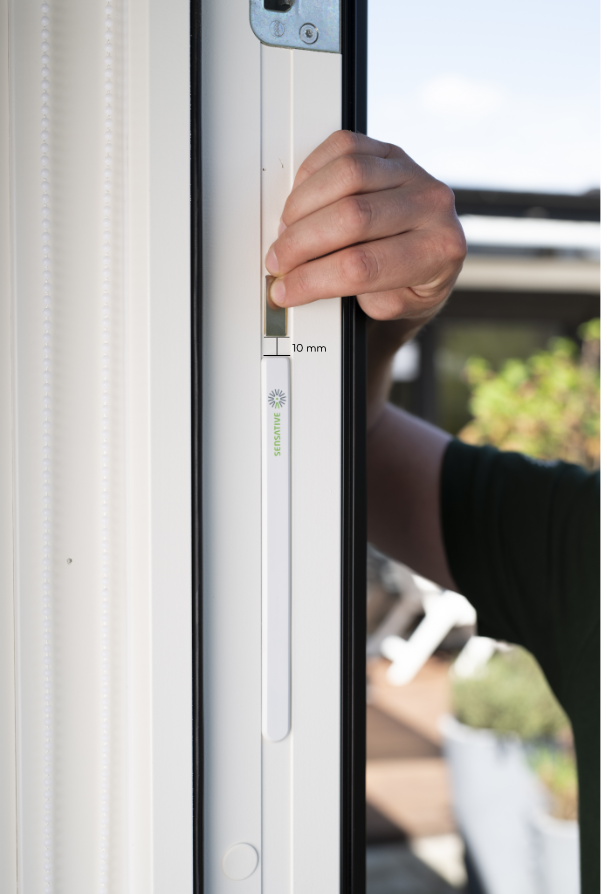
*And no more than 5mm on either side.

*Make sure to align the magnet in the correct manner, after marking the installation position, either use regular tape to secure the magnet and test… or just remove the adhesive from the magnet and place in the designated area. We suggest testing by opening and closing the door and checking for transmissions.
*For more detailed information on magnet positioning, please download our in depth mounting guideline.
Removing installed Strips
Removing Strips from its mounted position
*To easily remove Strips when the sensor is mounted with the adhesive backing, simply get floss or something similar, and gently draw it behind the back of the device and the surface it is mounted on and run the string up or down the length of the Strip, removing it from the surface.
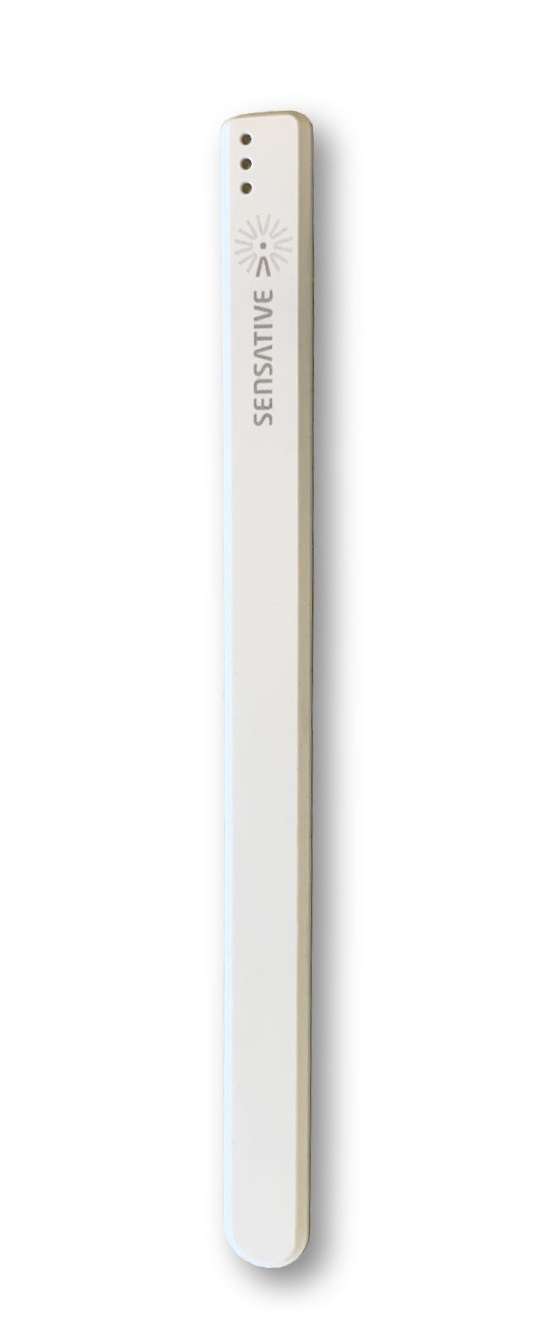
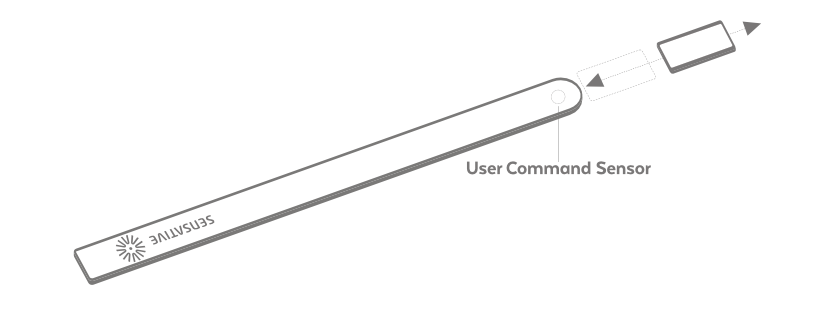
User Commands
Strips is designed to be interacted with via the “user command sensor” which is a magnet sensor located at the rounded edge of the device.
Simply touching the square magnet to the rounded edge and observing the LED blinks will allow you to issue user commands such as:
i) Reset
ii) Send open frame
iii) LED Behavior
Reset
Factory resetting Strips
To factory reset Strips, simply take the square magnet and touch it to the rounded end 3 times, on the 3rd touch keep the magnet in place for 10 seconds, until you see 2 long green LED blinks.
When resetting Strips, if joined to a network – the device will unjoin. When resetting Strips, configurations will NOT reset.
Manually send uplink
Manually sending an uplink
If you would like to manually force and uplink to your application, simply touch the square magnet to the rounded edge 3 times for 3 green LED blinks.
This command can be used to accept a downlink from the server, as Strips is a type A device.
LED Behavior
Strips signals user feedback with its LED light which has 3 different colors and can blink either short or long. The descriptions below explain when these happen and how they can be recognized.
Green: Occur in the following situations
- Magnet is detected on round edge (short)
- Successful Wake-up pattern (4th additional blink, short)
- Strips successfully receives ACK from gateway (confirmed messages, short)
- Strips resets (long)
- Strips boots up (long, happens after a reset or power-on)
Red: Occur in the following situations
- Join failed (5 short links in a row)
- Contact sensor trigged in Standby-mode (long blink)
- Report not sent because Strips is in Resend mode (2 short blinks)
- Resent confirmed message failed due to Strips being in Resend mode (5 or 3 short blinks in a row)
Orange/Yellow
This only occurs when Strips is sending a report (short)
Mixed
Strips is duty cycle restricted due to sending too many reports/alarms than the device or NS allows. A new attempt to send the message will occur shortly after. (short orange/yellow followed by a short red)
Important Information
Do not re-pack Strips with magnets attached after adding them to your system or removing the magnets
Documentations - Links
Please find more documentation online: