Connecting NB-IoT Devices
NB-IoT devices are added to Yggio as Generic devices. The Yggio side of this is short. The device side is not, because an NB-IoT device has to be told how to reach the mobile network before it can reach anything at all, and that part is configured with AT commands over a serial or Bluetooth console rather than a graphical interface.
This page covers the whole path, in the order you have to do it. The Yggio steps are the same for any manufacturer. The device steps use one widely used sensor family as the worked example, but the sequence, and most of the commands, apply to any device built on a common NB-IoT module.
A Generic device can report over MQTT, HTTP, CoAP, UDP or raw TCP, and which of those a given device supports is up to its manufacturer. This guide uses MQTT as its worked example, because it is the best supported path and by some margin the easiest to troubleshoot.
That split matters when you read the steps below:
- Getting the device onto the mobile network, meaning the SIM, the console and the attach, is the same work whatever protocol the device ends up speaking. Steps 3, 4 and 5 apply to every NB-IoT device.
- Everything about credentials, topics and the connection to Yggio is specific to MQTT. Steps 1, 2 and 6 look different for a device reporting over CoAP or HTTP, which authenticate and address themselves differently.
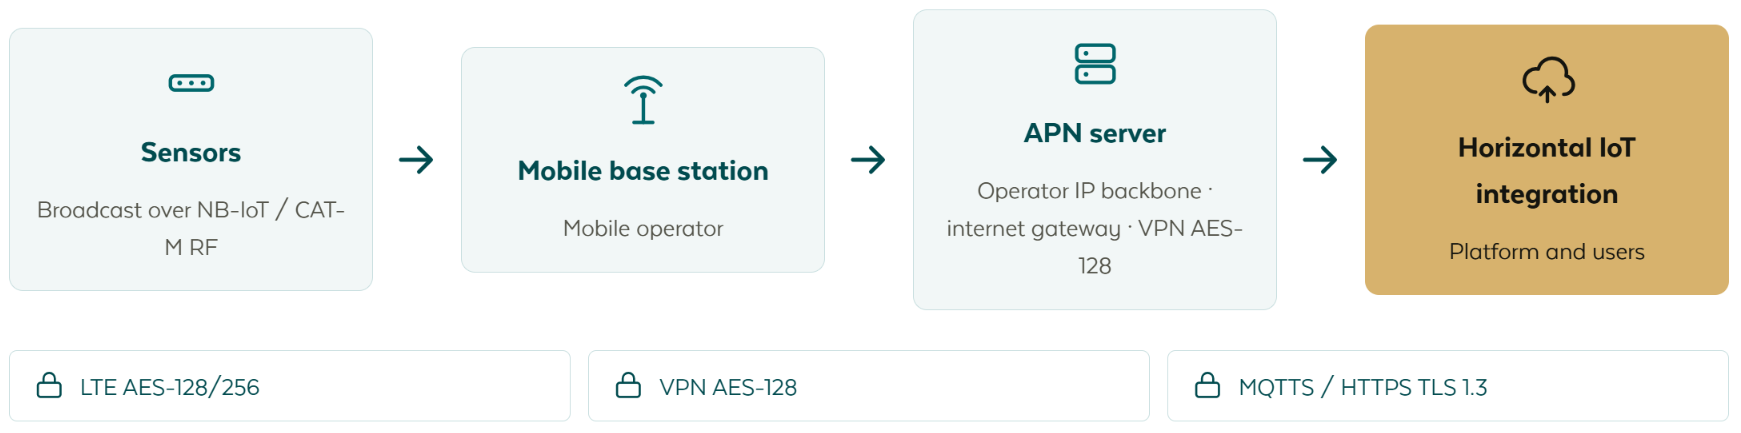
If a step does not behave as described, go to NB-IoT Troubleshooting rather than changing several settings at once.
Before you start
- An NB-IoT SIM card. This is not the same as a normal mobile broadband SIM, and a normal one will not attach.
- The APN, and any other connection details, from whoever supplied the SIM.
- A phone or computer that can reach the device console. Many devices use Bluetooth and a manufacturer app; others use a USB serial cable.
- The device manual, for the command set and the PIN or password protecting the console.
- Administrator rights in Yggio, since the credential set and the reserved topic are created through the API.
- The device's own identifiers, usually the IMEI and a console PIN, printed on the device or its packaging.
Set aside more time than you expect for the first device. Once one is working, the rest are quick, and most devices can load a saved configuration file rather than being typed in command by command.
Step 1: Create a credential set (MQTT)
The credential set is what the device authenticates with. Create it through the API:
POST /basic-credential-sets

{
  "username": "<a name for this device or group>",
  "password": "<a strong password>"
}
The response contains an _id. Keep it; the next step needs it.
{
  "_id": "<credential set id>",
  "username": "<a name for this device or group>"
}
Use a password you would be willing to put on a device that may transmit unencrypted. See Step 6.
Step 2: Reserve an MQTT topic (MQTT)
The reserved topic is what becomes the device in Yggio. Create one per device, and point it at the credential set from step 1:
POST /reserved-mqtt-topics

{
  "topic": "yggio/generic/v2/<your device id>",
  "basicCredentialsSetId": "<credential set id>"
}
One credential set can own several topics, which is convenient when a site has a handful of identical devices. Spell the topic carefully: a mismatch here is the most common reason data never appears, and it fails silently.
Step 3: Fit the SIM (all devices)
Cut the power before touching the SIM. Removing power with the device still energized risks damaging the modem.
- Open the enclosure.
- Disconnect the power jumper or battery, then wait. Press the device button a few times to discharge any remaining charge.
- Release the modem module if the SIM holder sits underneath it.
- Insert the nano SIM with the contacts facing the board. It should click and sit flush, with nothing protruding.
- Refit the module, taking care with plastic threads, and restore power.
Give the device a moment to boot before connecting to it.
Step 4: Reach the device console (all devices)
Devices with a Bluetooth console usually advertise for a short window rather than continuously. Typically either power-cycling the device or holding its button until the indicator flashes opens a window of about a minute.
Connect, then enter the PIN or password from the device documentation. The console will confirm it before accepting commands. Most devices then respond to a command that prints the current configuration, which is a good first check that you are talking to it properly.
Step 5: Attach to the mobile network (all devices)
This is the step that takes the time, and it depends on the SIM supplier and on which operators have coverage where the device sits. Work through it in order and change one thing at a time.
Set the APN. This is the access point the SIM connects through, and it comes from the SIM supplier. On many networks this alone is enough:
AT+APN=<apn from your SIM supplier>
If it does not attach, constrain the search. A modem left to scan every band and every operator can take a long time, or give up. Three settings help:
- Restrict the bands to the ones your operator actually uses locally, so the modem stops searching the rest. In Europe, bands 8 and 20 are common for NB-IoT.
- Increase how long the modem is allowed to keep trying before it stops.
- Select the operator explicitly, by its network code, instead of letting the modem choose.
The operator code is the country code followed by the network code, and your operator publishes it.
Confirm the attach. Most modules report signal strength continuously on the console, with one
value meaning "searching, not attached". Find that value in your manual, because it differs between
manufacturers, and wait for the reading to change before moving on. Everything after this depends on
it. On a Dragino D20S-NB or D23-NB the value is 99.
Check the SIM from the other end. Your SIM provider's web portal shows the SIM's status independently of anything the device tells you: whether it is activated, whether it has attached to a network, which network, and how much data it has sent. That is the fastest way to tell a device problem from a subscription problem, and it is worth opening before you start changing settings. A SIM that has never attached, or was never activated, will not be fixed by any command on the device.
Step 6: Point the device at Yggio (MQTT)
With the device on the network, tell it where to send data and how.
Yggio accepts several protocols, and MQTT is the recommended one. It uses somewhat more power than the lighter alternatives, but it is the best supported path and the easiest to troubleshoot.
Configure, in this order:
- The log or payload format. Yggio expects a flat JSON object rather than one containing arrays. Many devices have a setting for this and it is easy to miss.
- The protocol and payload type, meaning MQTT with a JSON payload.
- Restart the device, since protocol changes usually need one before they take effect.
- The publish topic, matching the reserved topic from step 2 exactly. Some devices also require a subscribe topic to be set even when nothing is sent back; check the manual, because on some models leaving it empty or wrong causes the device to stop responding.
- The server address and port. Port
1883is unencrypted. - The client identifier, username and password from the credential set in step 1.
- The reporting interval. Consider battery life against how fresh the data needs to be; a default of every two hours is common and often longer than necessary, or shorter than a battery budget allows.
On encryption. Port
1883sends data in clear text. Yggio also accepts TLS, but installing a certificate on a constrained device is considerably more involved than the rest of this procedure, and not every device supports it well. Decide deliberately: for a public bathing-water temperature this may be an acceptable trade, and for anything personal or operationally sensitive it is not.
Step 7: Confirm the data arrived
Trigger an upload, either by restarting the device, power-cycling it, or holding its button until the indicator confirms.
Reconnect to the console immediately and watch the log. A successful upload names each stage, so you can see how far it got: the address resolving, the connection opening, the login succeeding, the publish completing.
In Yggio, a device now appears under the reserved topic, of type Generic. Rename it to something
meaningful; the topic stays as it is.
Watch it arrive with MQTT Explorer
Before deciding anything is wrong, connect MQTT Explorer to the Yggio broker and subscribe to your topic, using the same credential set the device uses. You then see the message land at the broker the instant it arrives, which tells you exactly where the chain stops:
- Nothing in MQTT Explorer, and nothing in the device log either, means the device is not publishing. The fault is on the device or the network.
- Nothing in MQTT Explorer, but the device log claims a successful publish, means it is publishing somewhere other than where you are listening. Compare the topic and the credentials character by character.
- The message appears in MQTT Explorer but no device appears in Yggio. Now the fault is on the Yggio side, and that is the point at which support can help.
That last case is the only one where we can do anything useful for you, so it is worth reaching before raising a ticket. Everything above it is resolved faster with the device manual, the SIM provider's portal and NB-IoT Troubleshooting.
Step 8: Decode the payload
The device now delivers its own field names and its own conventions, which is where a translator comes in. Two things are usually worth doing even for a simple sensor.
The first is mapping the manufacturer's field onto the name Yggio expects. A device with several
inputs often numbers them rather than using the name Yggio looks for, so none of them is recognized
as a temperature. Copying the one in use to temperature makes it appear in previews, views and
charts like any other device. On a Dragino D20S-NB or D23-NB the three inputs are temperature1,
temperature2 and temperature3.
The second is handling the value a device sends when a probe is absent. Many report a fixed out-of-range number rather than nothing at all, which then flows into charts and averages as if it were real. Check your manual for what your device sends. A translator can turn it into an explicit status instead:
function translate (iotnode) {
  const raw = _.get(iotnode, 'temperature1');
  const value = Number(raw);
  const isValid = _.isFinite(value) && value >= MIN_VALID && value <= MAX_VALID;
  return {
    result: {
      temperature: isValid ? _.round(value, 1) : undefined,
      temperatureStatus: isValid ? 'ok' : 'invalid'
    }
  };
}
A sensible valid range also guards against nonsense readings from a sensor that has been tampered with, moved indoors, or left in the sun.
For writing and uploading translators, see Translator development.
Worked example: a Dragino D20S or D23-NB
These sensors use a common NB-IoT module and are configured over Bluetooth with the manufacturer's app. The console PIN is printed on the packaging, and the device advertises under its IMEI.
The commands below are the ones needed to get from an unconfigured device to data in Yggio, in the order they are used. The manufacturer documents the full command set in the Dragino NB-IoT configuration wiki, which is the reference for anything beyond this sequence.
Angle brackets mark the only values you have to substitute. Everything else is entered exactly as written.
Part 1: get on the mobile network
Connect over Bluetooth, enter the PIN, then:
AT+CFG
AT+APN=<apn from your SIM supplier>
AT+CFG prints the current configuration, which confirms the console is accepting commands.
AT+APN is the one setting that is always required.
On many networks that is enough. Where it is not, constrain the modem's search rather than letting it scan everything:
AT+QBAND=2,8,20
AT+CSQTIME=10
AT+COPS=1,2,"<operator code>"
AT+QBAND=2,8,20searches two bands, 8 and 20, in that order. The leading2is the count, not a band.AT+CSQTIME=10allows ten minutes to attach instead of giving up sooner.AT+COPS=1,2,"<operator code>"selects one operator manually rather than automatically. The1means manual, the2means the code is numeric, and the code itself is the country code followed by the network code, for example24001. Your operator publishes theirs.
Watch the console. While it prints signal strength 99 the modem has not attached. When that
number changes, it has, and only then is it worth continuing.
Part 2: point it at Yggio over MQTT
AT+CLOCKLOG=1,65535,0,0
AT+PRO=3,5
ATZ
AT+CLOCKLOG=1,65535,0,0produces a flat JSON payload, without the arrays Yggio will not read.AT+PRO=3,5selects MQTT as the protocol and JSON as the payload format.ATZrestarts the device. The protocol change does not take effect until it does.
Reconnect after the restart, then enter the connection details:
AT+PUBTOPIC=yggio/generic/v2/<your device id>
AT+SUBTOPIC=yggio/generic/v2/<your device id>/subtopic
AT+SERVADDR=staging.yggio.net,1883
AT+CLIENT=<credential set id>
AT+UNAME=<credential set username>
AT+PWD=<credential set password>
AT+TDC=3600
ATZ
AT+PUBTOPICmust match the reserved topic from step 2 exactly.AT+SUBTOPICmust be the publish topic with/subtopicappended. Nothing is ever sent back on it, but leaving it empty or setting it equal to the publish topic makes the device stop responding.AT+SERVADDRtakes the host and port.1883is unencrypted.AT+CLIENTis the credential set_idfrom step 1, not its username.AT+TDC=3600reports hourly. The factory default is often7200, every two hours.- The final
ATZrestarts the device, which triggers an upload.
Reconnect immediately and watch the log. A working device names each stage as it passes: the address resolving, the connection opening, the login succeeding, the publish completing.
Two quirks to know in advance
The subscribe topic requirement above is the first, and it is easy to lose an afternoon to because the device simply stops answering.
The second is that an input with no probe attached reports -409.5, which is below absolute zero
and therefore a sentinel rather than a reading. The three inputs are temperature1, temperature2
and temperature3, so a translator is what turns the one you use into temperature and the
sentinel into a status.
For everything confirmed on this hardware, see device-specific behaviour.
Where to go next
- NB-IoT Troubleshooting when a step does not behave.
- IoT Nodes and Network Protocols for the Generic device type and the other protocols it accepts.
- Network technologies for how NB-IoT compares with the alternatives.
- Sensative support if you are stuck on the Yggio side.