Hubitat (Z-Wave and Zigbee)
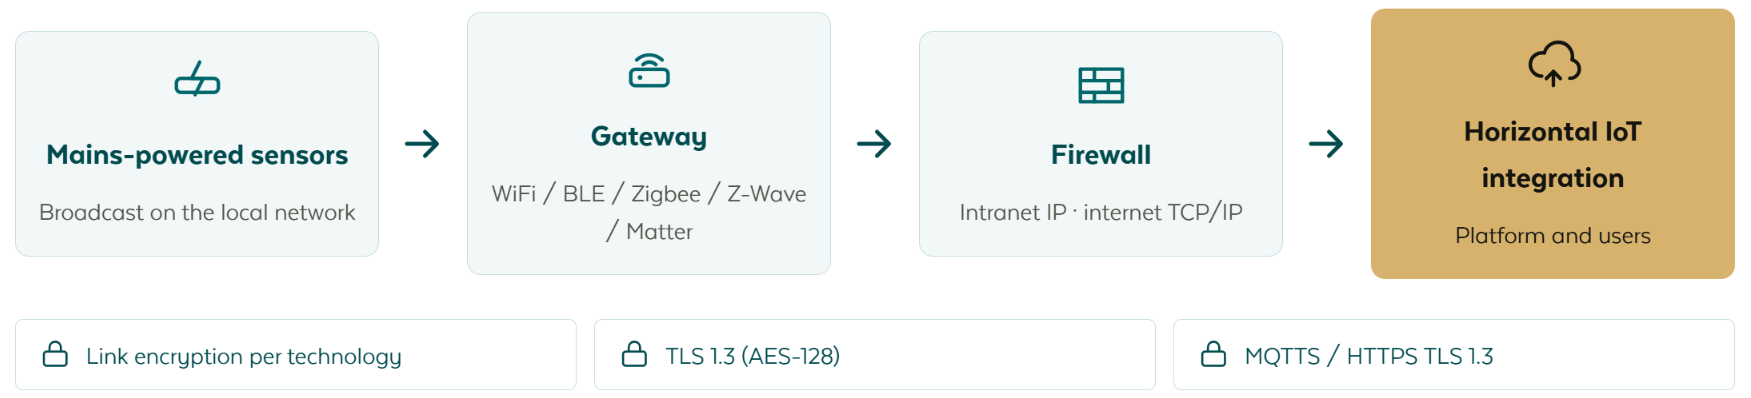
A Hubitat hub brings Z-Wave, Zigbee, Matter, Thread and Lutron devices into Yggio through a single connector, in both directions. The hub runs locally and needs no cloud subscription of its own, because Yggio is the cloud backend.
What the hub brings in
A Hubitat hub carries its own radios, so connecting one brings every protocol it speaks into Yggio at once, as ordinary devices:
| Protocol | Notes |
|---|---|
| Z-Wave | Sensors, relays, dimmers, locks |
| Zigbee | Sensors, plugs, lighting |
| Matter | Over Wi-Fi and Ethernet |
| Thread | Matter devices on a Thread network |
| Lutron | Through Hubitat's own integration |
| LAN and cloud devices | Anything else Hubitat reaches, through its own or community drivers |
Yggio needs no radio and no integration per protocol: the hub handles the protocol, Yggio handles the data. A Z-Wave door sensor and a Zigbee plug arrive as devices like any LoRaWAN sensor, with the same fields, views, rules and reports. The link runs both ways, so a rule in Yggio can switch a relay or set a dimmer level, and the new state comes straight back.
No cloud subscription
The hub can be bought on its own and run without the manufacturer's cloud service, which means no recurring subscription for the cloud side. It works locally, and Yggio is the cloud backend: remote access, history, dashboards, rules, reports and access rights all come from Yggio rather than from a second cloud account.
That also keeps the home or building automation working when the internet is down, since the hub keeps running locally and reconnects to Yggio when the link returns.
Setting it up
This guide covers setting up the Hubitat integration end to end: installing Sensative's app and driver on the Hubitat hub, choosing which devices to share, and creating the credentials the hub needs to reach Yggio.
For creating the connector itself, see the Hubitat Connector.
Please note that this guide is divided into two main parts: the Hubitat User Interface and the Yggio User Interface. Both parts are interrelated and necessary to get the integration working.
Hubitat User Interface
I. Download and Setup Code Files
In this section, we'll download the necessary code files and open them in a text editor. Here's how you do it:
-
Download the App and Driver code files from the following GitHub repository:
https://github.com/Sensative/Hubitat_Strips_700_800_Series_Products
Files to download
a. Sensative-Yggio-Hubitat-MQTT-App.groovy b. Sensative-Yggio-Hubitat-MQTT-driver.groovy
Open these files in a text editor of your choice.
II. Install the Driver in Hubitat
In this section, we'll install the driver in Hubitat. The driver is a piece of code that allows Hubitat to communicate with the Yggio platform. Here's how you do it:
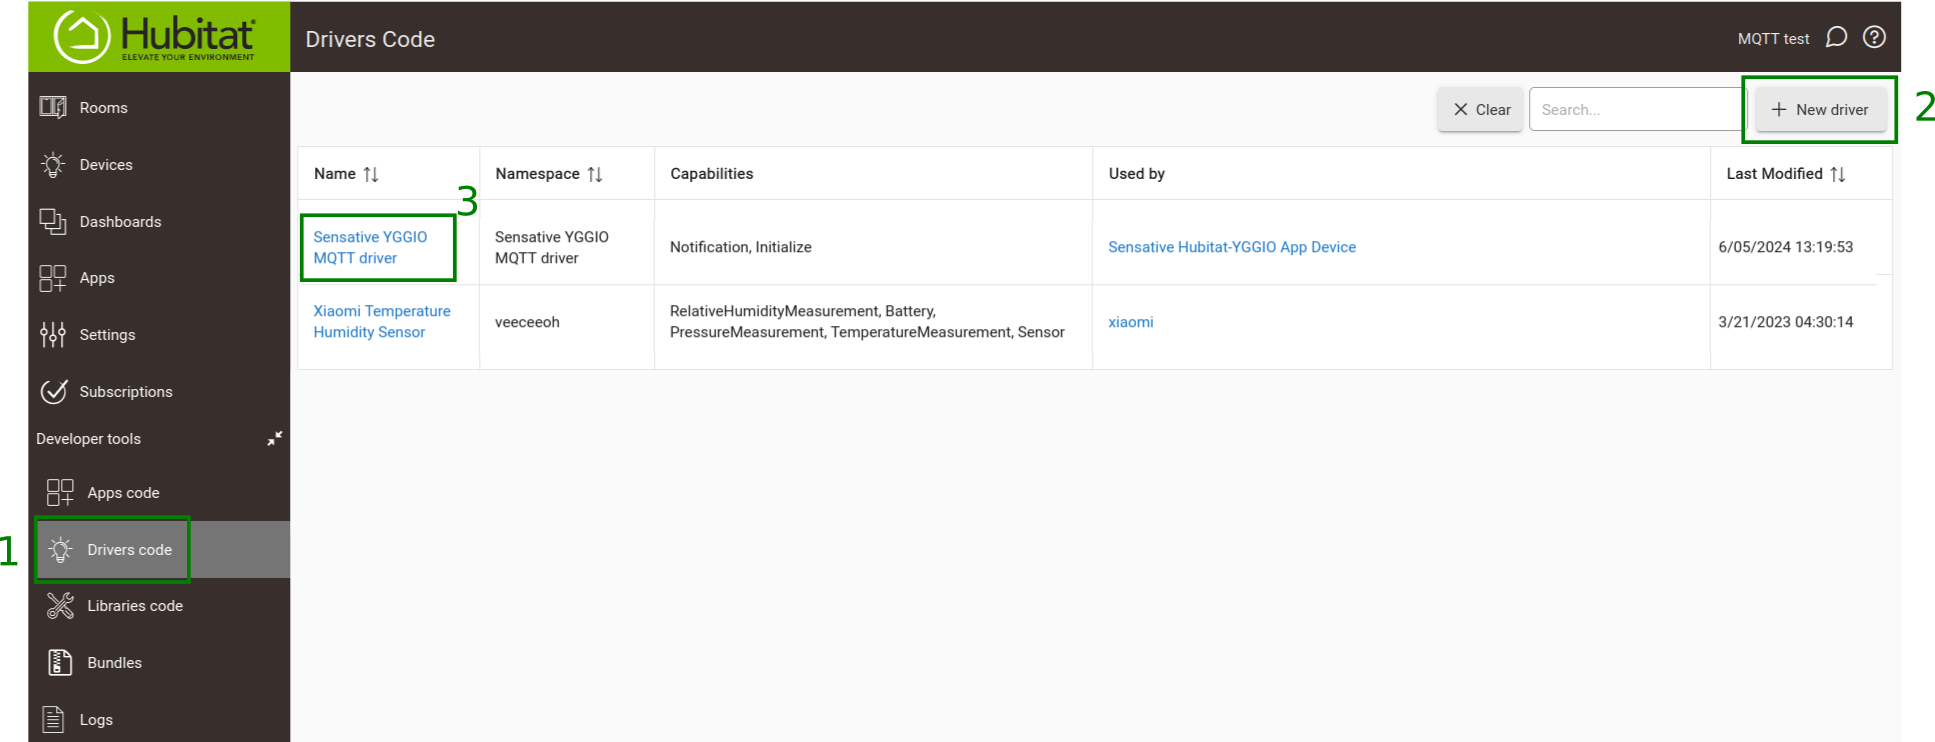
- In the Hubitat User Interface, go to Developer Tools -> Drivers Code on the left.
- Click the New Driver button in the top right corner.
- Open the
Sensative-Yggio-Hubitat-MQTT-driver.groovyfile that you downloaded earlier. Copy and paste the code from this file into the editor in Hubitat, then click Save. The driver will be saved under the name "Sensative Yggio MQTT Driver".
III. Install the App code in Hubitat
In this section, we'll install the app in Hubitat. The app is a piece of code that allows Hubitat to interact with the Yggio platform. Here's how you do it:
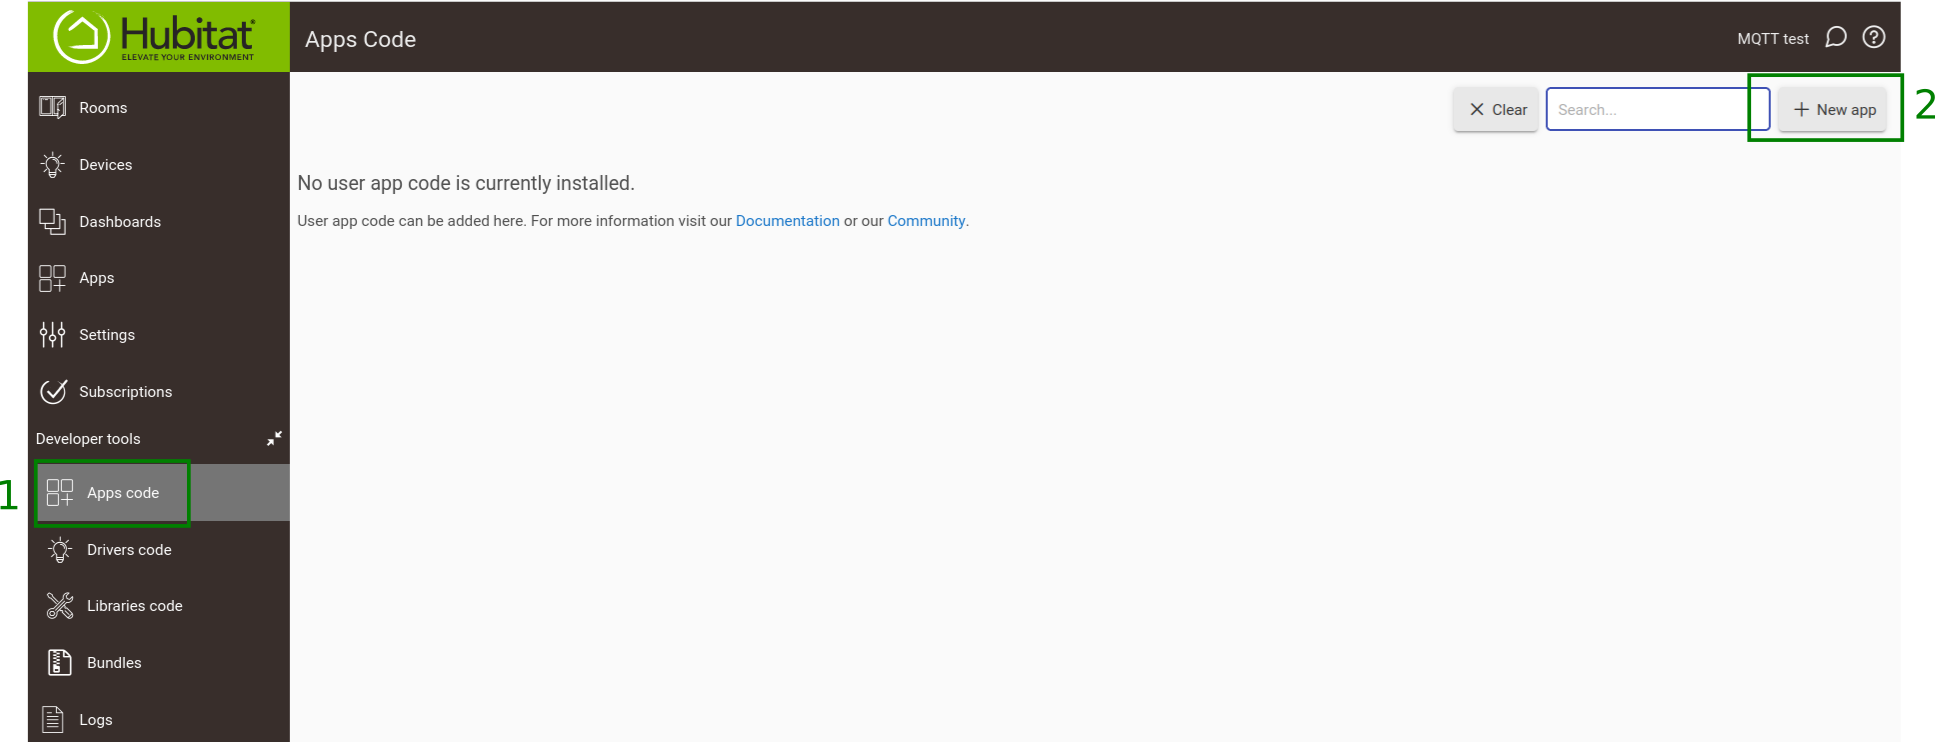
- In the Hubitat User Interface, go to Developer Tools -> Apps Code on the left.
- Click the New App button in the top right corner.
- Open the
Sensative-Yggio-Hubitat-MQTT-App.groovyfile that you downloaded earlier. Copy and paste the code from this file into the editor in Hubitat, then click Save. The app will be saved under the name "Sensative Yggio MQTT App".
IV. Create and Configure the Virtual Device
Important: Before proceeding with this step, ensure you have completed sections VI to XI. The details required in this section are either provided by the Yggio Admin or obtained from the steps in sections VI to XI.
In this section, we'll create a virtual device in Hubitat and configure it to connect to the Yggio platform. Here's how you do it:
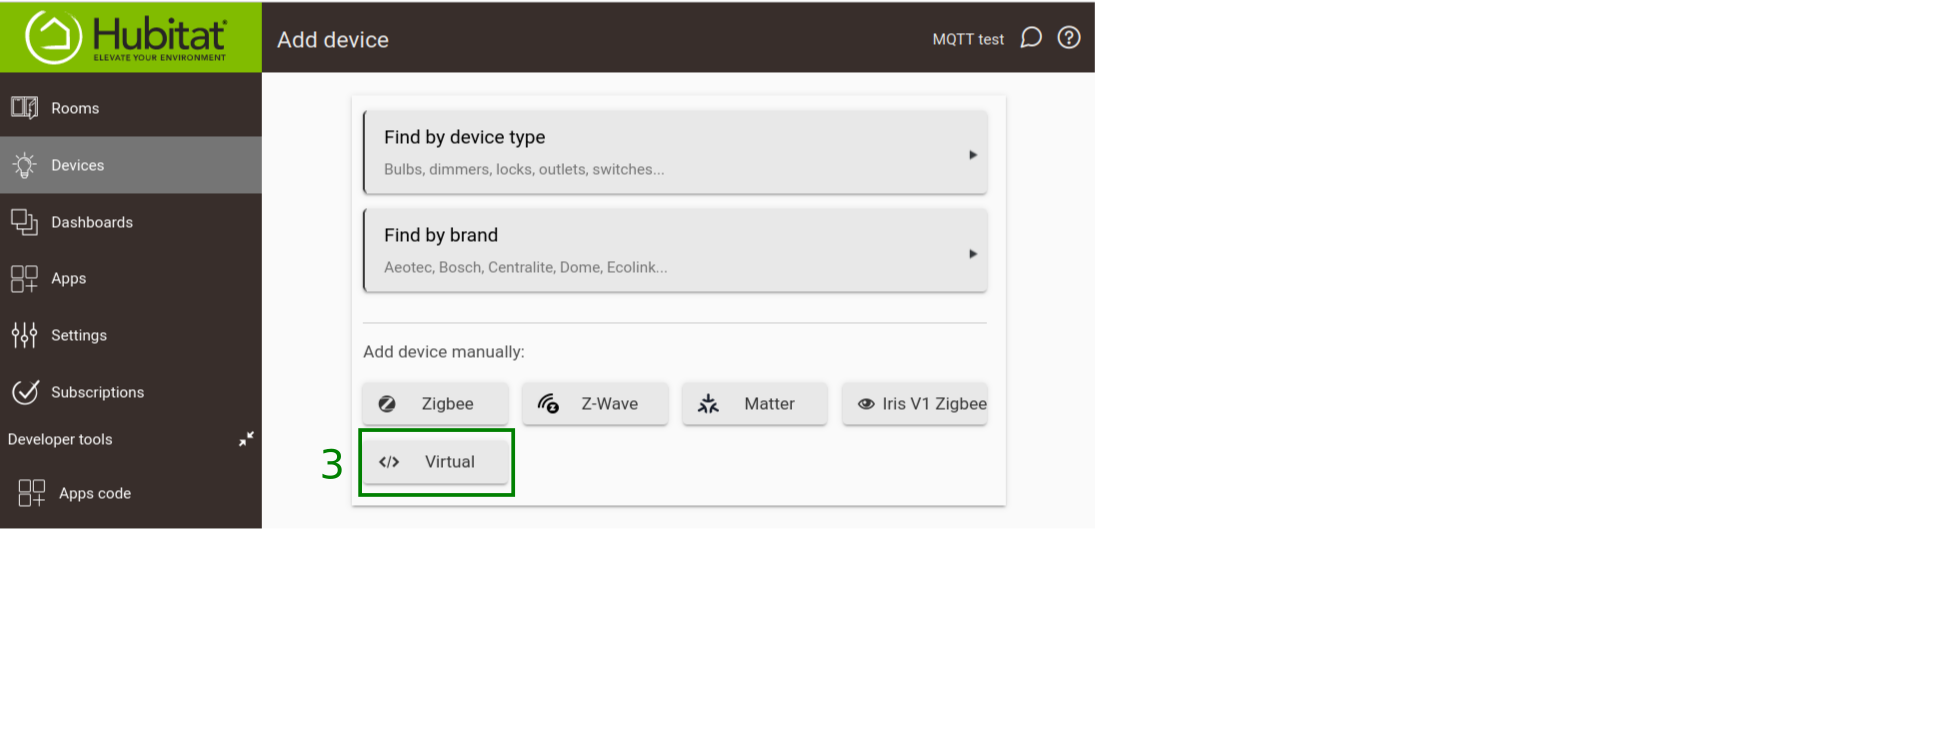
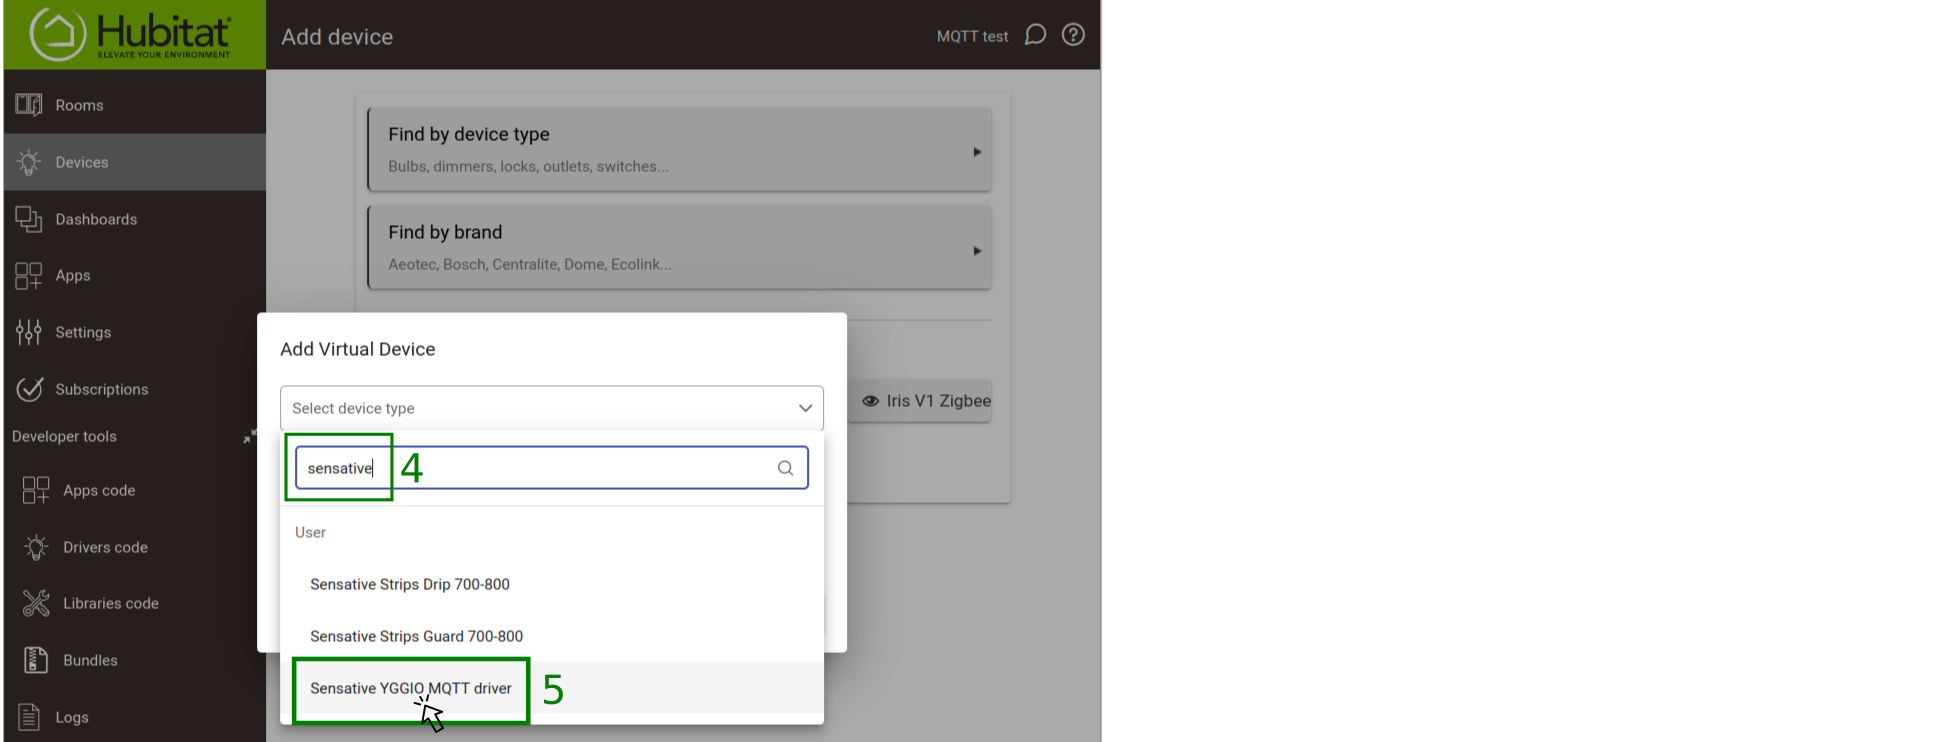
- In the Hubitat User Interface, go to Devices on the left.
- Click the Add Device button in the top right corner.
- Click the Virtual button.
- In the Device Information section, under the Type dropdown, type in "Sensative" to filter drivers.
- Select Sensative Yggio MQTT Driver.
- Give the device a memorable name, e.g., "Sensative Hubitat-Yggio App Device".
- Click Save Device.
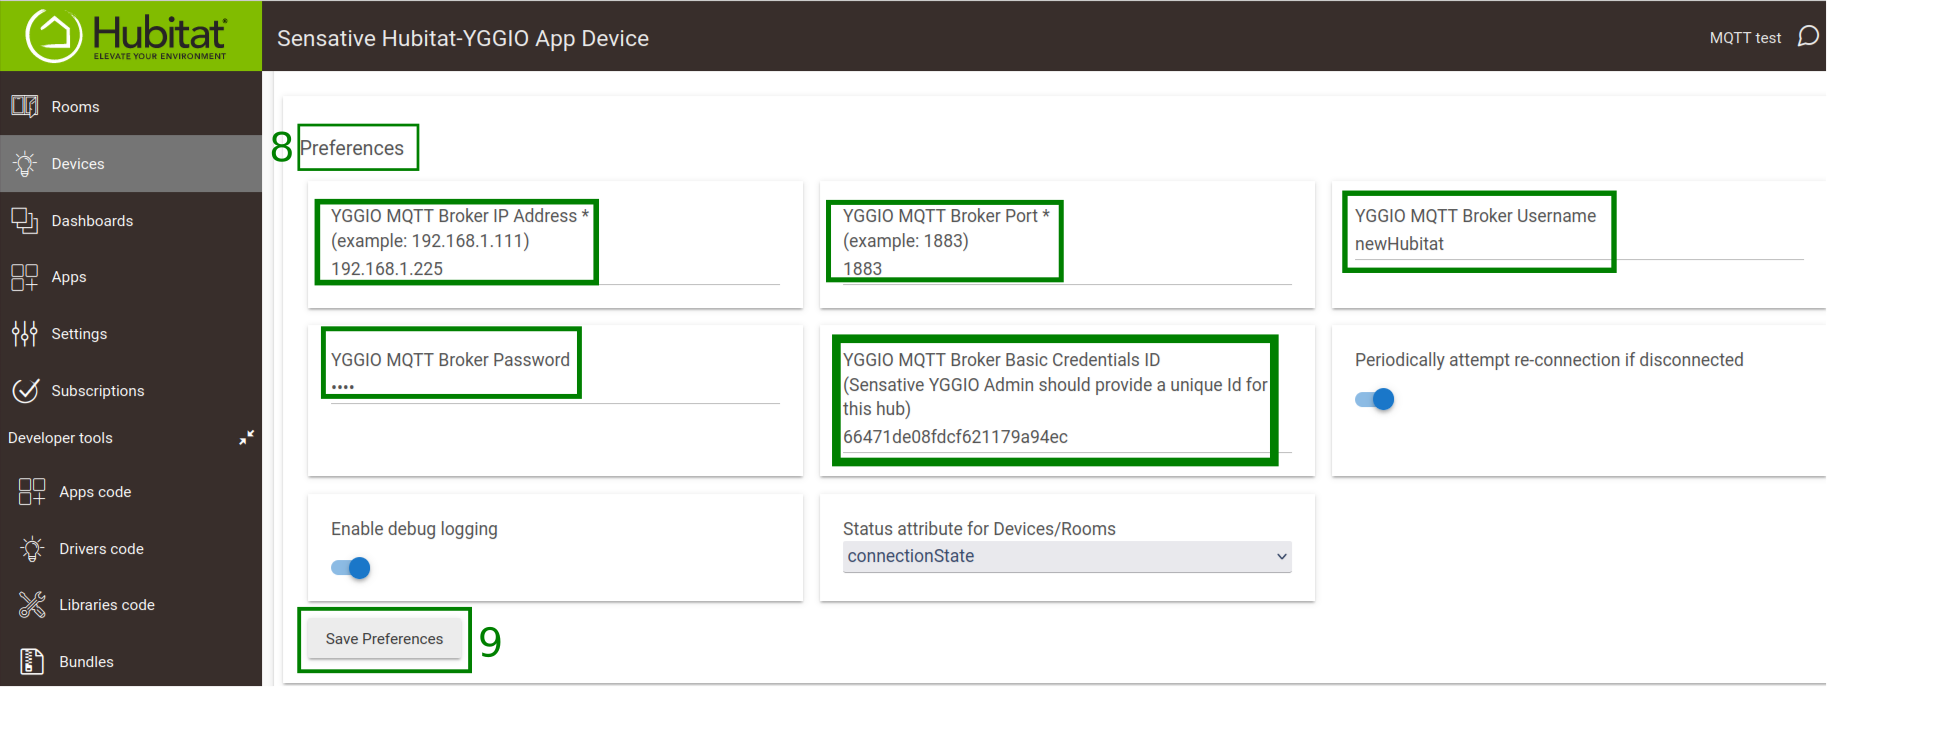
- Enter the following mandatory credential details in the Preferences section:
- Yggio MQTT Broker IP Address
- Yggio MQTT Broker Port
- Yggio MQTT Broker Username
- Yggio MQTT Broker Password
- Yggio MQTT Broker Basic Credentials ID
- Click Save Preferences.
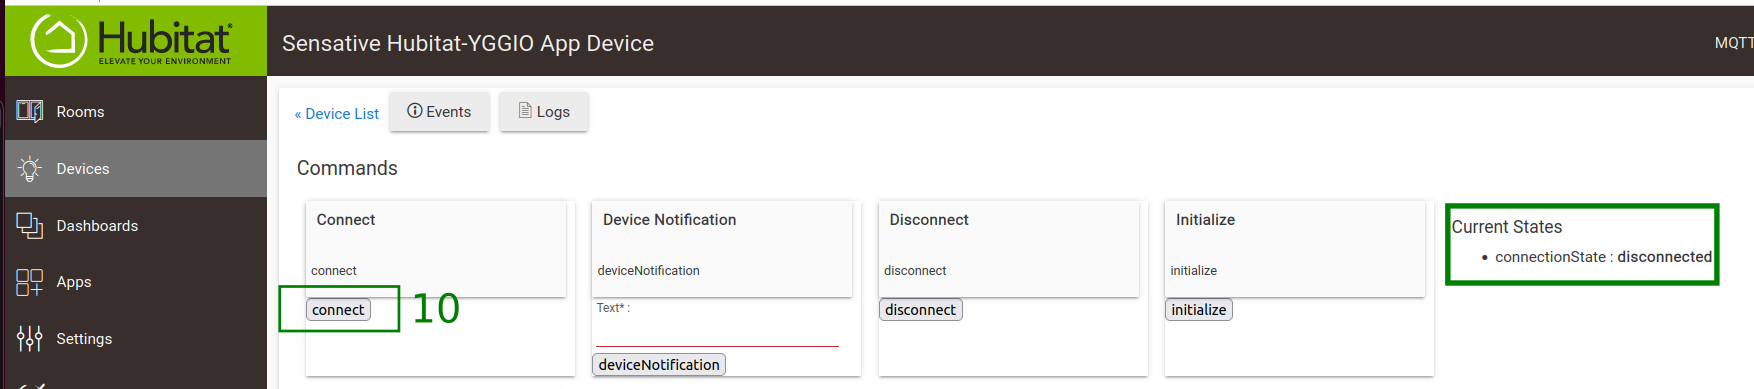
- If it doesn't connect right away, click the Connect button in the User Interface.

V. Setup the Sensative Yggio MQTT App
In this section, we'll set up the app in Hubitat. The app allows Hubitat to interact with the Yggio platform. Here's how you do it:
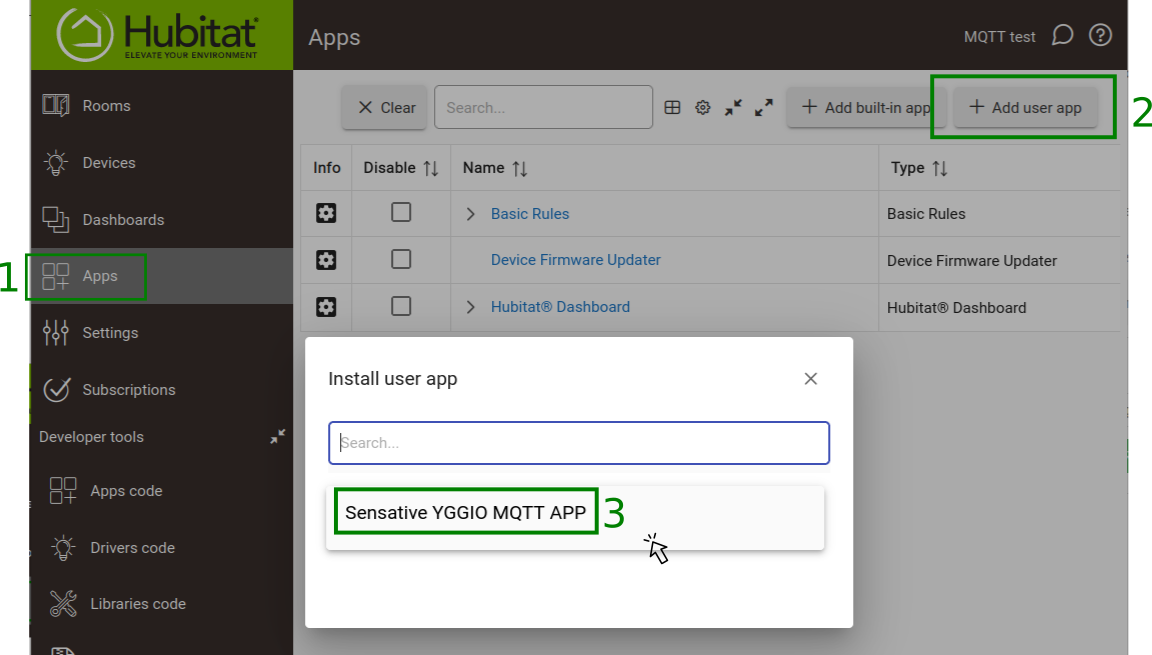
- In the Hubitat User Interface, go to Apps on the left.
- Click the Add user app button in the top right corner.
- Click on Sensative Yggio MQTT App.
- The configuration page for Sensative Yggio MQTT App will open.
- In the configuration page, select the device that you created earlier in the Sensative Yggio MQTT Driver section and click the Update button.
- Select the devices that you want to connect to the Yggio platform and click the Done button. If you add new devices later and want to sync them with the Yggio platform, revisit this section, select the new devices, and click the Done button.
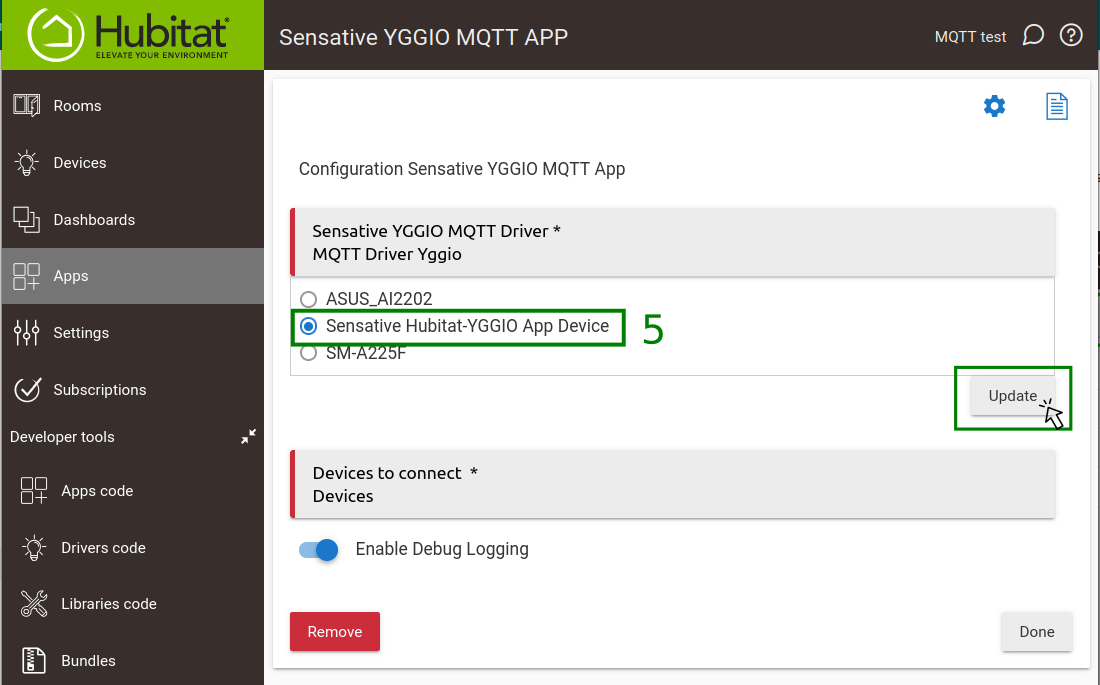
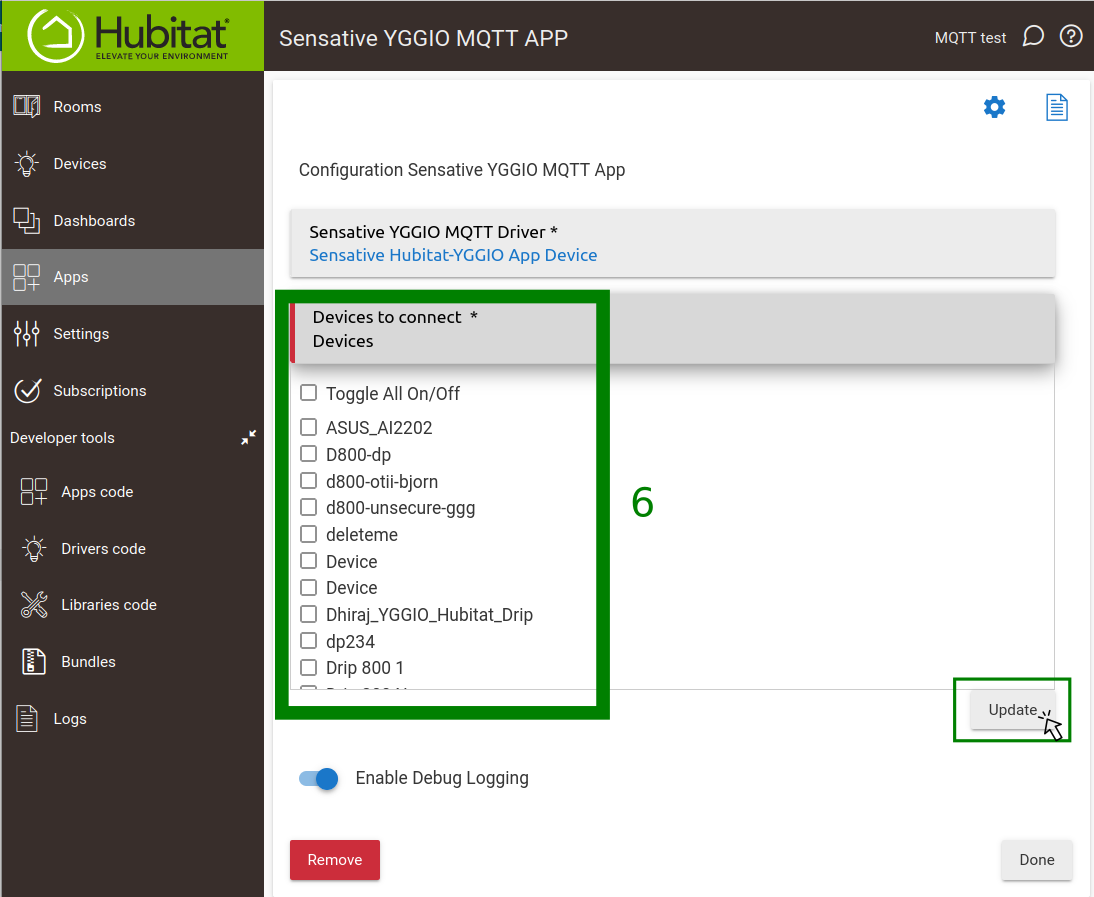
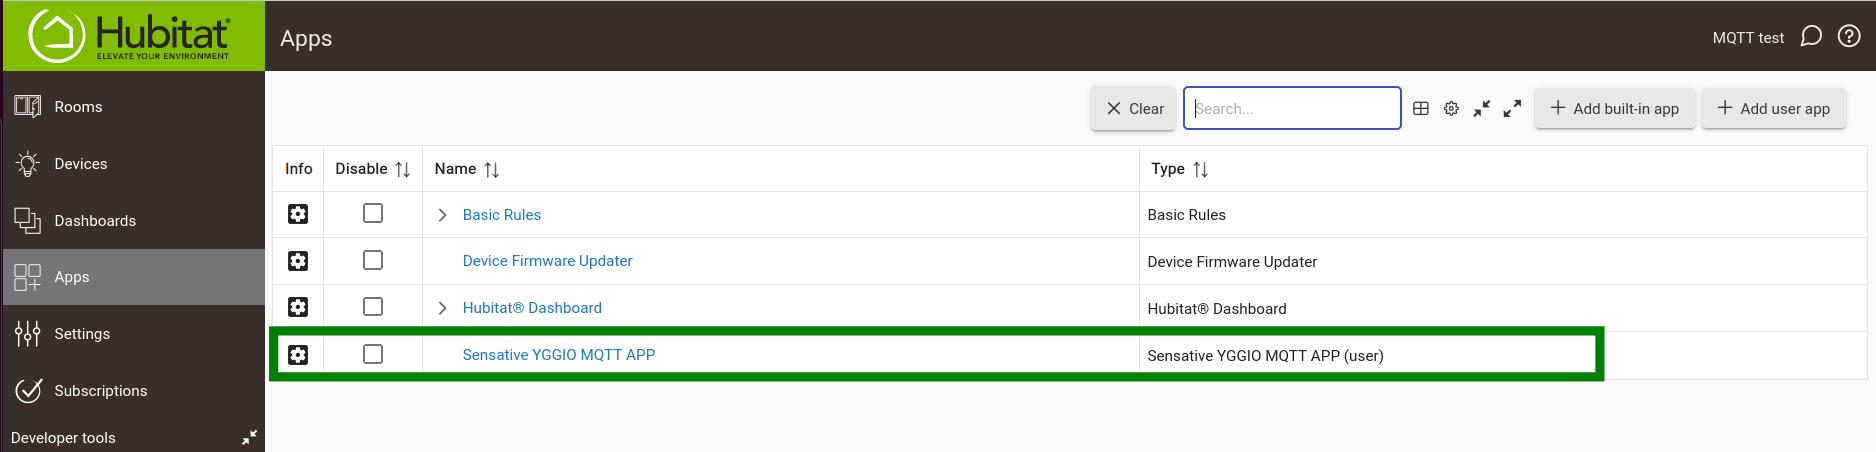
Yggio User Interface
VI. Authorize in Swagger
The next two steps are done through the Yggio API, using the Swagger application. Log in to Yggio, open Swagger from the menu, then authorize:
- In the Authorization section, open
POST/auth/localand click Try it out. - Replace the
"username"and"password"placeholders with your login details and click Execute. - Copy the token from the response.
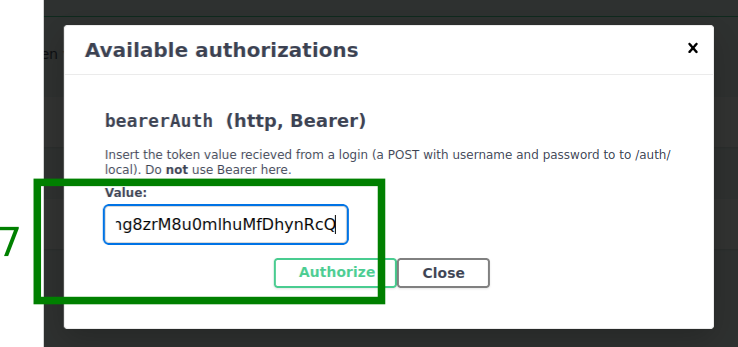
- Click Authorize, paste the token into the value field, click Authorize, then Close.
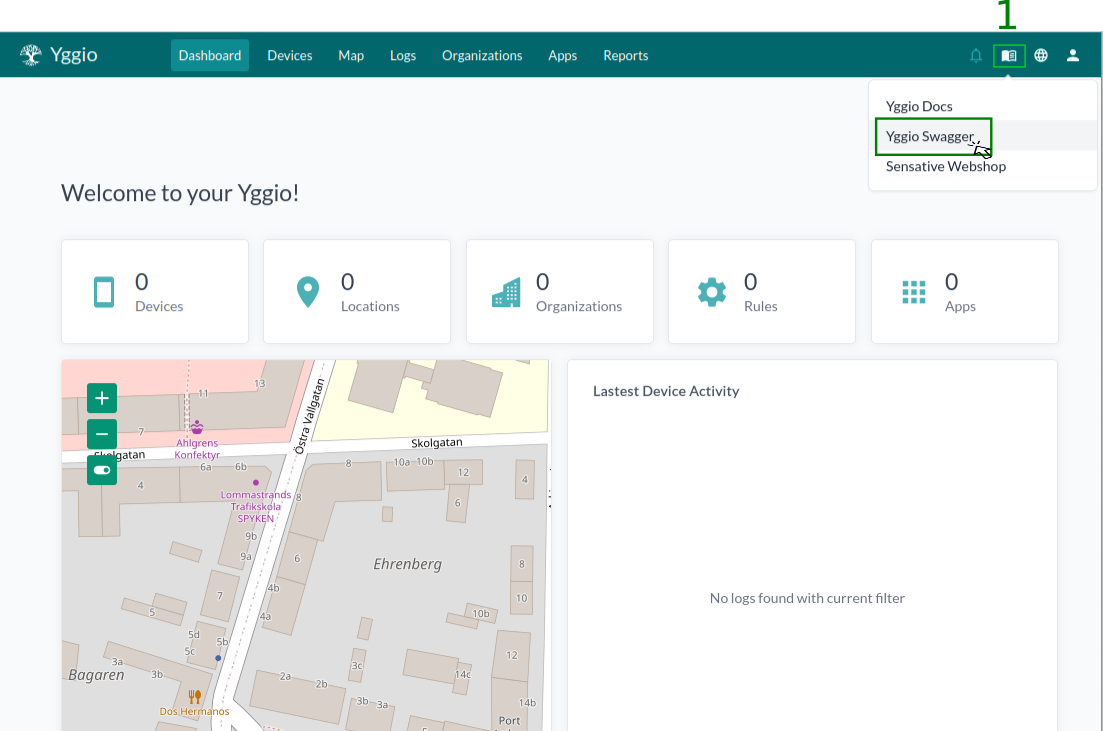
VII. Create a Basic Credentials Set
The next step is to create a Basic Set Credentials ID. This ID is used for authentication and ensuring the integrity of MQTT topics.
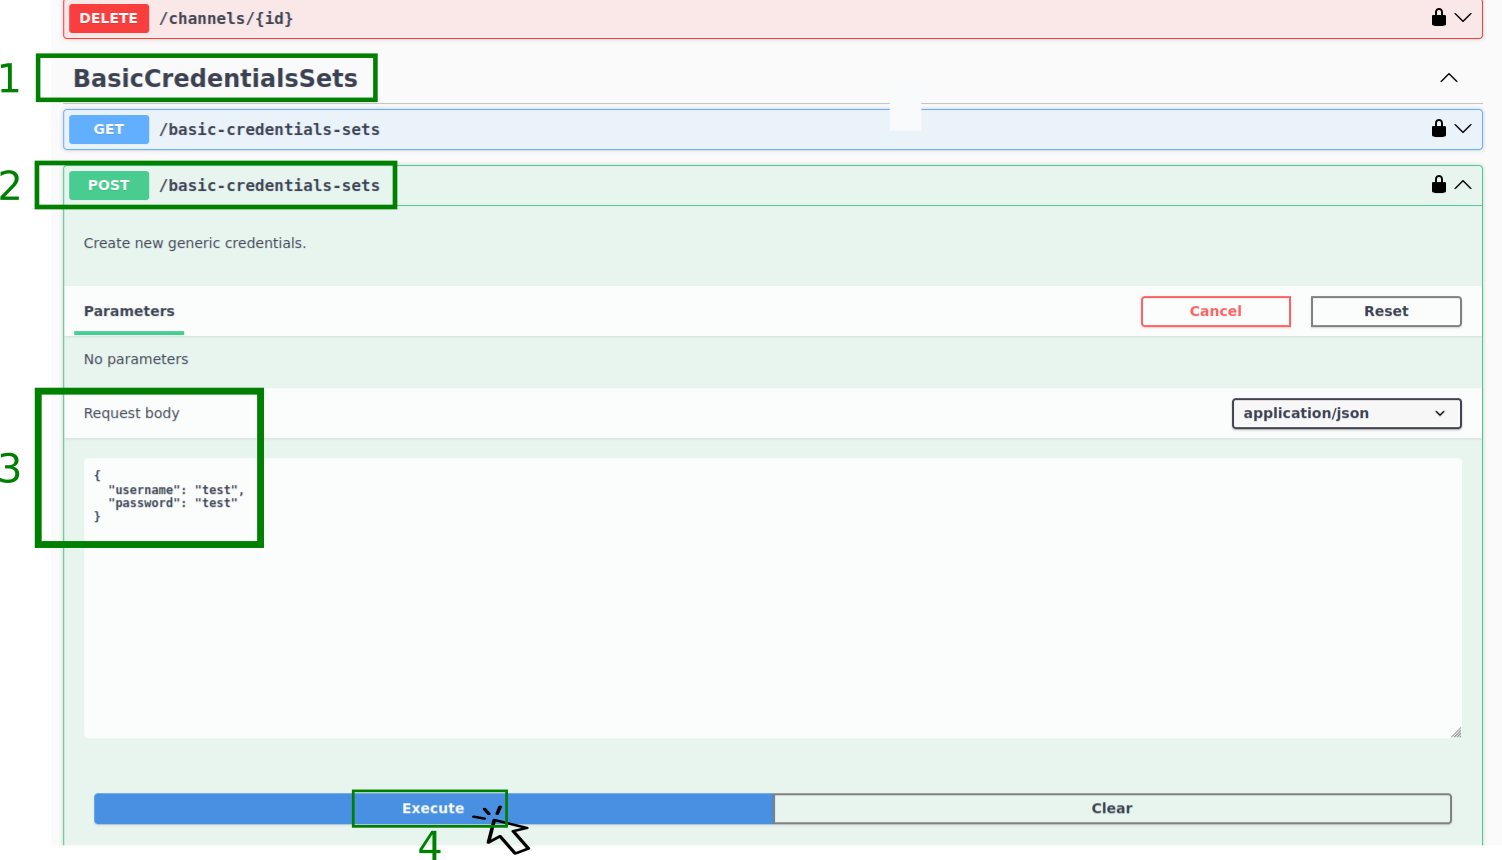
- Navigate to the BasicCredentialsSets section in the Swagger application page.
- Click on the
POST/basic-credentials-setsdropdown, then click on the Try it out button. - In the Request body section, replace the placeholders marked as
"string"with your Yggio login details or a new set of credentials as per your wish. These placeholders are located in the fields labeled"username"and"password". Make a note of the new credentials as these will be needed for configuring the Yggio MQTT Broker Username and Yggio MQTT Broker Password. For more details on this configuration, refer to the section IV. Create and Configure the Virtual Device. - Click the Execute button. This will generate a Basic credentials sets Id.
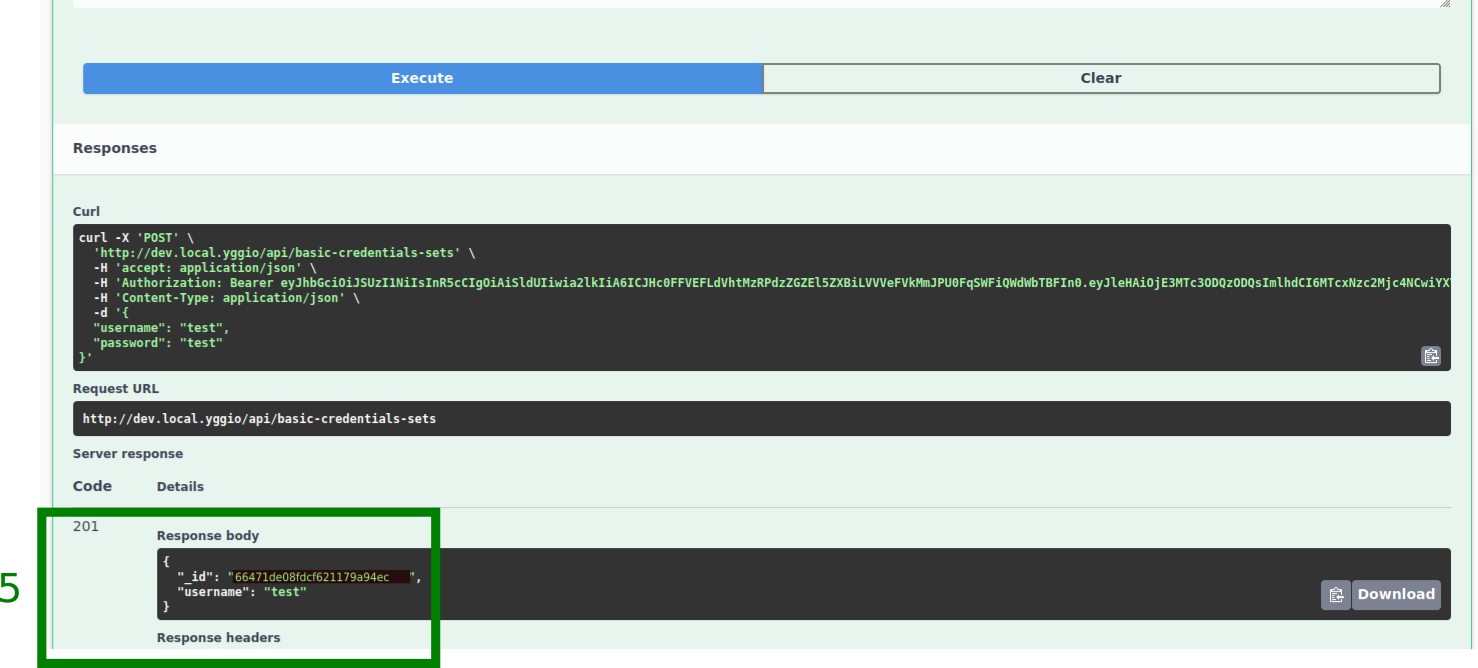
- In the Response body section, you will see an
_idand yourusername. Save the_idas you will need it for later steps and for configuring the Yggio MQTT Broker Basic Credentials ID. For more details on this configuration, refer to the section IV. Create and Configure the Virtual Device.
BasicCredentialsSets response...
VIII. Reserve the MQTT Topic
The next step is to create a reserved MQTT topic. This topic is used as a prefix and comprises of the Yggio - Hubitat integration version and the Basic credentials sets Id created earlier.
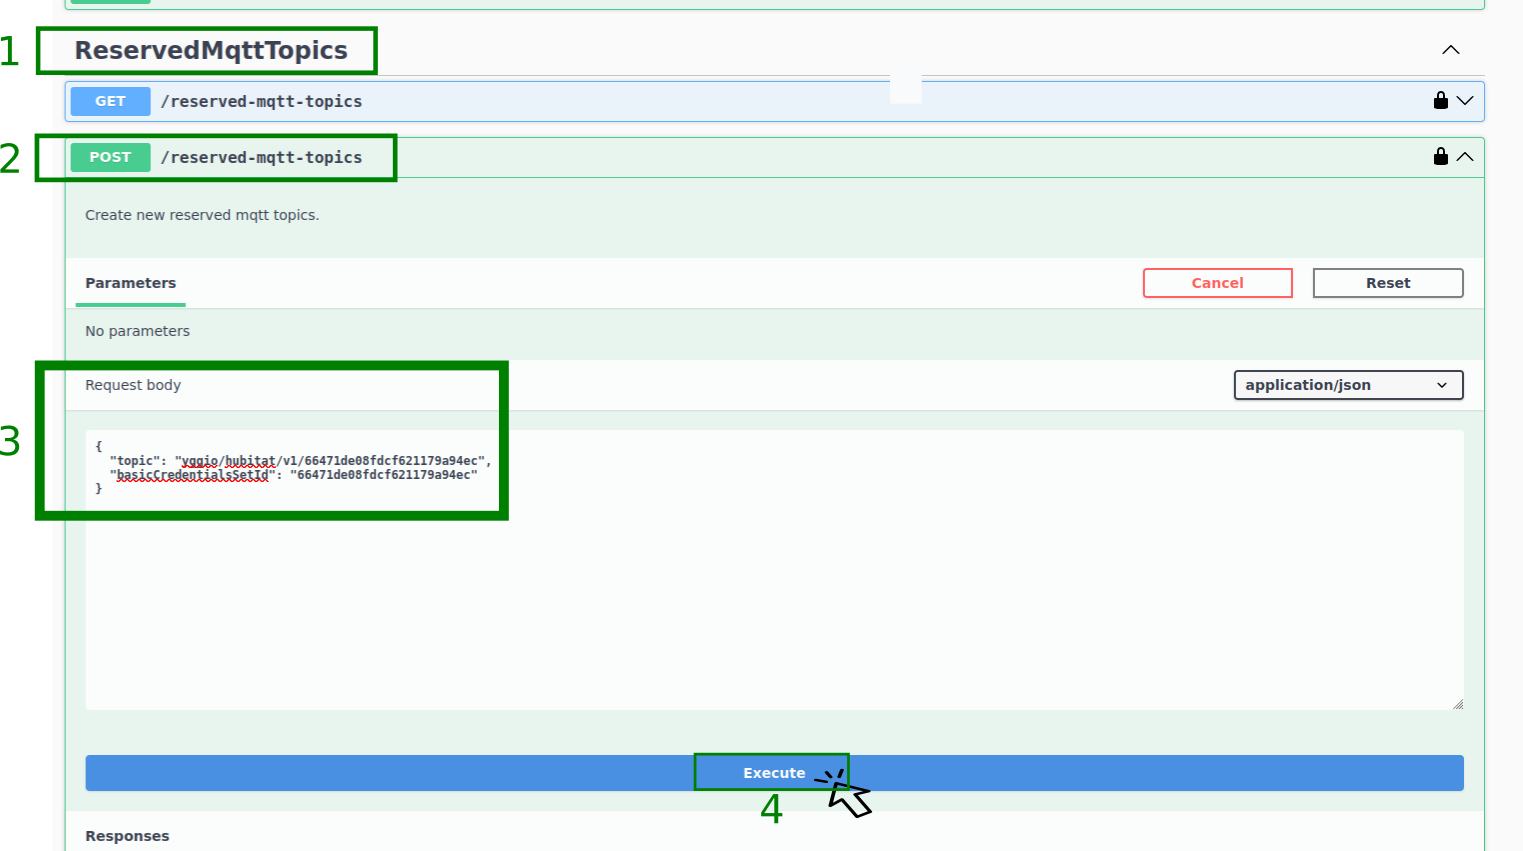
- Navigate to the ReservedMqttTopics section in the Swagger application page.
- Click on the
POST/reserved-mqtt-topicsdropdown, then click on the Try it out button. - In the Request body section, replace the placeholders marked as
"string":- For the field labeled
"topic", replace the"string"with"yggio/hubitat/v1/<your BasicCredentialsSets _id>"(replace<your BasicCredentialsSets _id>with the actual_idyou copied earlier). - For the field labeled
"basicCredentialsSetId", replace the"string"with your actual BasicCredentialsSets_idthat you copied when creating the BasicCredentialsSets Id.
- For the field labeled
- Click the Execute button.
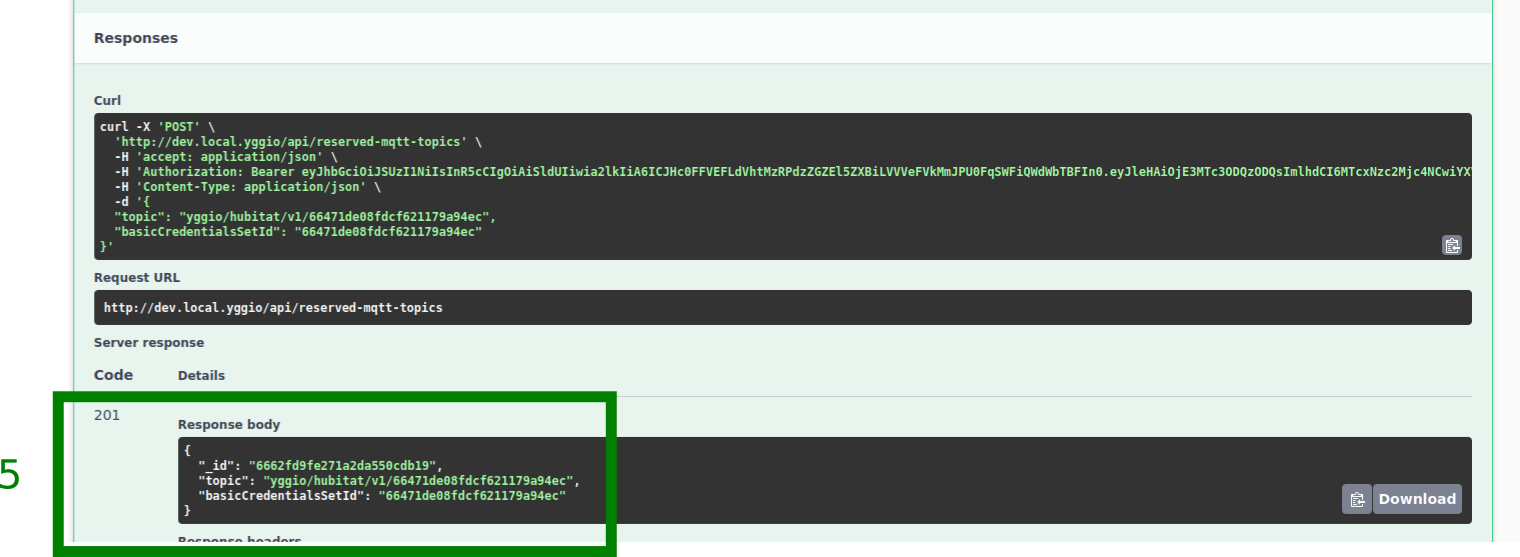
- The Response body section will confirm if the Reserved MQTT Topic is created successfully.
Template:
{
   "topic": "yggio/hubitat/v1/<Replace with the basicCredentialsSetId>",
   "basicCredentialsSetId": "Replace with the basicCredentialsSetId"
}
ReservedMqttTopics response...
IX. Create the Connector in Yggio
With the credentials set and the topic reserved, create the connector. This is done in the Connectors UI and needs only the Basic Credentials Set ID and the Hub UID, which is found in the Hubitat settings.
See Hubitat Connector for the steps.
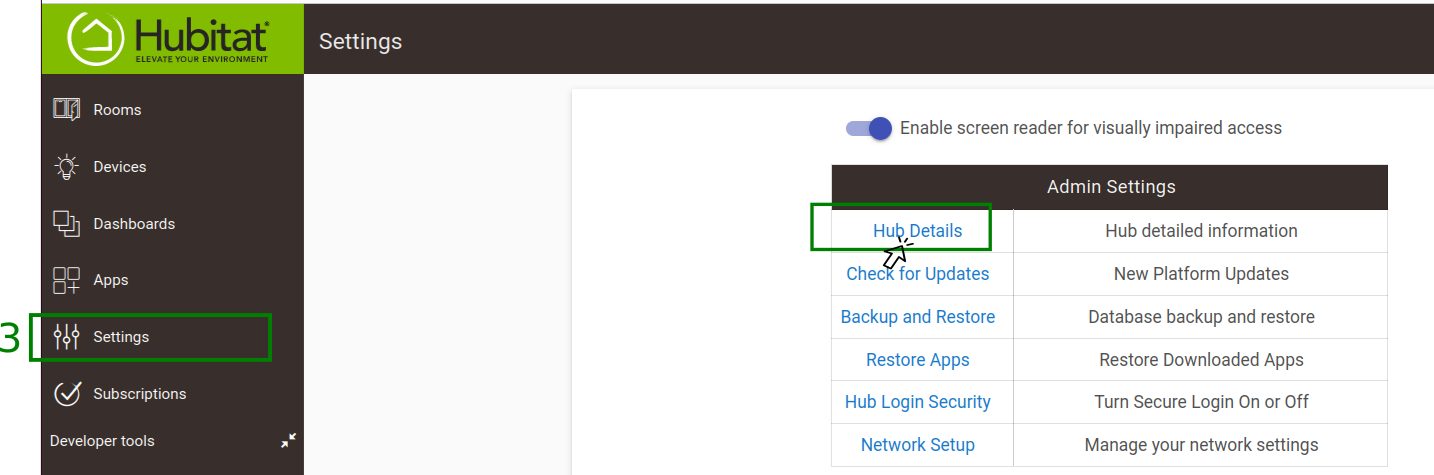
The Hub UID in the Hubitat settings.
X. Viewing Hubitat Devices in Yggio
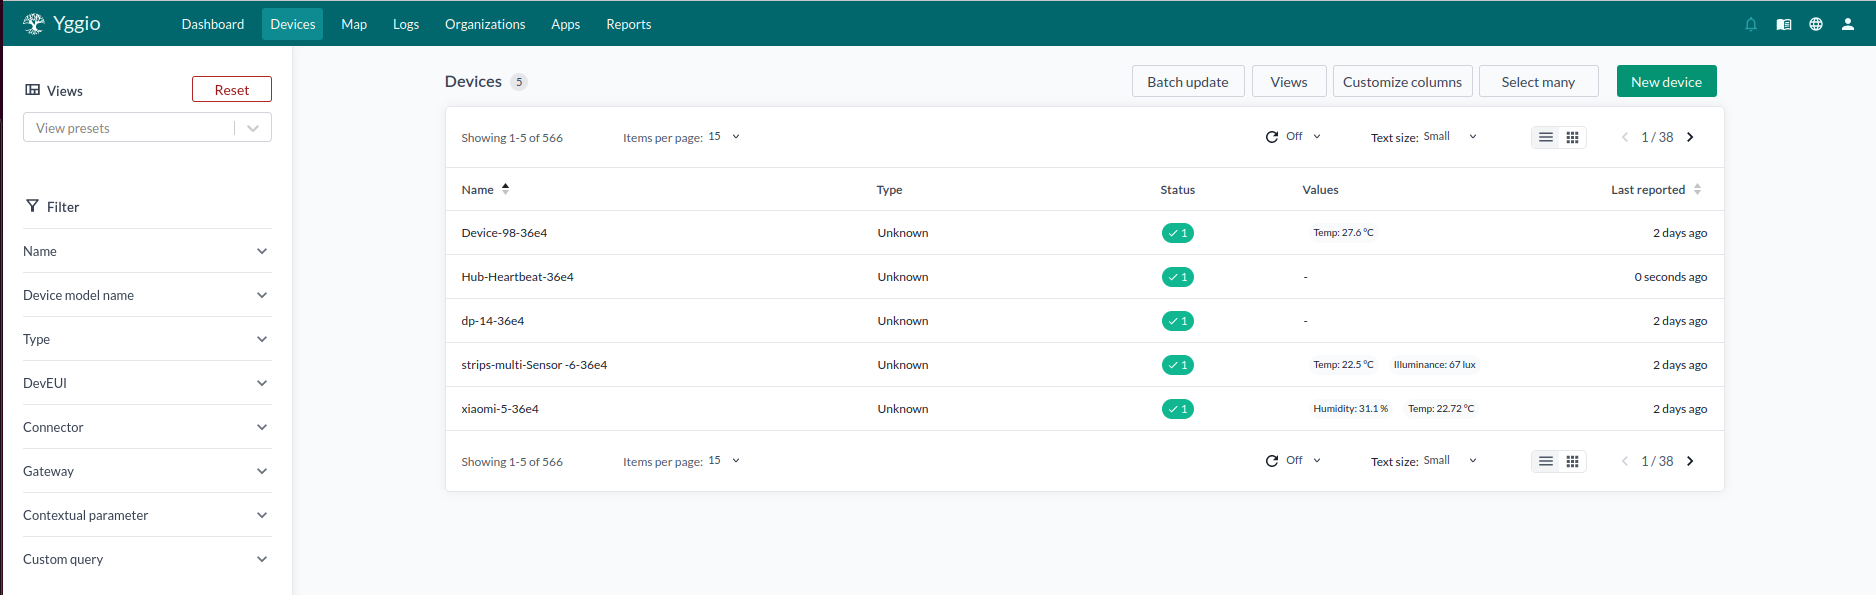
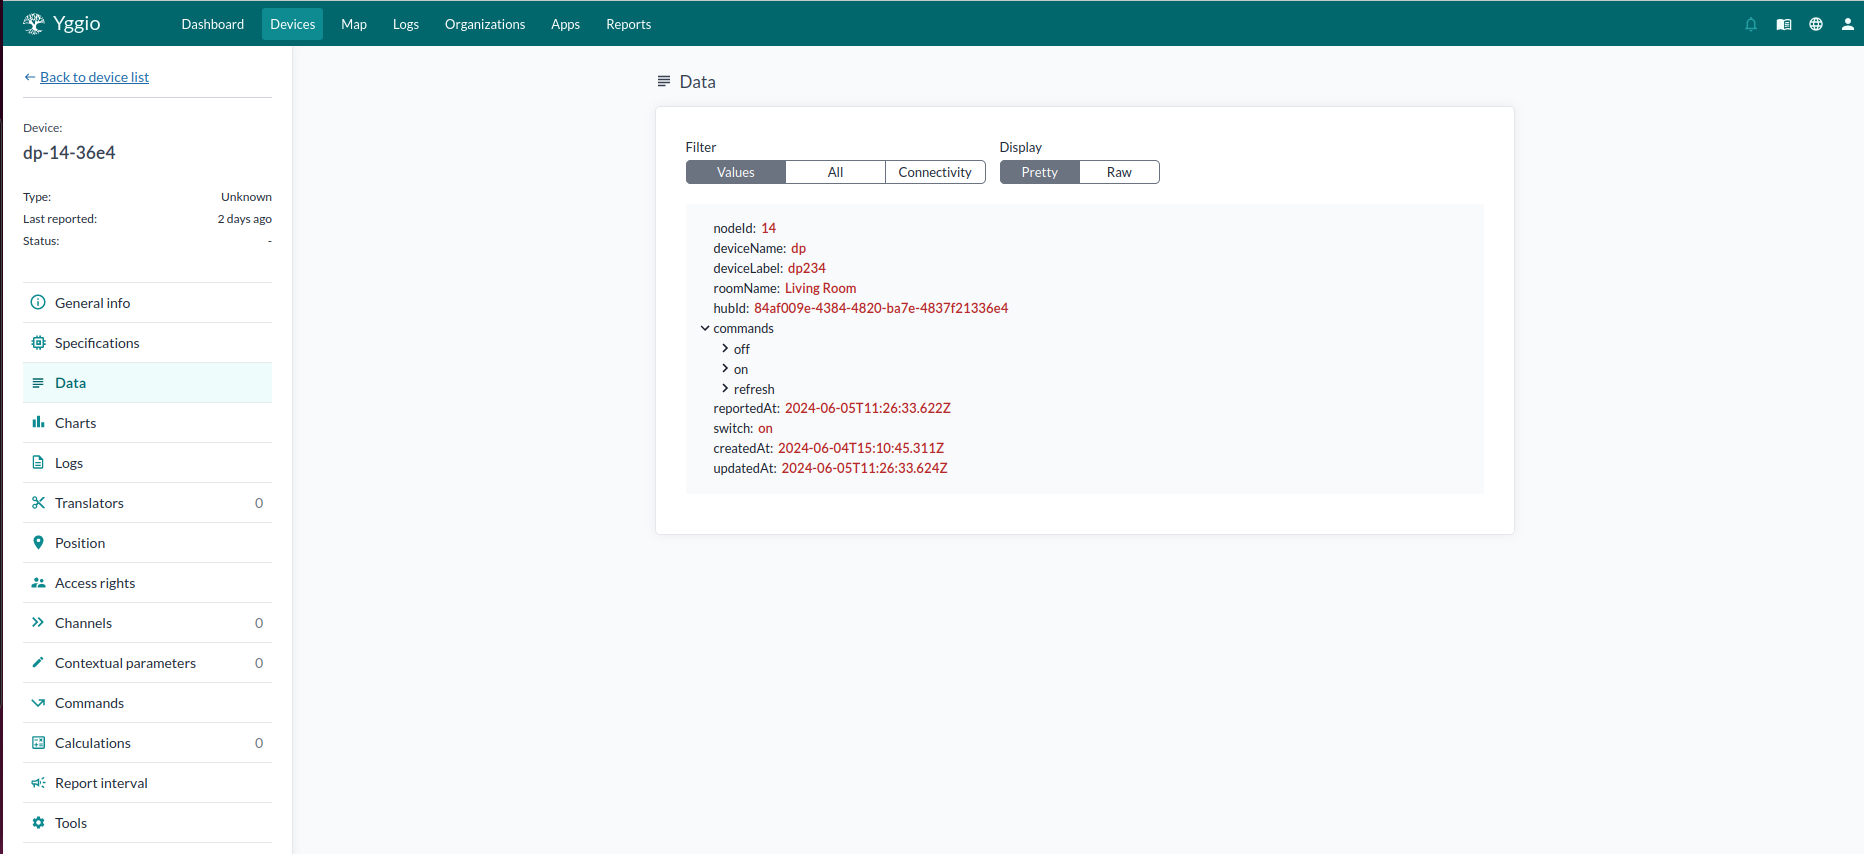
After completing the previous steps and successfully syncing your Hubitat devices with Yggio using MQTT communication, you can view your Hubitat devices on the Yggio dashboard. This provides a convenient way to monitor and control your devices.
The first image below shows the Yggio dashboard with the devices that were synced from the Hubitat hub. The second image provides a detailed view of the data for a virtual Z-Wave switch device, showing the current state of the switch as 'on'.
XI. Uplink Example
Uplink communication refers to the communication from Hubitat to Yggio. An example of this would be a device status update from Hubitat being sent to Yggio.
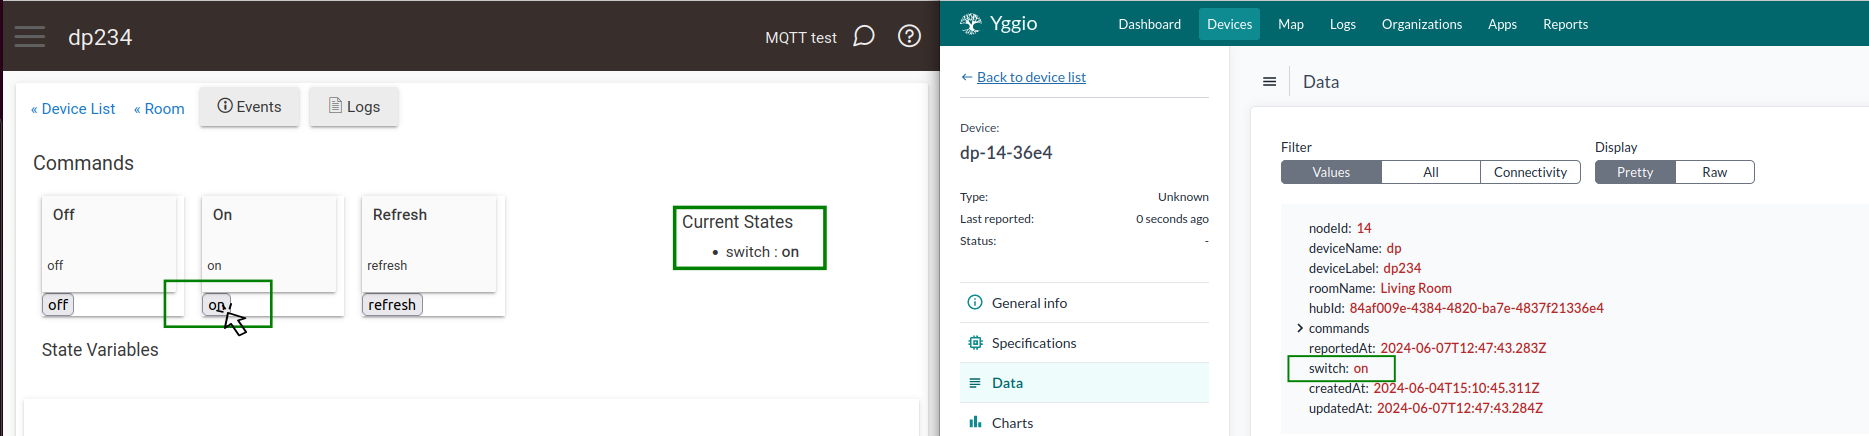
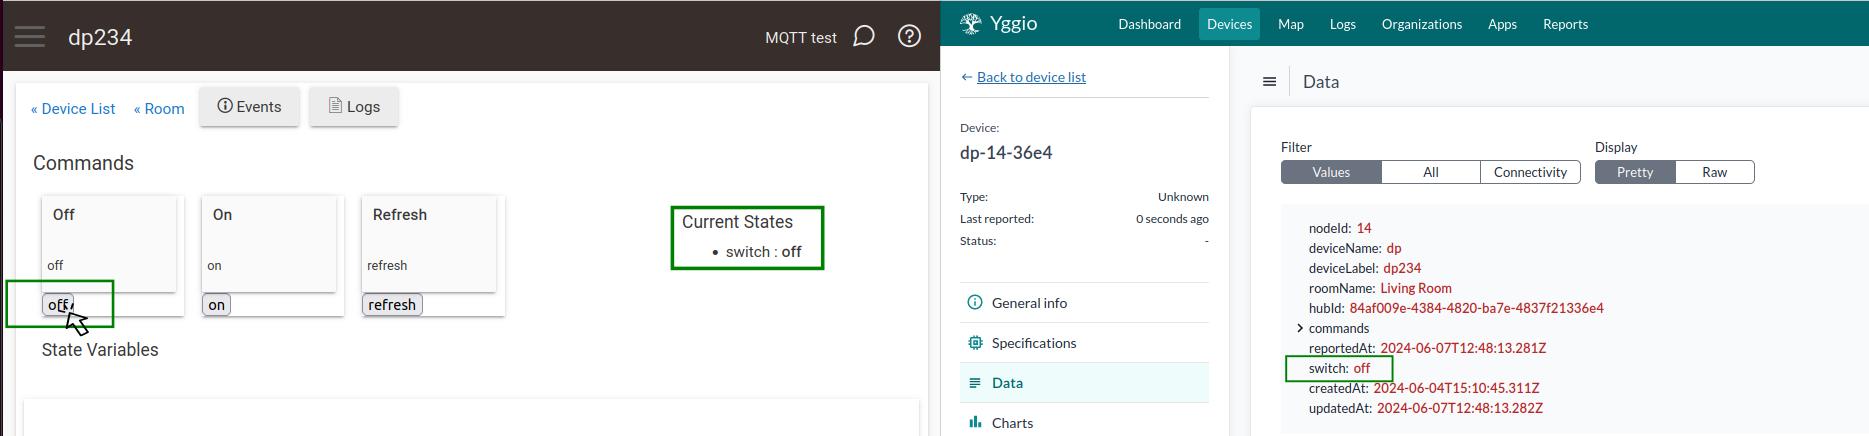
The two images below illustrate this uplink communication. The first image shows the status update when the 'on' button is clicked on the virtual Z-Wave Switch device in the Hubitat interface. This action is reflected in the same device's data on the Yggio side. The second image shows a similar update when the 'off' button is clicked on the virtual Z-Wave Switch device in the Hubitat interface, and how this change is reflected on the Yggio side.
XII. Downlink Example
Downlink communication refers to the communication from Yggio to Hubitat. An example of this would be a command from Yggio being sent to a device on Hubitat.
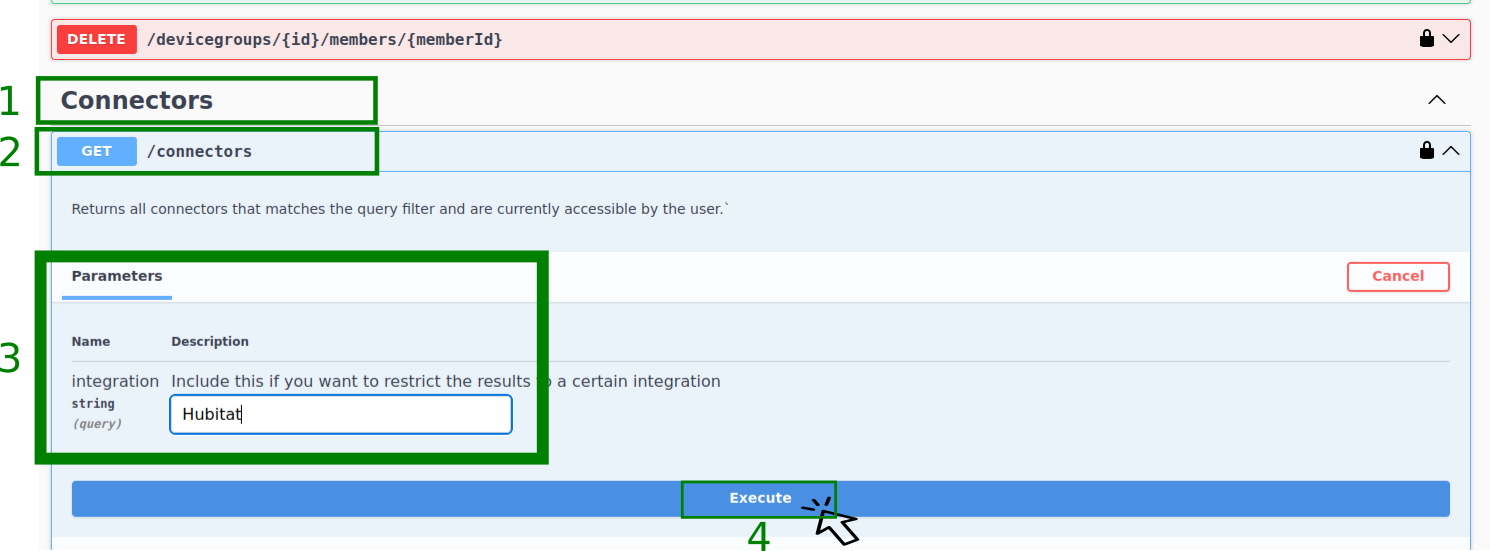
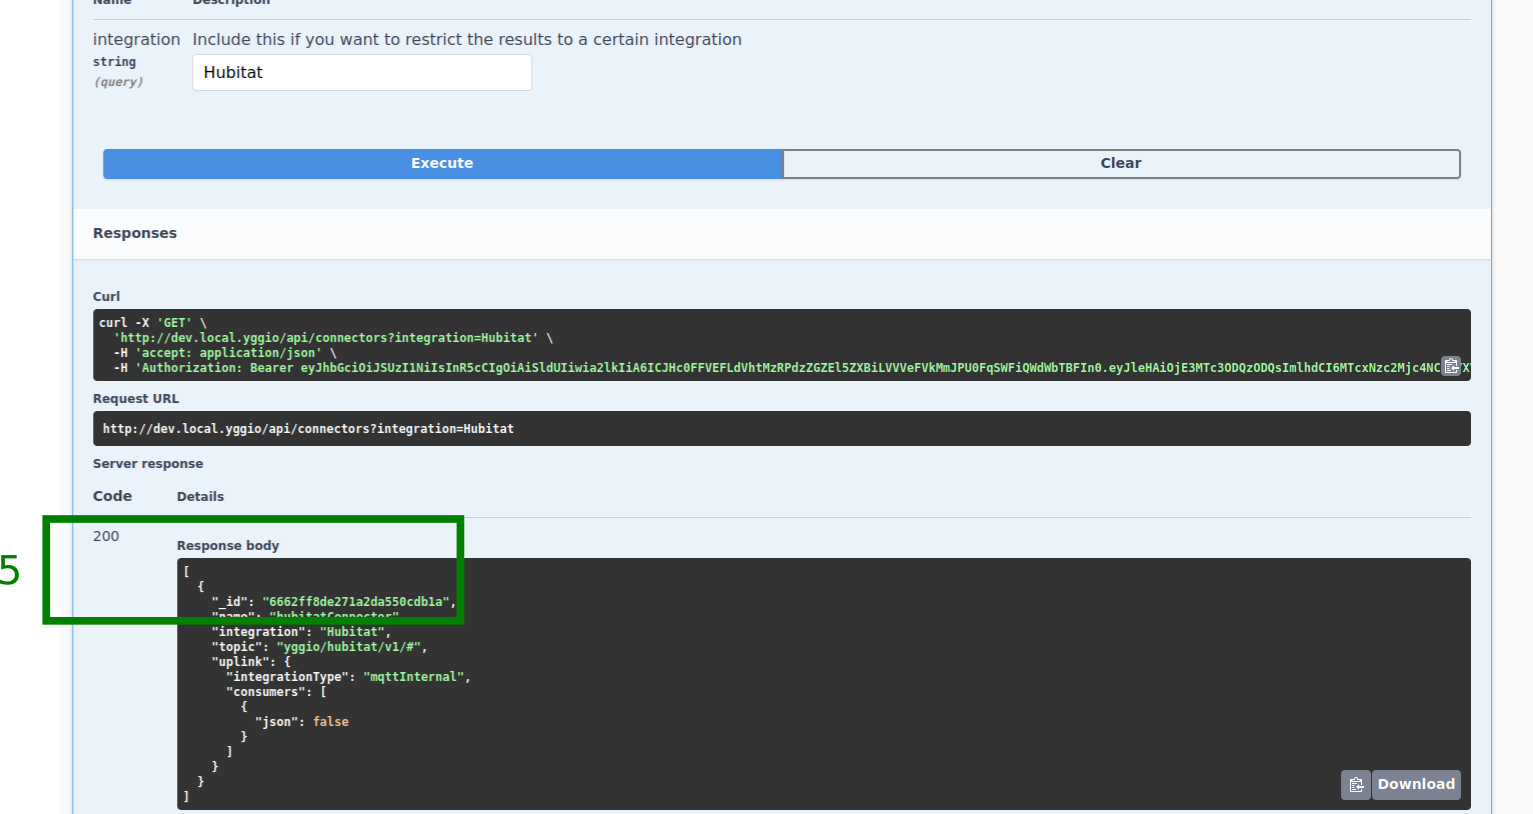
The first two images below illustrate how to retrieve the connector Id from the Connectors section in the Swagger application. This might be necessary if you did not copy it in section XI. Create a Hubitat Connector step 6, or if you have lost the connector Id. To do this, you need to
-
Navigate to the Connectors section in the Swagger application page.
-
Click on the
GET/connectorsdropdown, then click on the Try it out button. -
In the Request body section, replace the placeholders marked as
"string"with"Hubitat"in theintegrationfield. -
Click the Execute button.
-
From the Response body section, if successful, copy the Connector _id and save it for sending downlink commands.
-
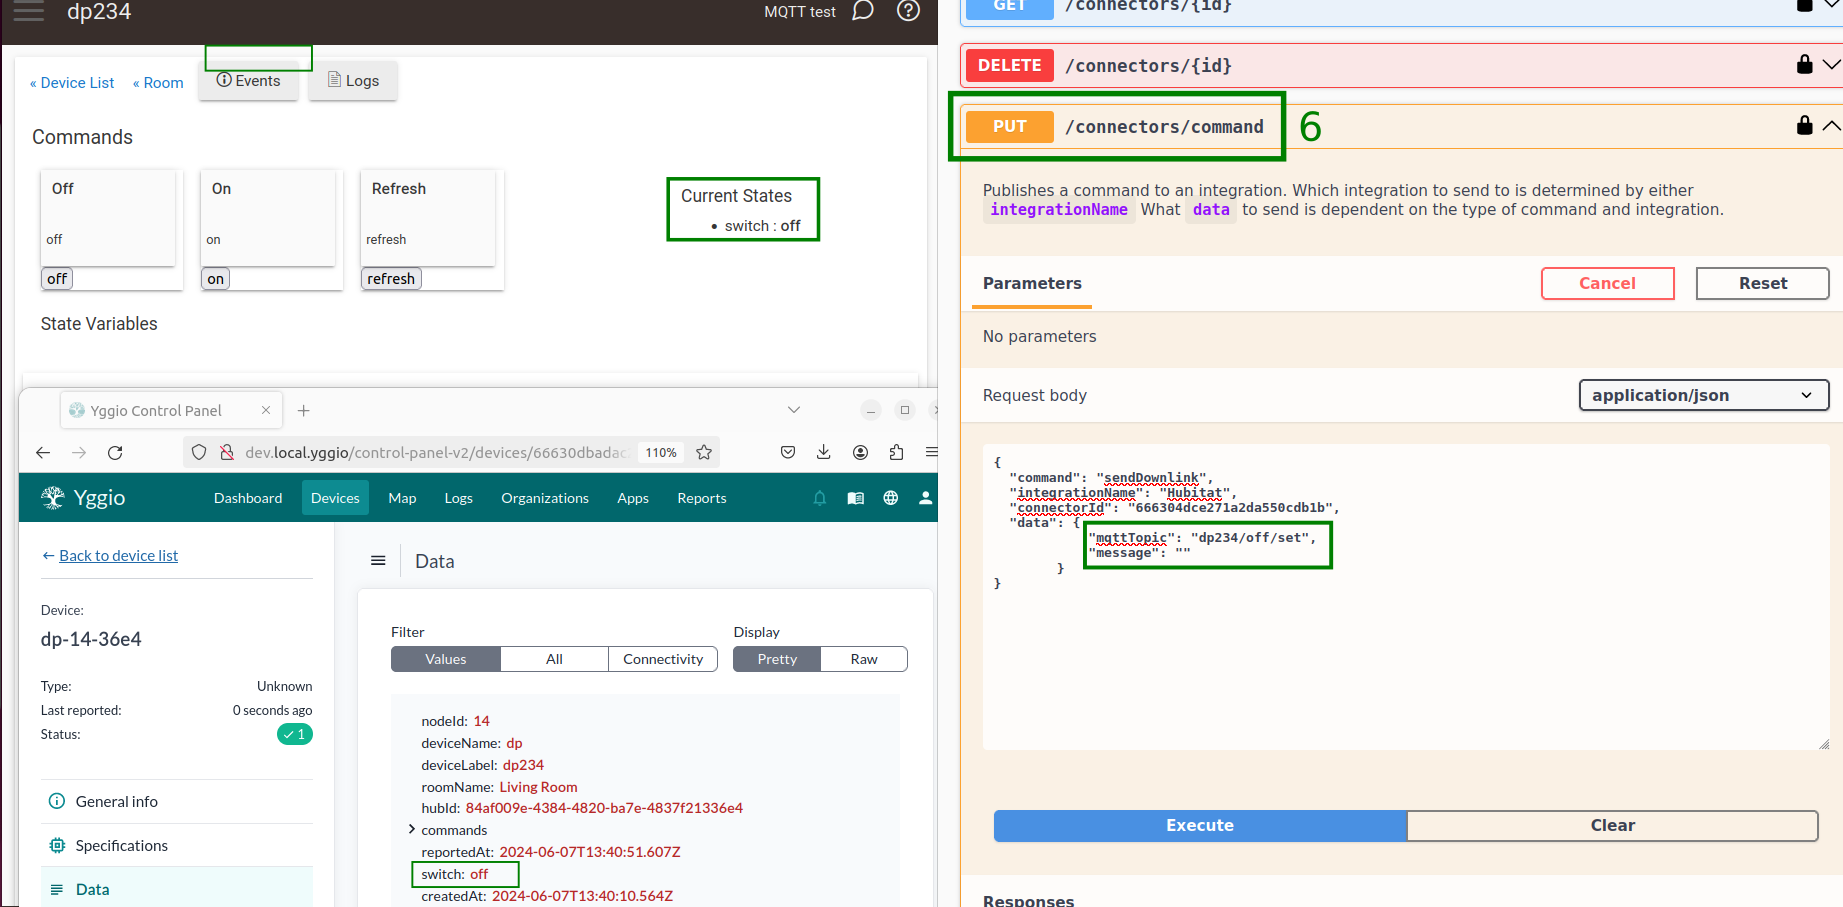
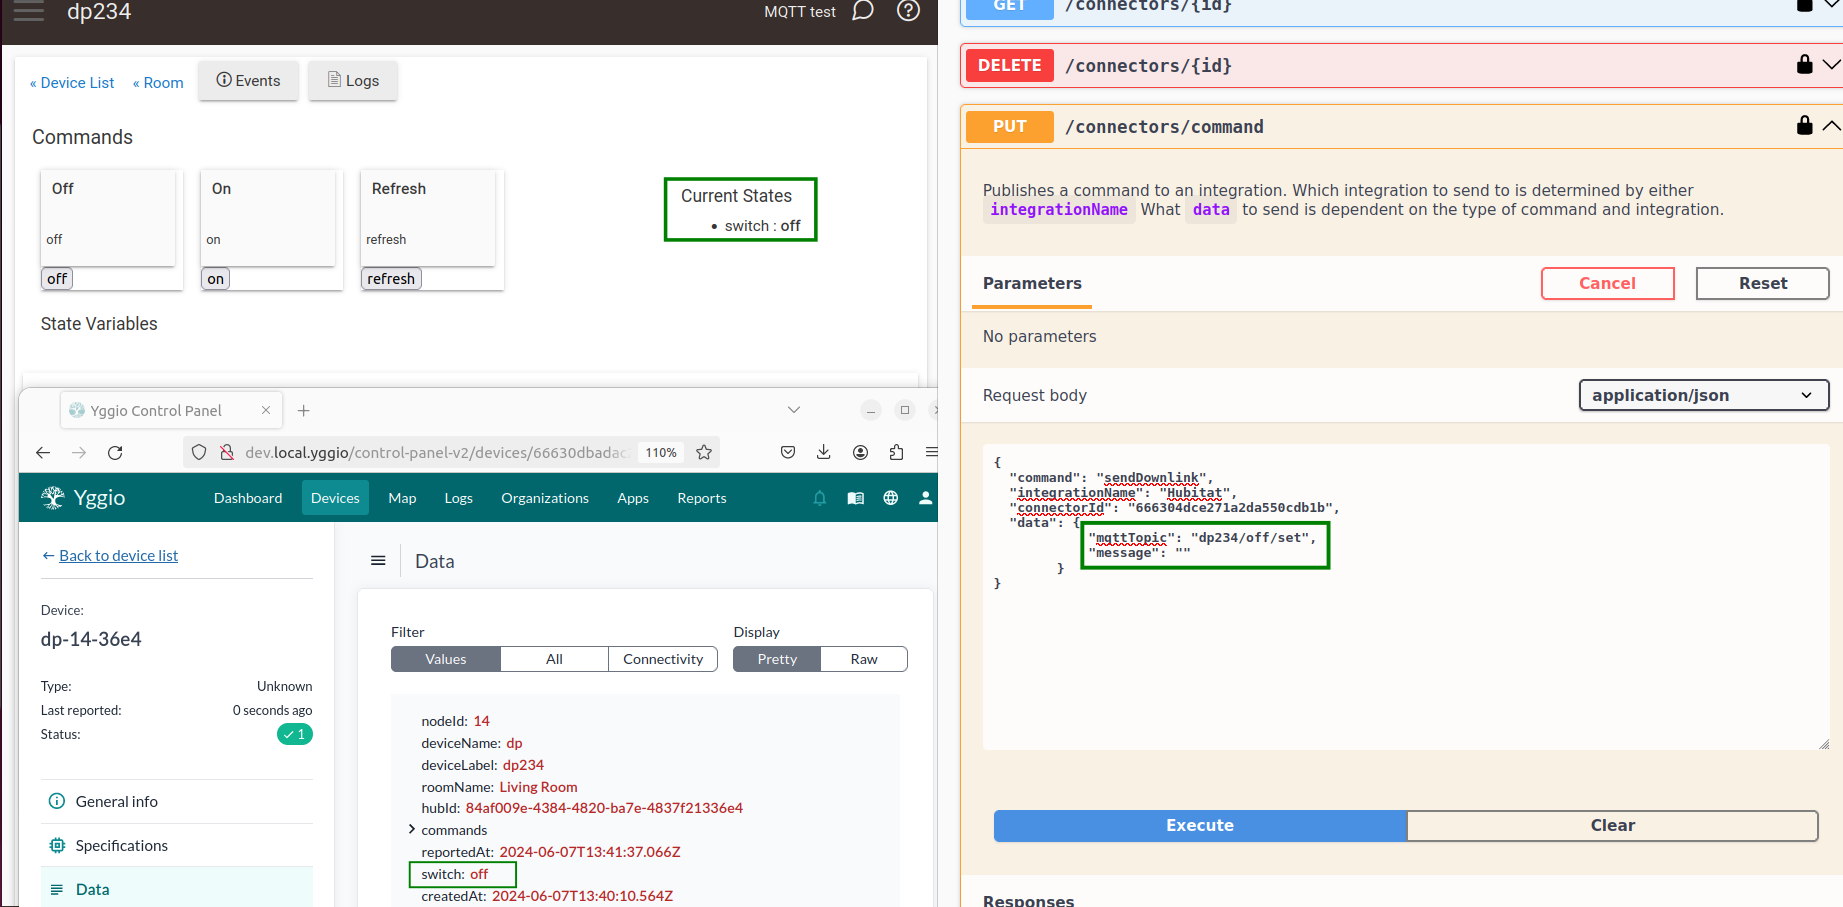
The image marked '6' shows the current state of the virtual Z-Wave switch device on the Hubitat and Yggio side. In the Swagger application, you can set up the downlink command in the
PUT/connectors/commandsection. Here's how:- For the field labeled
"command", the"string"is replaced with"sendDownlink"command. - For the field labeled
"integrationName", replace the"string"with"Hubitat". - For the field labeled
"connectorId", replace the"string"with your actual Connector_idthat you copied when creating the Hubitat Connector or following the steps 1 to 5 in this section. - For the field labeled
"data", add the following JSON.
"data": {"mqttTopic": "dp234/off/set","message": ""}where
"mqttTopic"usually follows the format"[deviceLabel]/[command name]/set"and
"message"is the actual payload you want to send.Notes for the payload
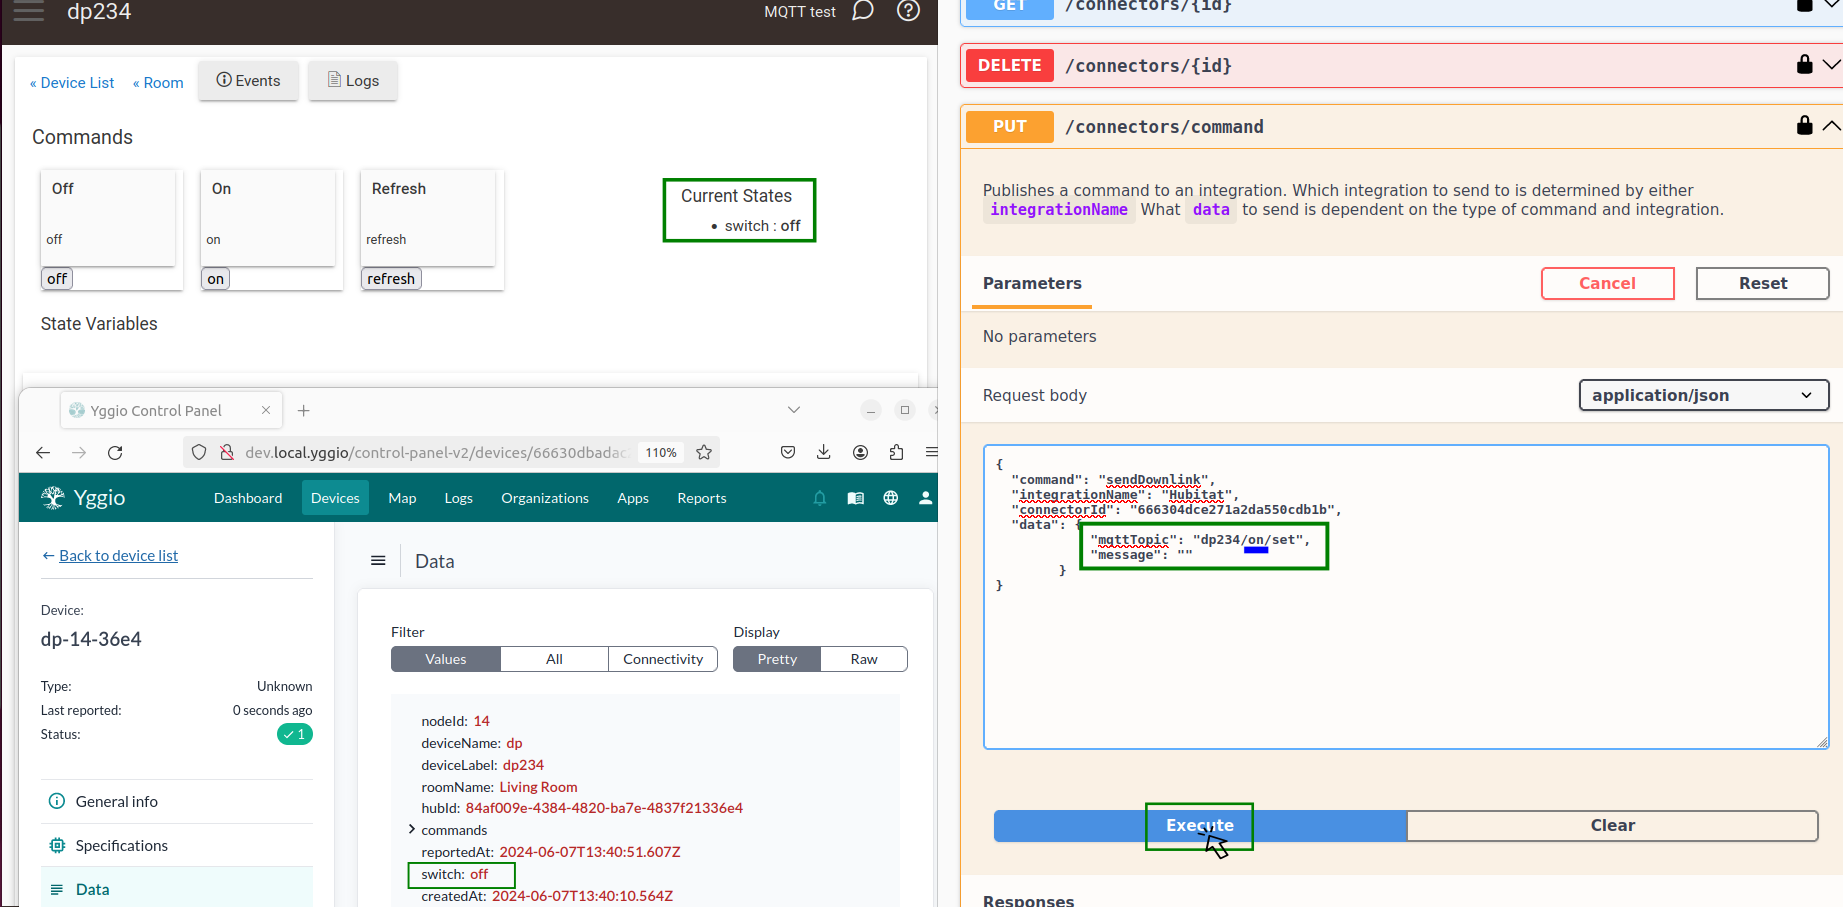
Note 1: For commands that do not require parameters (like 'on' and 'off'), you can publish anything as the value for the /set topic. The Sensative Yggio MQTT App ignores this value.
Note 2: For commands that require multiple parameters, you should separate each parameter with a comma. For example, '80, 25'.
- For the field labeled
Get Connectors response...
The image below shows the current 'off' state of the virtual Z-Wave Switch in both Hubitat and Yggio.
Send 'on' state downlink command from the Swagger application.
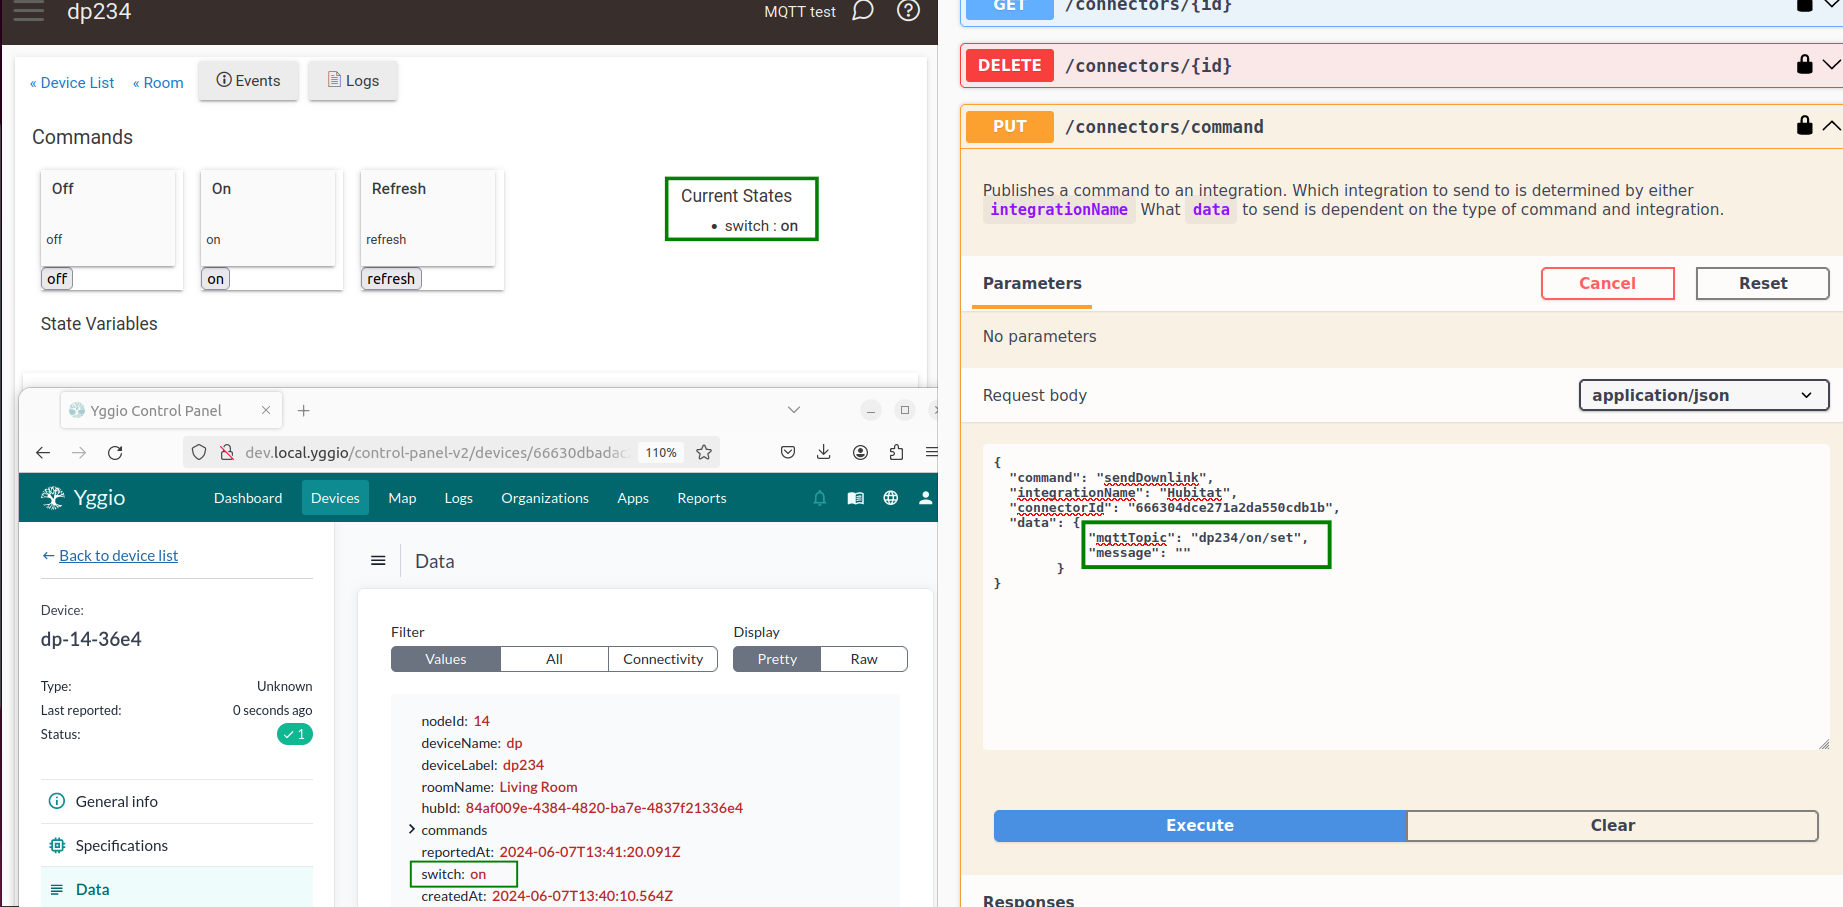
New state - 'on' of the virtual Z-Wave Switch reflected in Hubitat and Yggio.
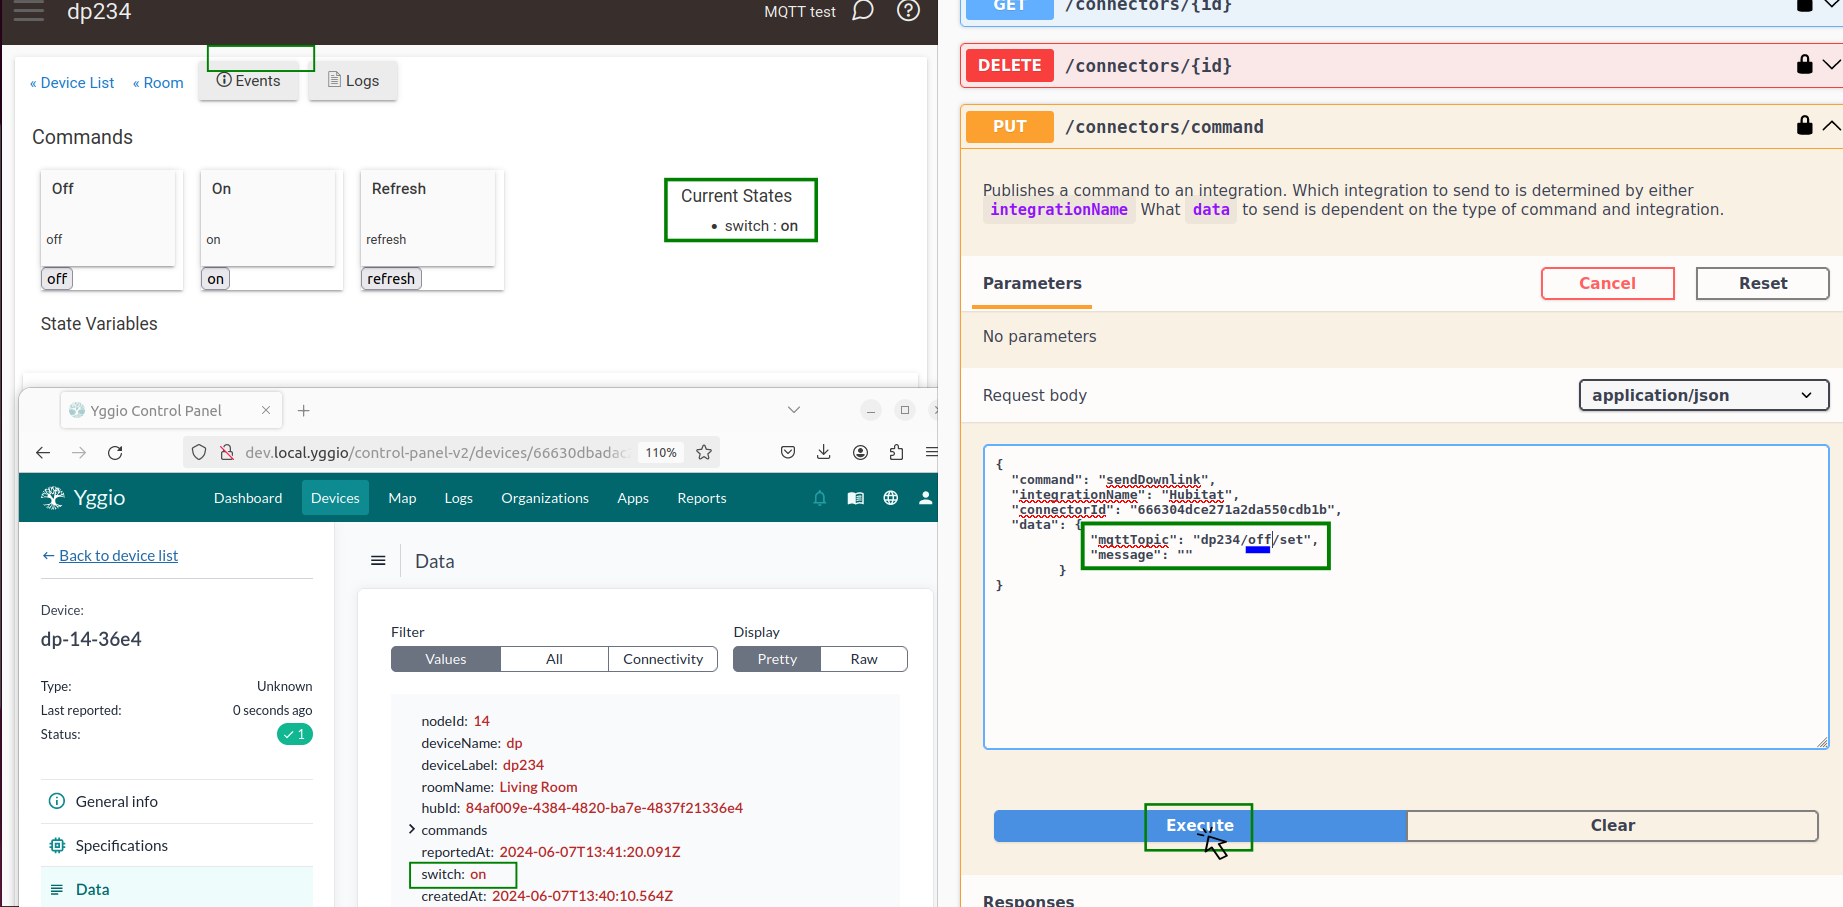
Send 'off' state downlink command from the Swagger application.
New state - 'off' of the virtual Z-Wave Switch reflected in Hubitat and Yggio.
With both sides configured, Hubitat devices appear in Yggio and stay in step, and commands sent from Yggio are carried out on the hub.