Single install
Single mode adds one device at a time through the interface, asking for exactly what that device type needs. Use it for a handful of devices, or for the first device of a new type.
For more than a handful, use Batch install instead, which takes the same information from a CSV file.
Before you start, most device types need a connector to carry their data into Yggio. If you do not have one yet, set that up first - see Connectors.
Install a device, step by step
The wizard shows its progress along the top: Device type, then a step named after the type you picked, then Device model name, Translator, Details and Result. You can go Back without losing what you have entered.
- Navigate to
Devicesfrom the menu bar, then clickNew device. - Click
Single mode. - Select the device type. This decides which fields you are asked for next.
- Complete the fields for that type. See What each device type needs.
- Enter the Device model name. See Device model name.
- Select a translator, so the device's data arrives as named values rather than a raw payload. See Translators.
- Fill in the details: a name, and optionally description, icon, photo, location and contextual parameters. See Details.
- Review the result page to confirm the device was added, or to see what went wrong.
What each device type needs
Each type is identified differently, and that is mostly what these fields are for: they are how Yggio recognises the device when its data arrives. Some types need a connector as well, and one needs nothing at all.
| Device type | What it asks for |
|---|---|
| Generic | A secret of at least 8 characters. You choose it and configure the same value on the device, which then sends it in its payload or URL |
| LoRaWAN | A connector, then whichever fields that connector's network server requires - typically an activation type, the DevEUI and its keys, a class type and a LoRaWAN version. Which ones appear depends on the network server, so the step is different for ChirpStack than for Actility / Netmore ThingPark |
| LoRa Gateway | A connector and the Gateway EUI |
| Sodaq | The device's IMEI |
| Wireless M-bus | The manufacturer - Easymeter (ESV), B Meters (BMT) or Kamstrup (KAM) - and the device ID. If the device uses encryption, the encryption key as well |
| Box2 Gateway | A URL, username and password |
| BLE Device | A connector and the MAC address |
| Weather Device | A weather connector |
| Astro clock | Nothing |
| RSMP Component | A Component ID, an External ID, an RSMP connector and a status code |
Below is the LoRaWAN step for an Actility / Netmore ThingPark connector. It asks for the connector, the activation type, the DevEUI and its keys, the class type, the LoRaWAN version and the connectivity plan. Each field has an information icon explaining what it wants.
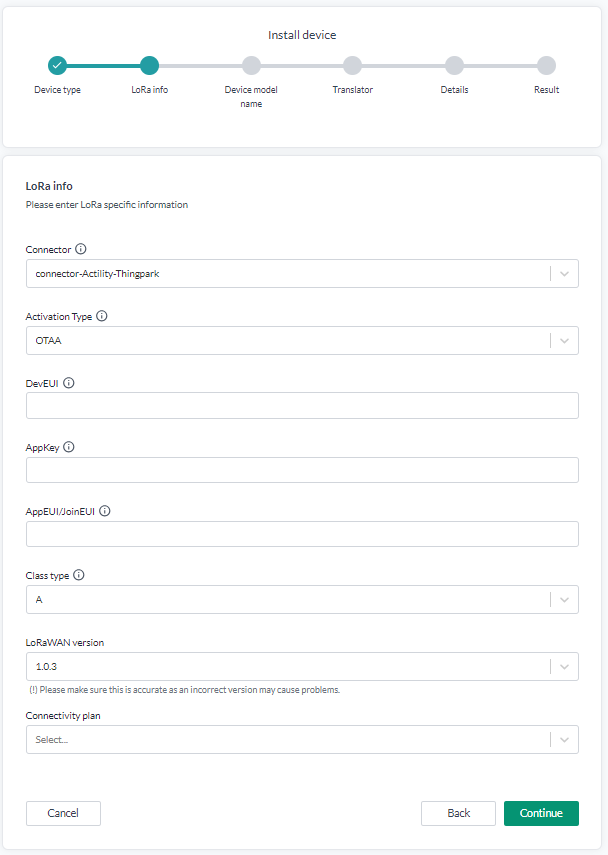
Set the LoRaWAN version correctly, though a mismatch rarely stops a device. Worst case the join fails; more often it costs the occasional lost message.
These identifier fields are the same ones Batch install writes from a CSV column. Device identifiers describes each one in more detail.
Device model name
The model name identifies what the device is, and it is what Yggio uses to suggest a suitable translator. Enter the manufacturer's model designation rather than a description of where the device sits - the name is about the hardware, not the installation.
Keep it consistent across devices of the same model. It is also a filter in the device list, so consistent model names mean you can list every device of one model later.
Translators
A translator decodes the device's payload into named values. Without one, the data arrives but is not interpreted.
The model name you entered is used to recommend one, but you can pick any translator, set its version and upgrade policy, and give it parameters. Several can be chained, each taking the previous one's output as input. The choices are the same as in Batch install, described under Translators.
Details
Only the name is required. It is what you will see in the device list, so name the device for where it is and what it does, not for its model. The model name field already records that.
The rest is optional:
- Description - free text, for anything the fields do not cover.
- Icon and photo - a photo of the installed device is often what tells a later visitor which box on the wall this is.
- Location - places the device on the map.
- Contextual parameters - your own metadata: who installed it, which room, which building. Yggio does not interpret them, but they are searchable and filterable, and installation is when you know them. See Contextual parameters.
All of it can be changed later on the device itself, or in bulk with Select many and Batch update.