Batch install
Batch install adds many devices to the platform at once from a CSV file. A guide walks you through the settings that are the same for every device, and the CSV carries what differs per device.
It also updates devices that already exist. Re-running a CSV file is the normal way to correct an installation: fix the metadata in the file and run it again, and the fields you changed are updated on the devices. See Updating existing devices.
The guide
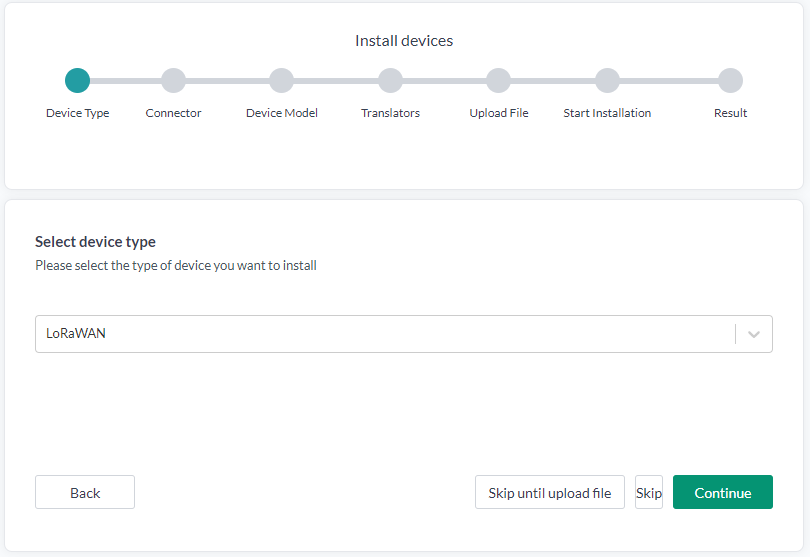
The guide has up to seven steps. Which ones appear depends on the device type: the Connector step only appears for LoRaWAN, and the Device Model and Translators steps do not appear for connector device types.
| Step | What it sets | Applies to |
|---|---|---|
| Device Type | type | Every row |
| Connector | connector, and the LoRaWAN fields for that connector | Every row |
| Device Model | deviceModelName | Every row |
| Translators | The translators, their versions, upgrade policies and parameters | Every row |
| Upload File | Nothing - this is where the CSV goes in | - |
| Start Installation | Nothing - shows the device count and starts the job | - |
| Result | Nothing - what succeeded and what failed | - |
Two buttons let you leave a step unset:
- Skip passes over that one step. The field is then not set for any row, so the CSV has to supply it.
- Skip until upload file passes over all the remaining guide steps and goes straight to the CSV. Use it when the file already contains everything.
Fields the guide sets
This is the full set of fields the guide can put on every row.
| Step | Fields |
|---|---|
| Device Type | type |
| Connector | connector, activationType, appEUI, classType, deviceProfileId, connectivityPlanId, priceModelMessagesCountTypesCompositeCode, lorawanVersionTypeCompositeCode, externalJoinServerEUI, processingStrategyId, domains, routeRefs, frequencyPlanId, loraWANVersion, loraWANPHYVersion |
| Device Model | deviceModelName |
| Translators | translatorPreferences, built from the translators you pick |
The CSV overrides the guide
A value in the CSV wins over the same value set in the guide. The guide is a default for every row; where a row says something different, the row is used. So you can set a translator in the guide for the whole batch and still give twenty of the rows a different translator in the file.
Per field:
| Field | If the CSV row has it |
|---|---|
type | The row wins. The guide's device type is only applied where the column is missing or empty |
deviceModelName | The row wins, same rule |
Translators (translatorXName and friends) | The row wins. Any row with a translator name in it keeps its own translators, and the guide's selection is not added to it |
contextMap, name, description and everything else | Only the CSV sets these; the guide has no field for them |
The Connector step is the exception
Values from the Connector step do not follow the rule above: they are written over the row. If you set a connector in the guide, that connector replaces whatever the
connectorcolumn says, and each connector field you filled in replaces that column too. Fields you left empty in the guide are not touched, so the CSV still supplies those.If your CSV carries per-row connector values, skip the Connector step rather than filling it in, otherwise the file's values are discarded.
For Actility / Netmore ThingPark, the guide can derive the device profile. When the LoRaWAN version
and the class type are both set, they are combined into deviceProfileId and the two source fields
are dropped, so you do not have to look the profile up.
Install devices, step by step
-
Open the Devices tab, then click "New device".
-
Press "Batch mode".
-
Device Type - select the type of device you are installing, then Continue.
-
Connector (LoRaWAN only) - select the connector and, where the connector needs them, the LoRaWAN settings and the Device Profile. Setting them here once avoids mismatched connector and Device Profile values spread across the file.
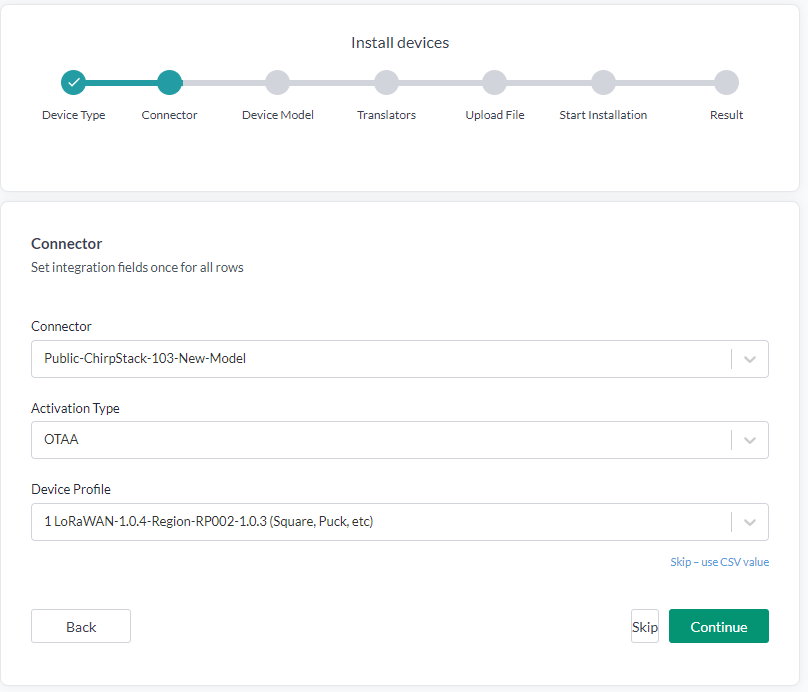
For some connector types the guide also fetches values specific to that connector, such as connectivity plans, and lists each one's name next to its ID. Use that ID in the corresponding CSV column, for example
connectivityPlanIdfor Actility / Netmore ThingPark. If none are found, or the request fails, the guide shows a message instead of the list. -
Device Model - enter the Device model name. It identifies the device and is what suggests a suitable translator.
-
Translators - select the translator to use for the batch, with its version, upgrade policy and any parameters. See Translators below.
-
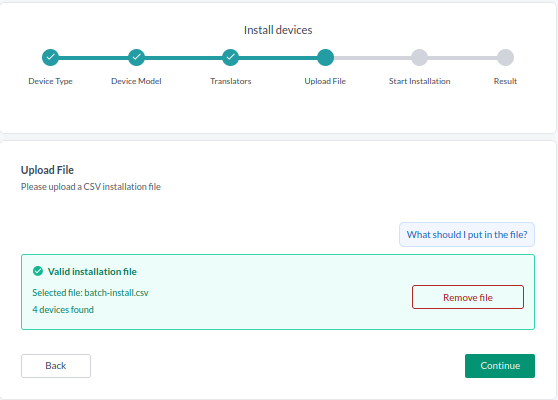
Upload File - drag the CSV onto the box, or press the box and pick the file. See CSV file reference.
-
Start Installation - check the device count, then start. Once started, the installation cannot be stopped.
-
Result - confirm what was installed, and see what failed and why.
Updating existing devices
Batch install does not only create. Running a file again updates the devices it refers to, so it is also the quickest way to repair an installation:
- You installed a batch and then found the metadata was wrong, or a field was missing.
- Edit that column in the same CSV file and run the batch install again.
- The fields present in the file are updated on the devices. Columns you did not touch are left as they are.
Keep the file you installed with. It is both the record of the installation and the tool for fixing it.
For updating devices you did not install from a file, or for renaming in bulk, use Batch Update instead. It works from an export of the devices you want to change.
Once you have completed the guide and uploaded your CSV file, the file is checked and the number of devices found is shown. Press "Continue", then "Start Installation", and all the devices are installed and provisioned automatically.
CSV file reference
The file must be a correctly formatted CSV.

Different device types need different sets of columns. The tables below list what each type and each network server expects.
This reference applies to Batch Update too. Both features read the same kind of CSV, with the same delimiters, the same file encodings and the same rules about field names. Batch Update works from an export of existing devices, so the columns it cares about differ. The formatting rules below are the same in both.
Formatting rules
-
Delimiter: comma or semicolon. Both are accepted.
-
Surrounding spaces in values are trimmed.
-
File encoding: UTF-8, UTF-8 with a byte-order mark, UTF-16 with a byte-order mark, and Windows-1252 / ISO-8859-1 are all read correctly. Å, ä and ö survive whichever of those your spreadsheet saved, which matters because Excel on a Swedish or Windows locale commonly exports Windows-1252 rather than UTF-8. When there is no byte-order mark the file is read as UTF-8 and falls back to Windows-1252 if those bytes are not valid UTF-8. If you have the choice, save as UTF-8: detection is only a heuristic, and BOM-less UTF-16 is not detected.
-
Field names: write them exactly as they appear in the tables below. A misspelled or miscapitalised header is not reported as an error. The column is treated as a new field and stored under that name, so the value silently does not land where you meant it to.
There is one narrow tolerance. The platform case-corrects a header only when the whole header matches one of the plain field names it knows:
name,description,type,deviceModelName,connector,contextMap,secret,activationType,devEui,devAddr,appKey,appEUI,nwkSKey,appSKey,classType,deviceProfileId,connectivityPlanId,priceModelMessagesCountTypesCompositeCode,lorawanVersionTypeCompositeCode,externalJoinServer,externalJoinServerEUI,frequencyPlanId,loraWANVersionandloraWANPHYVersion. For those,devEUIanddeveuiboth resolve todevEui.Everything else is case-sensitive, including:
- the translator columns -
translator1Name,translator1Version,translator1UpgradePolicyandtranslator1.[fieldname]must be exact - anything after a dot - only the part before the first dot is ever corrected, so
contextMap.installedBykeepsinstalledByverbatim - the device identifier fields in Device identifiers, such as
imei,sensorId,serialNumber,meterId,gatewayEui,wMbusDeviceIdandmacAdress - your own contextual parameter and translator parameter names
When in doubt, copy the name out of the table rather than typing it.
- the translator columns -
-
Numbers in translator parameters: a
translatorX.[fieldname]value that looks like a number is stored as a number rather than as text. -
Legacy translator columns in the old
translatorPreferences.0...form are rejected with an error. Use the shorttranslatorXNameform below. -
If you are unsure whether your data is valid, run a batch with a couple of rows before running the whole file.
Common fields
General
| Field | Description |
|---|---|
| name | The device name |
| description | Free-text description |
| type | The device type. Set by the guide's Device Type step where the column is absent |
| deviceModelName | Used for identifying a translator. Set by the guide's Device Model step where the column is absent |
| connector | The id of the desired connector. Use the Connector helper tool, or set it in the guide's Connector step |
| contextMap | Adds contextual parameters. See Contextual parameters |
| translatorXName and friends | Assigns translators. See Translators |
LoRaWAN OTAA - Over the air activation
| Field | Description |
|---|---|
| activationType | OTAA, for ABP see the table further down |
| devEui | DevEUI, the device's 64-bit globally unique identifier, assigned by the manufacturer and printed on the device. It never changes, and it is what the LoRaWAN server knows the device by |
| appKey | Encryption key, called appKey or nwkKey depending on manufacturer |
| appEUI | AppEUI, also called JoinEUI, the 64-bit identifier of the join server the device joins through. Not required by ChirpStack |
LoRaWAN ABP - Activation by personalisation
| Field | Description |
|---|---|
| activationType | ABP |
| devEui | DevEUI, the device's 64-bit globally unique identifier, as above |
| devAddr | DevAddr, the device's 32-bit address on this network. Unlike the DevEUI it is not globally unique and it belongs to the network rather than to the device: with OTAA the server assigns it during the join, and with ABP you set it yourself, which is why it is only listed here |
| nwkSKey | Network session key, used for the message integrity check between the device and the network server |
| appSKey | Application session key, used to encrypt the payload between the device and the application |
| appEUI | AppEUI / JoinEUI, as above. Not required by ChirpStack |
Generic
| Field | Description |
|---|---|
| secret | The identifier the device puts in its own payload or URL so Yggio knows which device sent the data. At least 8 characters. Choose it yourself and configure the same value on the device |
Device identifiers
Every device needs something that identifies it when data arrives, and which field that is depends on how the device reaches Yggio. These are the fields Yggio matches incoming data on. Use the one that belongs to your device type; a device does not need more than one.
| Field | Identifies |
|---|---|
secret | Generic devices, over HTTP, MQTT, CoAP or UDP. At least 8 characters, chosen by you |
devEui | LoRaWAN devices. The 64-bit manufacturer-assigned DevEUI |
gatewayEui | LoRa gateways. The gateway's own 64-bit EUI |
imei | SIM-based devices, such as Sodaq and other NB-IoT or Cat-M devices. The modem's IMEI |
serialNumber | Devices identified by their serial number, such as Celsiview |
sensorId | Devices whose payload carries a sensor id, such as IMBuildings over UDP |
meterId | Metering devices |
deviceIdentification | Elvaco CME devices. Eight characters or fewer |
wMbusDeviceId | Wireless M-bus devices, together with manufacturer |
manufacturer | Wireless M-bus manufacturer: Easymeter (ESV), B Meters (BMT) or Kamstrup (KAM) |
bleAddress | BLE devices, by their Bluetooth address |
macAdress | Devices identified by MAC address. Spelled with one d in the platform, so use that spelling in the column |
nodeId | Z-Wave nodes, by node id |
tag | Devices identified by a tag value |
Network server fields
ChirpStack
| Field | Description |
|---|---|
| deviceProfileId | The id of the device profile, copy from an existing device 'Data' -> 'Connectivity' |
Netmore
| Field | Description |
|---|---|
| classType | A or C |
| priceModelMessagesCountTypesCompositeCode | Use the Connector helper tool |
| lorawanVersionTypeCompositeCode | V100@SENSOR_COMMON, V101@SENSOR_COMMON, V102@SENSOR_COMMON, V103@SENSOR_COMMON or V104@SENSOR_COMMON |
| externalJoinServer | true or false. Set to true when the device joins through a join server outside Netmore |
| externalJoinServerEUI | The 64-bit EUI of that external join server |
Actility / Netmore ThingPark
| Field | Description |
|---|---|
| connectivityPlanId | Use the Connector helper tool |
| deviceProfileId | Can be any supported profile. Common ones are: LORA/GenericA.1.0.2a_ETSI_Rx2-SF12, LORA/GenericC.1.0.2a_ETSI_Rx2-SF12, LORA/GenericA.1.0.3a_ETSI, LORA/GenericC.1.0.3_ETSI, LORA/GenericA.1.0.4a_ETSI or LORA/GenericC.1.0.4a_ETSI. The guide can derive this from the LoRaWAN version and class type instead |
The Things Network
| Field | Description |
|---|---|
| frequencyPlanId | EU_863_870_TTN, US_902_928_FSB_2, AU_915_928_FSB_2, KR_920_923_TTN, AS_920_923 |
| loraWANVersion | MAC_V1_0_0, MAC_V1_0_1, MAC_V1_0_2, MAC_V1_0_3, MAC_V1_0_4 |
| loraWANPHYVersion | PHY_V1_0_2_REV_A, PHY_V1_0_2_REV_B, PHY_V1_0_3_REV_A, RP002_V1_0_0, RP002_V1_0_1, RP002_V1_0_2, RP002_V1_0_3, RP002_V1_0_4 |
Connector helper tool
On the Upload File step, press "What should I put in the file?" to open the instructions panel. The Connector helper tool sits at the bottom of it.
Pick your connector from the "Select connector" dropdown and its ID is shown underneath. That ID
is the value to use in the CSV file's connector column, which saves looking it up elsewhere.
Where the connector type needs more than just its ID, the helper also lists those values with each one's name next to the ID to put in the file - connectivity plans for Actility / Netmore ThingPark, for example, or price models for Netmore. If none are found, it says so.

Translators
Translators are small programs that decode or transform device data.
Selecting a translator
A device's Device model name is used to recommend a suitable translator. You can however pick any translator you want.
Multiple translators
It is possible to have multiple translators on a device. The translators are then "chained", meaning that a translator takes input from the previous translators as well as from the initial device data.
Versions and upgrade policies
A translator can have many versions. You can select a version as well as an upgrade policy, which decides whether a newer version is picked up automatically. There are four policies:
| Policy | Behaviour |
|---|---|
| No upgrades | The selected version is always used |
| Patch upgrades | From 1.0.0, upgrades are limited to patch releases (1.0.x): bug fixes and security updates only |
| Minor upgrades | From 1.0.0, upgrades are limited to minor and patch releases (1.x). May include new features, but should stay backward compatible |
| All upgrades | Includes automatic major version upgrades, which may contain breaking changes. Only enable this if you can verify updates in a controlled environment |
A major version means the translator's data model changed. When you change a version yourself, Yggio shows the old and new data models side by side and asks you to confirm - see Changing a major version. An upgrade policy of All upgrades crosses those boundaries automatically, without asking, which is the reason for the warning in the table above.
Translator columns in the CSV
Set translators in the guide's Translators step for the whole batch, or per device in the CSV. A row that names a translator keeps its own; the guide's selection is not added on top of it.
| Field | Description |
|---|---|
| translatorXName | Translator name |
| translatorXVersion | The version of the translator to use. If not specified, the latest version will be used. If version 1.x.x is specified, the latest version within major version 1 will be used. |
| translatorXUpgradePolicy | The upgrade policy for this translator: - none - always use the selected version - patch - e.g. 1.0.0 → 1.0.x - minor - e.g. 1.0.0 → 1.x - all - always use the newest version Defaults to minor when the column is empty or the value is not recognised. |
| translatorX.[fieldname] | Used for providing translator parameters. Add a column per parameter using the pattern translatorX.[fieldname], e.g. translatorX.protocol. X is a number from 1 to 4 (e.g. translator1, translator2, translator3, translator4). |
X is a number from 1 to 4, so a device can carry up to four chained translators. These column
names are case-sensitive; see Formatting rules.
Use translator1Name, translator1Version and translator1UpgradePolicy to assign a translator,
and translator1.[fieldname] columns to set its parameters. Repeat with translator2,
translator3 and translator4 for additional translators, which are then chained.
name,translator1Name,translator1Version,translator1UpgradePolicy,translator1.protocol,translator2Name,translator3Name,translator4Name
MyDevice1,my-translator,1.0.0,minor,lorawan,my-other-translator,,
MyDevice2,my-translator,1.0.0,patch,lora,,,
MyDevice3,my-translator,1.x.x,,,,,
MyDevice4,my-translator,,minor,,my-2nd-translator,my-3rd-translator,my-4th-translator
For everything else about translators - the catalogue, the data model, writing your own - see Translators.
Contextual parameters
Contextual parameters are your own metadata on a device: where it is, who installed it, what it belongs to. Yggio does not interpret them, but they are searchable and filterable, they can be used in views and custom queries, and they are the usual place to record everything the device itself cannot tell you.
Batch install is the easiest way to set them, because installation is when you know them.
The contextMap column
Add one column per parameter, written in dot notation as contextMap.[name]. The part after the dot
is the parameter name and is taken exactly as you type it, so keep the spelling consistent across
files.
name,contextMap.placement,contextMap.installedBy
MyDevice1,floor,Markus
MyDevice2,roof,Sofia
MyDevice3,wall,Johan
Any number of parameters can be set this way.
Data types and how to override them
Values are typed by what they look like. A value that parses as JSON is stored as an object or
an array, so {"floor":2} and [1,2,3] keep their structure. Otherwise a numeric value is stored
as a number, true and false as booleans, and anything else as text.
That is usually what you want, but it catches values that only look numeric: a serial number, a
room called 0123, a phone number, a postcode with a leading zero. Stored as a number, the leading
zero is gone and the value no longer matches what is printed on the device.
So whenever the uploaded file contains contextMap columns, the Upload File step shows a
contextMap data types panel. It lists every parameter with a sample value from your file and the
type auto-detection chose, and a Force String toggle to keep that column as text instead.
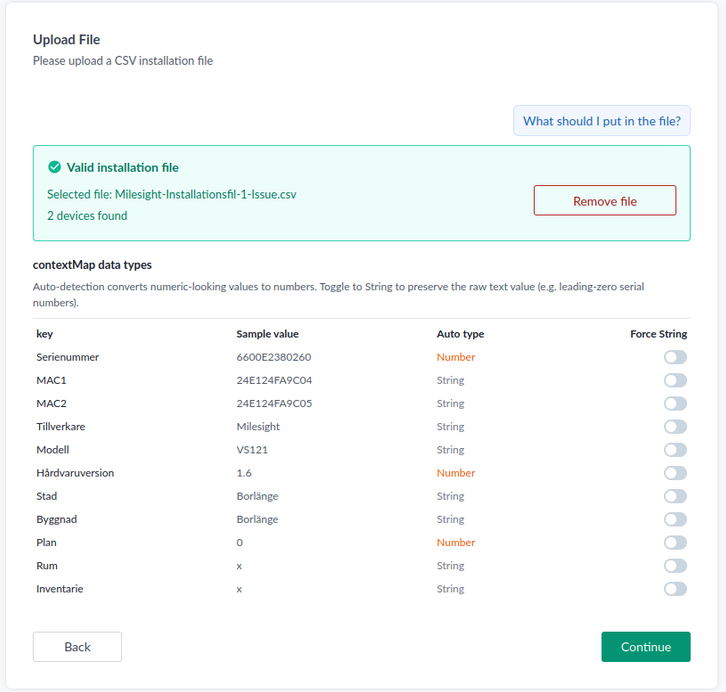
Check the Auto type column before continuing, and toggle Force String on anything that should
stay text. In the example above Serienummer and Hårdvaruversion were both read as numbers, and a
floor of 0 too - all three are cases where you probably want the raw text preserved.
Contextual parameters can be edited later on the device itself, or in bulk with
Select Many and Batch Update. Re-running the batch install file
with a changed contextMap column updates them too, as described under
Updating existing devices.