Generic MQTT Connector
Connector details Generic
The Generic MQTT connector allows the platform to publish data either on its own MQTT broker or an external MQTT broker. The main difference compared to an MQTT Channel is that publishing is done either by API or the Rule Engine, and the data can be reformatted before publishing. This provides the benefit that both the topic and data format can be adapted to match the requirements of an external system.
⚠️ It is currently not possible to use the Generic MQTT connector to subscribe to an MQTT broker.
Publishing Data on the Platform Internal MQTT Broker
To publish data on the platform MQTT broker, a basicCredentialsSetId must first be created. This currently needs to be done through the API / Swagger at the endpoint:
https://staging.yggio.net/swagger/#/BasicCredentialsSets/createBasicCredentialsSet
Steps
- Log in to Swagger with your credentials:
https://staging.yggio.net/swagger/#/Authorization/login - Copy the token.
- Go to the top-right corner in Swagger and add the token in the "Authorize" box.
- Navigate to the Basic Credential Set endpoint and create your username and password.
- Note the returned ID.
These credentials (username, password, and ID) will be used together with the topic by your external system to subscribe to the published data.
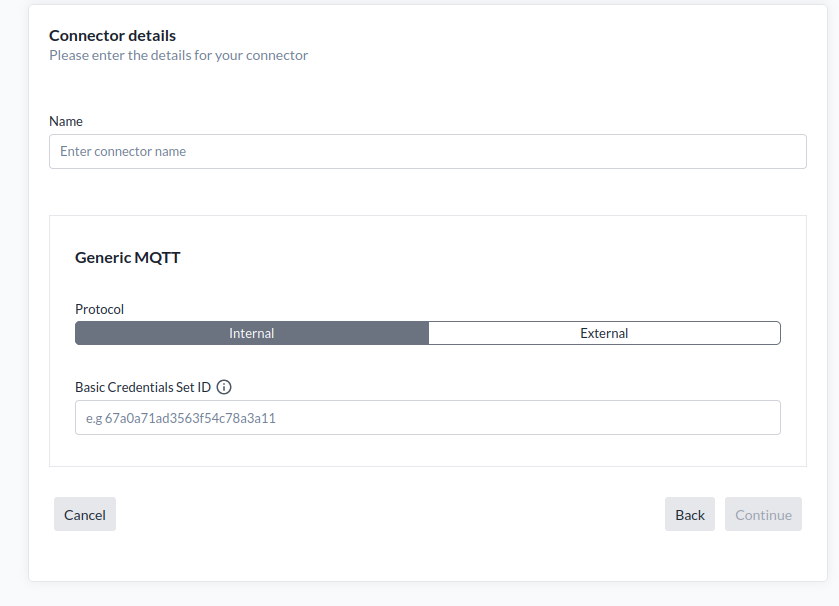
Required Information
To set up a Generic MQTT connector, provide the following:
- a. Basic Credential Set ID: The ID of the Basic Credential Set that defines the MQTT username and password.
Configure remote system
To subscribe to the platform MQTT broker, configure the remote system as follows:
- a. MQTT broker URL: mqtt.staging.yggio.net
- b. Port:
8883for secure TLS (strongly recommended)1883for unencrypted data
- c. Topic: The base topic for the platform internal MQTT broker cannot be configured. It will always be
yggio/push/v1/<BasicCredentialsSetId>/#. The#symbol in the topic will be replaced with a device-specific unique identifier by the publish command. - d. MQTT username: As defined in the Basic Credential Set.
- e. MQTT password: As defined in the Basic Credential Set.
- f. MQTT version: You can subscribe with either MQTT v3.1.1 or MQTT v5.
Publishing Data on an External MQTT Broker
To publish data on an external MQTT broker, the broker must first be configured to accept the data published by the platform, i.e. topic, username and password must be configured and the host URL known.
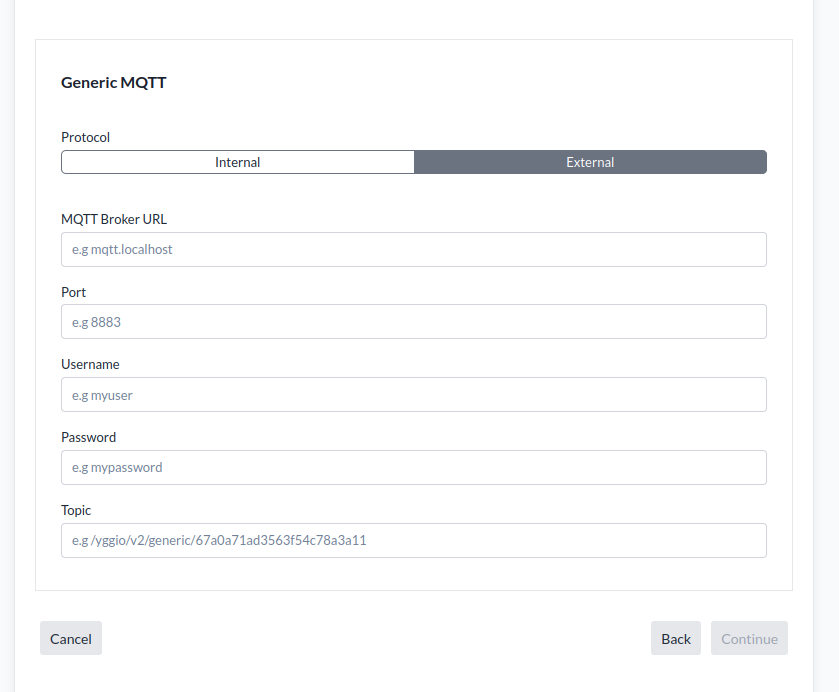
Configure remote system
Configure the remote system as follows:
- a. Port:
8883for secure TLS (strongly recommended)1883for unencrypted data
- b. Topic: The base topic the platform should publish data on. The publish command then appends a device-unique identifier to that base topic as a subtopic.
- c. MQTT username: The username.
- d. MQTT password: The password.
Required Information
To set up a Generic MQTT connector to publish on an external MQTT broker, provide the following as configured in the remote system:
- a. MQTT broker URL: The URL of the MQTT broker
- b. Port: The port number
- c. Topic: The base topic the platform should publish data on.
- d. MQTT username: The username.
- e. MQTT password: The password.
Using the Platform MQTT Broker as an External Broker
It is feasible to use the platform MQTT broker as an external broker in the Generic MQTT integration. This opens up some interesting use cases:
- Share data from one platform instance to another.
- Remove sensitive data before sharing it with another user.
- Use command buttons to trigger events in the platform.
Setup Instructions
-
Log in to Swagger in the platform instance you want to publish data to, by following the instructions above.
(It could be the same instance where you configure the Generic MQTT Connector.) -
Create a Basic Credential Set:
https://staging.yggio.net/swagger/#/BasicCredentialsSets/createBasicCredentialsSet -
Reserve MQTT Sub Topics for all IoT nodes you want to publish data on:
https://staging.yggio.net/swagger/#/ReservedMqttTopics/createReservedMqttTopic- The topic must follow the structure:
yggio/generic/v2/<unique identifier>
- The topic must follow the structure:
-
Create the Generic MQTT Connector with the following configuration:
- MQTT broker URL:
mqtt.staging.yggio.net
(or another platform instance) - Port:
8883(Secure TLS) - Topic:
yggio/generic/v2 - MQTT username: As defined in the Basic Credential Set.
- MQTT password: As defined in the Basic Credential Set.
- MQTT broker URL:
Result
When you publish data, a New IoT node will be created in the platform. You can then:
- Share it with specific users, or
- Add a custom translator with specific logic to handle the incoming data.
Publishing Data with the Generic MQTT Connector
In the sections above, we created different types of Generic MQTT Connectors but did not publish any data.
To publish data, you must either:
- Add a Send MQTT action to a rule in the Rule Engine, or
- Send a command directly to the connector through the API.
Create a rule
Using the Rule Engine to publish data is the most common use case for the Generic MQTT Connector.
The principle is simple:
- Use any type of trigger for the rule.
- Add a Send MQTT action, pointed at this connector.
- In the action, build the topic and the payload you want to publish, using placeholders for the values that come from the triggering device.
Setup Instructions
- Go to the Rule Engine and create a rule.
- Add a trigger: Device updated, Missing expected report, or Button if you want to publish on demand from a Command Button widget.
- Optionally add a Value threshold condition, so the rule only publishes when the value matters.
- Add a Send MQTT action and connect it to the trigger, or to the branch of the condition you want it to run on.
- In the action, select the Generic MQTT Connector and fill in:
-
Topic
The sub-topic that is appended to the connector's base topic.
Since the sub-topic usually needs to be unique per device, common choices are:{{iotnode._id}}{{iotnode.devEui}}{{iotnode.secret}}
-
Payload
The message to publish. Placeholders such as{{iotnode.temperature}}and{{diff.temperature}}are substituted before publishing, so the payload can be shaped to match whatever the receiving system expects.
- On an action connected to a condition, set the execution policy: On enter, On exit or Every event.
Both the topic and the payload support the {{path}} placeholder syntax. For the full list of
placeholders and what they resolve to, see Rule Engine.
Example topics and payloads
Command Button as trigger, to set power level to 50 %
| Topic | {{iotnode._id}} |
| Payload | {"powerLevel":50} |
Command Button as trigger, to set power to off
| Topic | {{iotnode._id}} |
| Payload | {"command":"off"} |
Reformat temperature to NGSI-LD format
| Topic | {{iotnode.devEui}} |
| Payload | {"temperature":{"value":{{iotnode.temperature}},"unit":"°C","type":"property"}} |
Reformat LoRaWAN signal quality parameters to NGSI-LD format
| Topic | {{iotnode.devEui}} |
| Payload | {"rssi":{"value":{{iotnode.rssi}},"unit":"dB","type":"property"},"snr":{"value":{{iotnode.snr}},"unit":"dB","type":"property"},"frameCount":{"value":{{iotnode.frameCount}},"type":"property"},"spreadingFactor":{"value":{{iotnode.spreadingFactor}},"type":"property"}} |
The payload is the message itself, so the JSON does not need to be stringified or its quotes escaped, as it did in the legacy Rule Engine.
Command API
The Generic MQTT Connector will publish data when it gets a sendDownlink command through the API. This is an example
curl --location --request PUT "https://staging.yggio.net/api/connectors/command" \
    --header "Authorization: Bearer <token>" \
    --header "Content-Type: application/json" \
    --data '{
        "command": "sendDownlink",
        "integrationName": "Generic",
        "connectorId": "<connector _id>",
        "data": {
            "mqttTopic": "subTopic",
            "message": "myMessage as stringified JSON"
        }
    }'