Actility / Netmore ThingPark DX Connector:
Actility / Netmore ThingPark Integration via DX API
The platform integrates with Actility / Netmore ThingPark using the DX API.
- Default DX API URL:
https://dx-api.thingpark.com/⚠️ This URL may differ depending on your ThingPark provider.
What the Connector Does
Using the DX API, the connector allows the platform to:
- Provision new devices
- Import existing devices
- Instruct ThingPark to publish device data to Yggio’s MQTT broker
Authentication & Connectivity
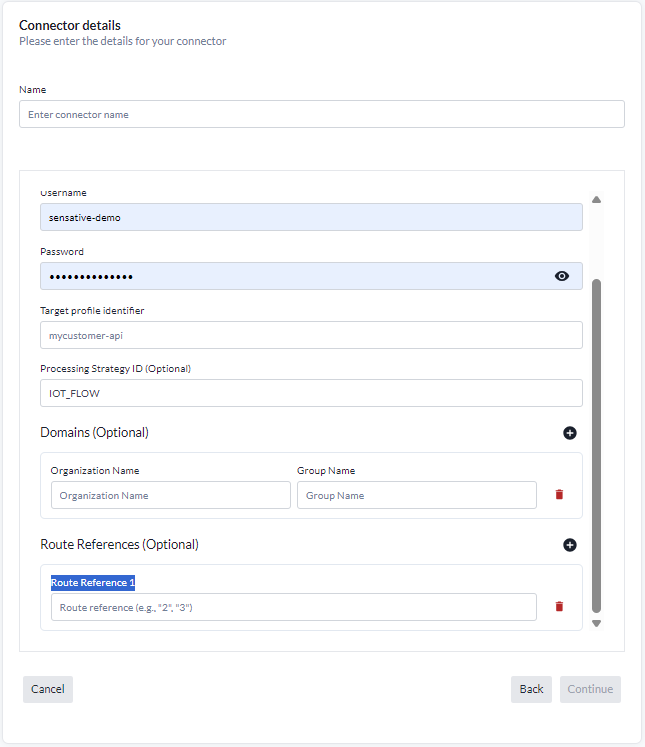
The DX API uses OAuth 2.0 authentication. The following credentials are required:
- DX API URL – Default:
https://dx-api.thingpark.com/, but may vary - Username – Valid for the domain of the selected profile
- Password – Corresponding password for the username
- Target Profile Identifier (optional) – Specifies the ThingPark domain and operator account used for API operations. ThingPark Enterprise hosts do not use one; leave it empty there
- Processing Strategy ID (optional) – The ThingPark processing strategy applied to devices provisioned through this connector, for example
IOT_FLOW - Domains (optional) – One or more ThingPark domains the device should belong to, each entered as an Organization name and a Group name
- Route References (optional) – One or more ThingPark route references, entered as Route Reference 1, Route Reference 2 and so on
Target Profile Identifier
This represents a combination of a ThingPark domain (e.g.,mycustomer.thingpark.com) and the operator account used to perform API operations and other parameters related to token generation.
Your ThingPark provider will supply this identifier and it must be pre-configured within the DX platform.Leave it empty on a ThingPark Enterprise host, which has no target profile. The login alone is then used to obtain a token, and a value the platform does not recognise is rejected with "Profile not defined on the server".
ThingPark Enterprise
An Enterprise platform serves the same API under a/thingpark/dxprefix, so enter the URL ashttps://<host>/thingpark/dx, for examplehttps://thingparkenterprise.eu2.actility.com/thingpark/dx. Everything else is configured the same way.A connector keeps the OAuth client it was created with. Editing its URL or target profile afterwards does not change how it authenticates, so to move an existing connector to an Enterprise host, create a new connector instead.
The three optional settings
Processing Strategy ID, Domains and Route References are ThingPark concepts rather than Yggio ones. They are most often needed with on-premises or operator-specific ThingPark installations; on a standard hosted ThingPark they can usually be left empty.Yggio stores them on the connector and passes them to ThingPark when it provisions a new device and when it updates an existing one. They are not used anywhere else, so a change takes effect for devices created or synchronized from that point onwards, not retroactively.
The values come from your ThingPark provider or administrator: ask which processing strategy, which domains and which routes your account expects. A value ThingPark does not recognise will cause provisioning to fail rather than being ignored.
Processing Strategy ID can also be set on an individual device, and the device's own value takes precedence over the connector's.
Two ways to receive uplinks
There are two ways to get device data from ThingPark into the platform, and you pick one when you create the connector.
A ThingPark-hosted broker. ThingPark keeps the data on its own MQTT broker and the platform connects outwards to collect it. Nothing has to be set up on our side, so this is the simpler option and the one used by customers migrating from the Netmore LoRaWAN Portal.
Tick External MQTT broker in the connector form and fill in:
| Field | Value |
|---|---|
| MQTT URL | The broker hostname from your provider, for example thingparkenterprise.eu2.actility.com |
| MQTT username | The service account Client ID |
| MQTT password | The service account Client Secret |
| Topic | The topic the broker publishes on, for example thingpark/things/+/uplink |
The service account is created in your Subscriber account. The same account can be used both for this connection and for the API integration.
The ThingPark-hosted broker is not enabled by default. Ask your provider to turn it on.
Publishing into the platform's broker. ThingPark pushes the data to us instead. The platform generates the MQTT account for you when the connector is saved, so this needs nothing set up by hand either. Pick whichever matches how your provider delivers the data.
Leave External MQTT broker unticked and follow the section below.
Setting Up MQTT Export (ThingPark → Yggio)
To publish data from ThingPark into Yggio, you must configure MQTT Export on both ends.
Required Steps:
-
Create the connector. When it is saved, the platform generates an MQTT username and password for it, and shows them on the last step of the wizard together with the two topics below, each with a copy button. Copy them from there rather than assembling them by hand.
The password is shown once. It is stored hashed and cannot be retrieved later. Copy it before leaving the page. Lost it? Delete the connector and create it again.
-
Configure ThingPark MQTT Export with the following values:
| Field | Value |
|---|---|
| Hostname | mqtt.staging.yggio.net:8883 |
| MQTT Username | the username the platform generated |
| MQTT Password | the password the platform generated |
| Published Topics | the published topic the platform generated, ending /things/{DevEUI}/uplink |
| Subscribed Topics | the subscribed topic the platform generated, ending /things/{DevEUI}/downlink |
| Protocol | SSL |
| CA Certificates | None required unless using a custom/on-prem ThingPark installation |
Table of what MQTT information that needs to get updated with correct information
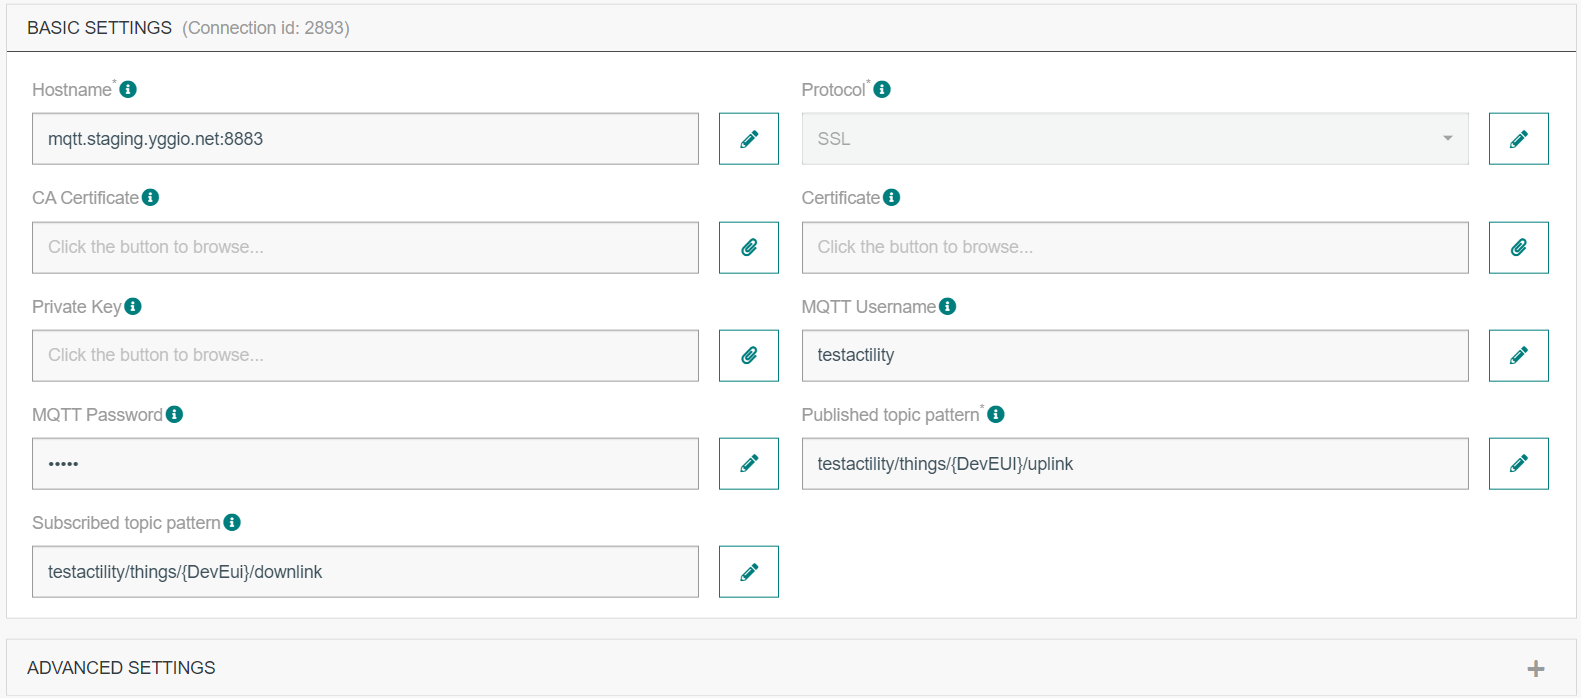 The thingpark MQTT connection setup details that should be updated with correct information
For complete setup instructions, refer to Actility’s and Netmore’s official MQTT connector documentation:
https://docs.thingpark.com/thingpark-x/latest/Connector/MQTT/
Verifying the Connector
-
The platform will automatically verify the connection when the connector is created,
but this does not guarantee full functionality. -
To perform a full verification:
- Create a device in the platform using the Actility / Netmore ThingPark connector.
- After creation, open the device page.
- Go to Tools and check the Synchronize status - it should not say
"never". - Click the Synchronize button manually to confirm it works successfully.
- Log in to ThingPark and confirm that the device has been provisioned.
- Trigger (or wait for) the device’s first uplink.
- Ensure that the uplink is received and properly decoded by the platform.
Import devices:
Once the connector is properly configured, you may want to import existing devices from ThingPark into the IoT platform. This can be done directly from the Connector UI and the platform will always attempt to import all accessible devices.
Multi account setup:
There are two primary ways to integrate ThingPark with the IoT platform. The key consideration is how billing to end users should be handled-via ThingPark, via the IoT platform, or a combination of both. If your users will access the IoT platform directly, you must configure Organization Manager to ensure each user only sees the devices they’re authorized to access.
Integration Options
-
Billing through ThingPark or both systems:
Mirror the ThingPark organization structure in the IoT platform.
Create one connector per ThingPark customer. -
Billing through the IoT platform only:
Use a flat setup in ThingPark, with all devices managed in a single location.
Only one connector is needed in the IoT platform.
⚠️ Important:
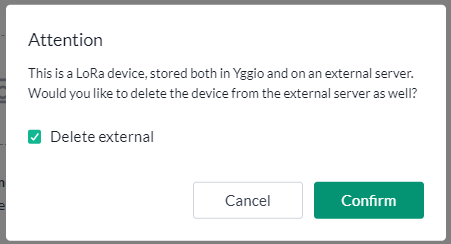
If a device is deleted from the IoT platform, it will by default also be deleted and decommissioned from the ThingPark LoRaWAN server. To avoid this, make sure to opt out of the delete action when prompted during the confirmation dialog.
Troubleshooting
Device Provisioning Fails
A red error message (toaster) appears when adding a new device, and price models do not show up. This typically indicates an issue with your URL, credentials, access rights or Target Profile Identifier. Eliminate these one at a time:
- Double-check the URL-make sure there’s no trailing
/at the end. - Verify that the Username, Password, Target Profile Identifier and Access permissions are correct.
- If you filled in Processing Strategy ID, Domains or Route References, confirm each value exists in ThingPark. They are sent as part of the provisioning request, so a value ThingPark does not recognise will reject it. Clearing them is a quick way to rule them out.
If above does not reveal the issue:
- Go to the DX API URL:
https://dx-api.thingpark.com/(or your operator’s custom DX API URL) - Try to log in using your username and password.
- If login fails or no token is returned:
- Contact your ThingPark provider to confirm the correct credentials and Target Profile Identifier.
I get no data when the device sends uplinks
Likely root cause is mismatch or misconfiguration in the MQTT export setup between ThingPark and Yggio. Go to the sensor in the ThingPark portal.
- Confirm the MQTT topics match on both the ThingPark side and IoT Platform side.
- Double-check the MQTT username, password, and base topic.
- Ensure that SSL and port settings (
mqtt.staging.yggio.net:8883) are correctly configured.
ThingPark MQTT documentation: https://docs.thingpark.com/thingpark-x/latest/Connector/MQTT/
I have an API Gateway between me and ThingPark - what should I do?
- Ensure the API gateway gives access to both the ThingPark API and that ThingPark gets access to the IoT platform MQTT broker.
- When creating the connector, update the API URL to point to the gateway endpoints that route correctly to ThingPark.
- An API gateway may use organization specific certificates that may need to get added to the IoT platform, contact Sensative support to add the required certificates.
I get a 40x error when trying to import or create devices - what could be the issue?
- A 40x error means ThingPark is rejecting the request. This is usually caused by:
- Incorrect credentials
- Wrong URL
- Missing or incorrect access rights on the ThingPark side
- Go through the setup again and verify the following:
- Username, password, API URL
- Target Profile Identifier
- Also confirm:
- The user accounts access rights
I still get a 40x error even after following the steps above. What now?
- If everything looks correct in your ThingPark account, proceed with advanced troubleshooting:
- Go to the DX API URL:
https://dx-api.thingpark.com/(or your operator’s custom DX API URL) - Try to log in using your username, password and Target Profile Identifier.
- If login fails, contact ThingPark support-API authentication may not be fully configured on their end.
- If login succeeds, test other endpoints to confirm your access rights via the API.