Enkelinstallation
Single mode lägger till en enhet i taget via gränssnittet och frågar efter exakt det som just den enhetstypen behöver. Använd det för en handfull enheter, eller för den första enheten av en ny typ.
För mer än en handfull, använd batchinstallation i stället, som tar samma information från en CSV-fil.
Innan du börjar: de flesta enhetstyper behöver en connector för att bära sin data in i Yggio. Om du inte har någon ännu, sätt upp den först - se Connectors.
Installera en enhet steg för steg
Guiden visar sitt förlopp längst upp: Device type, sedan ett steg som är namngivet efter den typ du valde, sedan Device model name, Translator, Details och Result. Du kan gå Back utan att förlora vad du fyllt i.
- Gå till
Devicesi menyraden och klicka sedan påNew device. - Klicka på
Single mode. - Välj enhetstypen. Den avgör vilka fält du får fylla i härnäst.
- Fyll i fälten för den typen. Se Vad varje enhetstyp behöver.
- Ange enhetens modellnamn. Se Enhetens modellnamn.
- Välj en översättare, så att enhetens data kommer in som namngivna värden i stället för en rå nyttolast. Se Översättare.
- Fyll i detaljerna: ett namn, och eventuellt beskrivning, ikon, foto, plats och kontextuella parametrar. Se Detaljer.
- Granska resultatsidan för att bekräfta att enheten lades till, eller för att se vad som gick fel.
Vad varje enhetstyp behöver
Varje typ identifieras på olika sätt, och det är mest vad dessa fält är till för: de är hur Yggio känner igen enheten när dess data kommer in. Vissa typer behöver även en connector, och en behöver ingenting alls.
| Enhetstyp | Vad den frågar efter |
|---|---|
| Generic | Ett secret på minst 8 tecken. Du väljer det själv och konfigurerar samma värde på enheten, som sedan skickar det i sin nyttolast eller URL |
| LoRaWAN | En connector, sedan de fält som den connectorns nätverksserver kräver - typiskt en aktiveringstyp, DevEUI och dess nycklar, en klasstyp och en LoRaWAN-version. Vilka som visas beror på nätverksservern, så steget skiljer sig för ChirpStack jämfört med Actility / Netmore ThingPark |
| LoRa Gateway | En connector och gatewayens EUI |
| Sodaq | Enhetens IMEI |
| Wireless M-bus | Tillverkaren - Easymeter (ESV), B Meters (BMT) eller Kamstrup (KAM) - och enhetens ID. Om enheten använder kryptering, även krypteringsnyckeln |
| Box2 Gateway | En URL, användarnamn och lösenord |
| BLE Device | En connector och MAC-adressen |
| Weather Device | En weather-connector |
| Astro clock | Ingenting |
| RSMP Component | Ett Component ID, ett External ID, en RSMP-connector och en statuskod |
Nedan är LoRaWAN-steget för en Actility / Netmore ThingPark-connector. Det frågar efter connectorn, aktiveringstypen, DevEUI och dess nycklar, klasstypen, LoRaWAN-versionen och connectivity plan. Varje fält har en informationsikon som förklarar vad det vill ha.
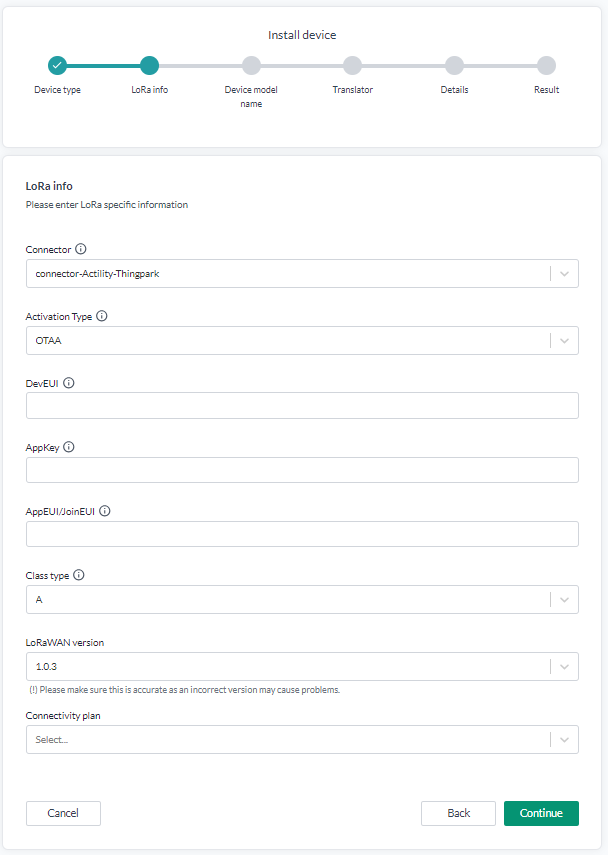
Sätt LoRaWAN-versionen rätt, även om en felaktig version sällan stoppar en enhet. I värsta fall misslyckas anslutningen; oftare kostar det bara ett bortfallet meddelande då och då.
De här identifieringsfälten är samma som batchinstallationen skriver från en CSV-kolumn. Enhetsidentifierare beskriver var och en mer i detalj.
Enhetens modellnamn
Modellnamnet identifierar vad enheten är, och det är vad Yggio använder för att föreslå en lämplig översättare. Ange tillverkarens modellbeteckning snarare än en beskrivning av var enheten sitter - namnet handlar om hårdvaran, inte om installationen.
Håll det konsekvent mellan enheter av samma modell. Det är också ett filter i enhetslistan, så konsekventa modellnamn betyder att du kan lista varje enhet av en modell senare.
Översättare
En översättare avkodar enhetens nyttolast till namngivna värden. Utan en sådan kommer datan in men tolkas inte.
Modellnamnet du angav används för att rekommendera en, men du kan välja vilken översättare som helst, sätta dess version och uppgraderingspolicy och ge den parametrar. Flera kan kedjas, där var och en tar den föregåendes utdata som indata. Valen är samma som i batchinstallationen, beskrivna under Översättare.
Detaljer
Bara namnet är obligatoriskt. Det är vad du kommer att se i enhetslistan, så namnge enheten efter var den sitter och vad den gör, inte efter modellen. Fältet för modellnamn dokumenterar redan det.
Resten är valfritt:
- Beskrivning - fritext, för allt som fälten inte täcker.
- Ikon och foto - ett foto av den installerade enheten är ofta det som talar om för en senare besökare vilken dosa på väggen det här är.
- Plats - placerar enheten på kartan.
- Kontextuella parametrar - din egen metadata: vem som installerade den, vilket rum, vilken byggnad. Yggio tolkar dem inte, men de är sökbara och filtrerbara, och installationen är då du känner dem. Se Kontextuella parametrar.
Allt kan ändras senare på enheten själv, eller i bulk med Select many och batchuppdatering.