Organisationshanteraren
Det här är huvudvägen till att ge personer åtkomst till enheter i Yggio. Bygg trädet, placera personerna i det, dela resurser in i det, och vem som når vad följer av var var och en sitter.
Åtkomsträttigheter på en enskild resurs och användargrupper är reservvägen, för de tvärgående fall ett träd inte kan uttrycka: någon som behöver en enhet ur en gren de inte tillhör, eller en uppsättning personer sammansatt över organisationsgränser. Ta till dem när en organisation inte kan uttrycka den delning ni vill ha.
En organisation är ett träd av enheter som resurser delas in i, och där medlemmar ges åtkomst vid en punkt i trädet. Dela en enhet vid en organisationsenhet så når alla med åtkomst till den enheten den, inklusive alla längre upp.
Har du hanterat behörigheter i ett filsystem känner du redan formen. Enheter är mappar, resurser är filer, och åtkomst given på en mapp når allt inuti den.
| Begrepp | Vad det är |
|---|---|
| Organisation | Hela trädet, dess medlemmar och de resurser som delats in i det |
| Rotenhet | Trädets topp. Döps oftast om till organisationens namn |
| Underenhet | En enhet inuti en annan enhet |
| Medlem | Ett användarkonto som tillhör organisationen |
| Resurs | En enhet, app, connector, rapportmall, basic credentials set, dashboard, bild, geofence eller enhetsgrupp |
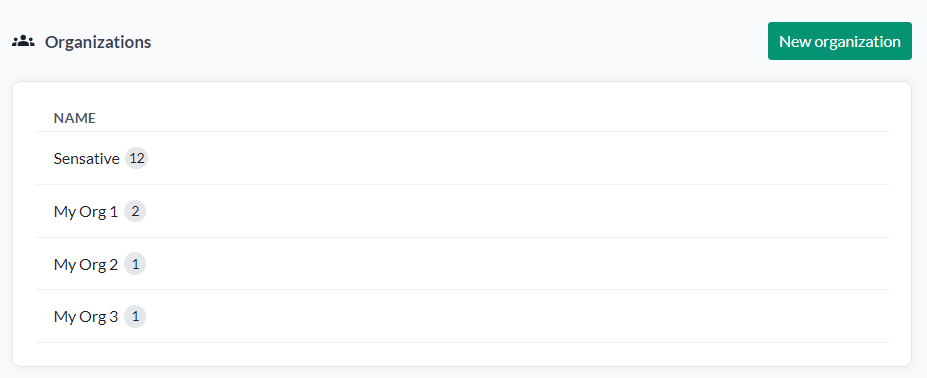
Organizations i toppraden listar varje organisation du når, med antal medlemmar. Att öppna en placerar dig i dess träd, med enhetshierarkin i sidopanelen.
Resten av den här sidan följer produkten i tre delar:
- Organisationen - Manage organization: själva organisationen, dess medlemmar och kontakter, och vad som delats in i den. Den ger ingen åtkomst till något.
- En organisationsenhet - där åtkomsträttigheter ges.
- Varumärkesprofil - organisationens flik Branding: ert eget namn, er logotyp och era färger i Yggio.
Börja här
Snabbaste vägen igång
En enhet, och inget träd att designa:
- Skapa organisationen. Den kommer med en rotenhet; låt det stanna vid den.
- Lägg till era personer på fliken Members, och ge dem sedan åtkomst på rotenhetens flik Unit members.
- Sätt Share all resources? till Yes för minst en medlem. Allt den medlemmen äger delas därmed vid roten, och alla med åtkomst där kan arbeta med det.
Då är organisationen igång. Underenheter är till för när olika personer ska se olika delar - lägg till dem när det inträffar, inte innan.
En första organisation, från början till slut
Åtkomsträttigheter sätts på en enhet, inte på organisationen. Manage organization har inga behörighetsknappar; välj en enhet i sidopanelens träd, och ge åtkomsten där.
- Öppna Organizations i toppraden och skapa en. Den börjar med en enda rotenhet.
- Öppna organisationen och lägg till personerna i den, på fliken Members under Manage organization. Att lägga till någon här gör dem till medlem. Det ger dem ingen åtkomst till något ännu.
- Klicka på en enhet i sidopanelens träd. Rotenheten duger till att börja med. Åtkomst ges per enhet, så en enhet måste vara vald innan det finns något att ge den på.
- På enhetens flik Unit members, hitta personen och klicka på knapparna för den åtkomst de ska ha: Read, Write, Admin eller Peek.
- Dela in resurser i enheten: sätt Share all resources? till Yes för en medlem på fliken Unit members, eller dela enskilda enheter från Enhetsdetaljer eller Välj flera, och enhetsgrupper genom att fälla ut gruppen i enhetslistan och öppna Edit group.
Medlemmen når nu de resurserna, och här kan ni stanna. Allt efter detta upprepar samma tre moment: lägg till en underenhet, dela resurser in i den, och ge personer åtkomst på den nivå i trädet som motsvarar hur mycket de ska se.
Note: en medlem utan åtkomsträttigheter på någon enhet tillhör organisationen men ser ingenting. Steg 3 och 4 är det som ger dem åtkomst.
Hur åtkomst flödar
Två mekanismer, och det hjälper att hålla isär dem.
Arv. Åtkomst given på en enhet gäller den enheten och varje underenhet under den. Ge en medlem Read på roten och de läser allt i organisationen. Ge den tre nivåer ned och de läser bara den grenen.
Uttrycklig delning. En resurs delas in i en enhet och blir nåbar där. Det finns exakt tre delningspolicyer, och de är värda att hålla isär.
| Delningspolicy | Vad den delar | Var den sätts |
|---|---|---|
| Dela allt | Allt medlemmen äger, med ett reglage | Share all resources? på enhetens flik Unit members |
| Dela en enhetsgrupp | Gruppen, och varje enhet i den | Fäll ut gruppen i enhetslistan, Edit group, och därefter åtkomstdialogen |
| Dela en enskild resurs | Den resursen, för sig | Enhetsdetaljer för en enhet, Välj flera för flera, eller åtkomstdialogen på en instrumentpanel, koppling eller geostaket |
En delad enhetsgrupp förblir levande, och det är den policy man ska ta till när mängden förändras. Alla som når gruppen når enheterna i den. En enhet som läggs till i gruppen senare blir nåbar genom den utan att delas om, och att ta bort en enhet ur gruppen drar tillbaka den på samma sätt. Så kan olika mängder enheter placeras på olika ställen i trädet och sedan underhållas genom gruppmedlemskap, i stället för genom att dela och sluta dela en enhet i taget.
De två kombineras: en medlems åtkomstnivå kommer från de enheter de fått rättigheter på, och vad de når kommer från vad som delats in i de enheterna.
Att välja delningspolicy
Valet följer av vem som äger enheterna, och det finns två vanliga former.
En central ägare. Varje enhet tillhör ett konto - fastighetsägaren, eller IT-avdelningen. Samla dem i enhetsgrupper efter det trädet är organiserat kring, och dela varje grupp vid den enhet den hör hemma i. Då är gruppmedlemskapet det enda som behöver underhållas, och en administratör kan placera olika mängder enheter på olika ställen i trädet utan att röra delningarna igen.
Ägandet spritt på personer. Varje enhet tillhör den som ansvarar för den - en fastighetsskötare för sin byggnad, en hyresgäst i sin lägenhet. Var och en sätter Share all resources? vid sin egen underenhet, och det de äger blir nåbart där utan att någon central hanterar det.
Den tredje policyn, att dela en resurs i taget, är till för undantagen från båda.
En delning per organisation
Varje delning har en plats per organisation. Att dela samma medlem, samma grupp eller samma resurs vid en andra enhet i samma organisation nekas, och den första delningen består. För Dela allt namnger meddelandet enheten den redan är delad vid - gå dit, stäng av den, och dela den sedan där ni vill ha den. För en enhetsgrupp eller en enskild resurs säger meddelandet bara att den redan är delad någon annanstans i organisationen, så ni kan behöva leta efter den; Source-knappen på en Resurser-flik namnger enheten den är delad vid.
Samma resurs kan delas in i flera organisationer. Organisationerna ser inte varandras delningar, så en enhet kan tjäna både en fastighetsägare och deras servicepartner samtidigt, var och en i sitt eget träd.
Varje delning når hela vägen. Att dela vid en enhet ger också varje enhet på vägen från roten ned till den, och varje medlem där får resursen på den nivå de har i sin egen enhet - det finns inga nivåer att välja när man delar. Därför nås en resurs som delas djupt i trädet av alla med åtkomst längre upp, och därför är den enhet den räknas som delad vid den djupaste den är given på. Medlemmar som bara finns i en underenhet under den enheten når den inte.
Organisationen
Manage organization i övre vänstra hörnet öppnar själva organisationen, vilken enhet du än står i. Den har upp till sex flikar: Sammanfattning, Medlemmar, Resurser och Åtkomstdetaljer, som alla i organisationen ser, plus Externa kontakter för organisationsadministratörer och ägaren, och Varumärkesprofil för en OEM-administratör. Att se en flik är inte detsamma som att se vad som står i den - Medlemmar och Åtkomstdetaljer är öppna för alla men visar en vanlig medlem mycket lite. Ingen av dem ger åtkomst till något; det sker på en enhet.
En organisation är i sig en resurs, som en enhet eller en dashboard, och som varje annan resurs har den exakt en ägare.
Att byta den ägaren, eller att ge ett annat konto adminrättigheter på själva organisationen, saknar ännu gränssnitt. Båda går att göra via REST-API:et - se Swagger och API-åtkomst.
Vem som får skapa en. Att skapa en organisation kräver plattformsrollen admin. Editor, installer och viewer-rollerna nekas.
Att tillhöra en organisation tar dessutom bort möjligheten: både en användare som skapats inuti en organisation och ett befintligt konto som lagts till i en märks som tillhörande den, och ett konto med den märkningen kan inte skapa egna organisationer - att vara organisationsadministratör ändrar ingenting. En ägare som lägger till sig själv i sin egen organisation är undantaget, och behåller möjligheten.
Sammanfattning
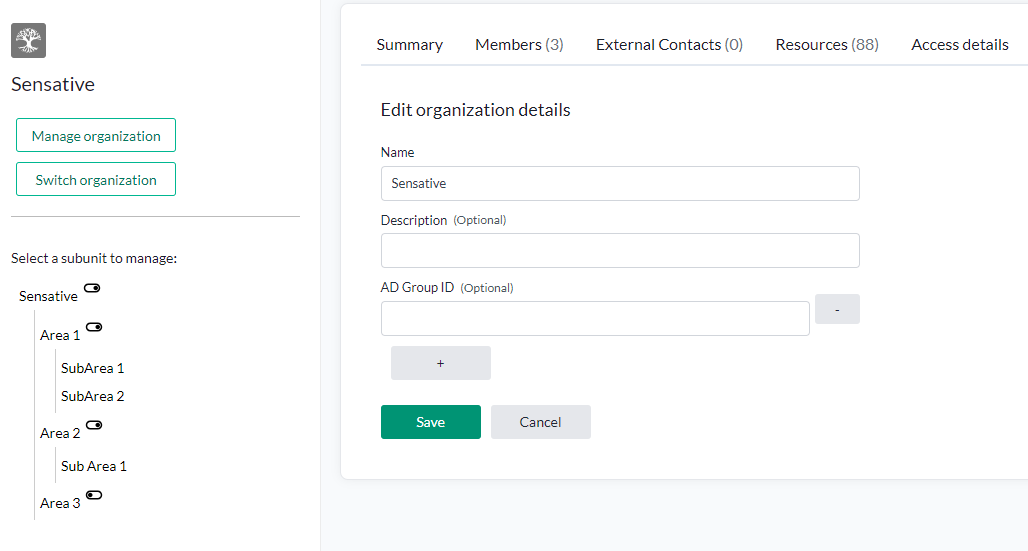
Organisationens namn, dess beskrivning och dess AD Group ID:n.
Edit och Delete visas bara för ägaren; en organisationsadministratör får dem inte. Edit öppnar fälten ovan, med + och - för att lägga till och ta bort rader med AD Group ID, och Save eller Cancel för att avsluta.
AD-gruppkoppling fungerar bara där en SAML-identitetsleverantör används. Kontakta din tekniska supportkontakt för att konfigurera en.
Medlemmar
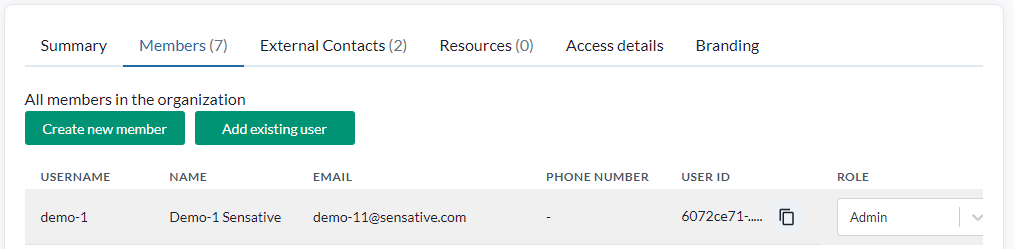
En lista över alla i organisationen: användarnamn, fullständigt namn, e-post, telefonnummer, användar-id med en kopieringsknapp, och roll. Det finns ingen sökfunktion, så en stor organisation läses genom att bläddra.
Alla i organisationen ser den här fliken, men inte samma sak i den. Organisationsadministratörer, ägaren och enhetsansvariga ser alla medlemmar; en vanlig medlem ser bara sin egen rad och kan alltså inte se vilka andra som tillhör organisationen. Administratörer och enhetsansvariga ser dessutom kolumnen AD-grupp, när organisationen har en AD-grupp, och åtgärderna för att hantera varje medlem.
Organisationsadministratörer och ägaren får två sätt att lägga till personer.
Create new member skapar ett nytt Yggio-konto och placerar det i organisationen.
| Fält | |
|---|---|
| First name, Last name | Obligatoriskt |
| Obligatoriskt. Används vid första inloggningen och för lösenordsåterställning | |
| Phone number | Valfritt |
| Username | Inloggningsnamnet. Att använda e-postadressen är vanligt |
| Password | Obligatoriskt. Ett engångslösenord är det säkrare valet |
| Role | Medlemmens plattformsroll |
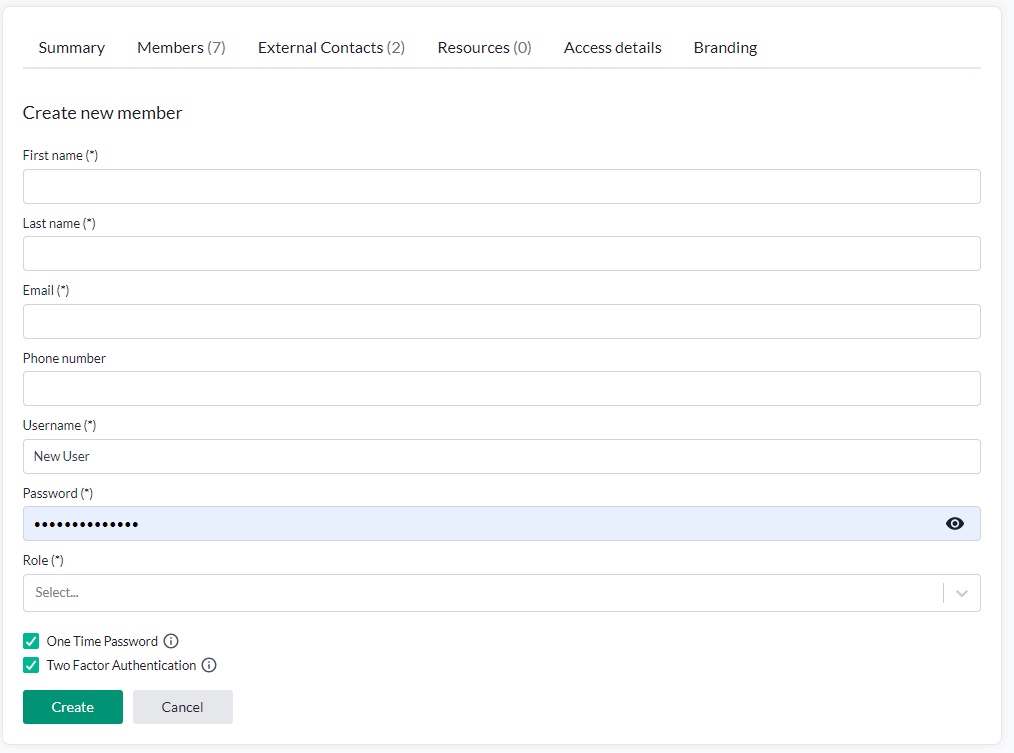
Tvåfaktorsautentisering stöds och kan slås på här.
Add existing member lägger till ett konto som redan finns, så att en person kan tillhöra flera organisationer. Ange användar-ID för användaren som ska läggas till, som det visas i medlemslistan för en organisation användaren tillhör.
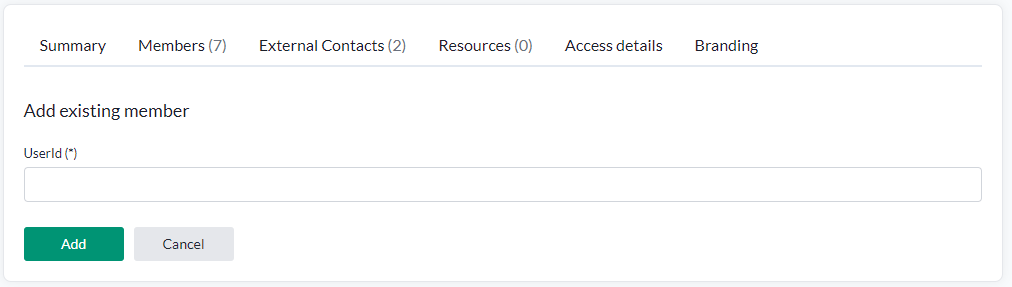
Ägaren av en organisation kan lägga till sig själv i den.
Medlemsåtgärder
En medlems rad har en åtgärd, Remove. Den tar ut medlemmen ur organisationen; kontot självt finns kvar, och den ber om bekräftelse först.
Knappen visas för alla som hanterar en enhet, men API:et är striktare än så, och den går alltså inte alltid igenom:
- Bara organisationsadministratörer och ägaren kan ta bort någon. En enhetsansvarig ser knappen och nekas med "insufficient rights".
- En organisationsadministratör går inte att ta bort - varken av en annan administratör eller av sig själv. Knappen finns på din egen rad, men att trycka på den svarar "Admins cannot be removed or deleted".
Att ta bort en medlem är alltså i praktiken något en organisationsadministratör gör med en vanlig medlem. För att ta ut en administratör får ni först ta bort administratörsrättigheterna via REST-API:et
- se Swagger och API-åtkomst.
Att ändra en medlems uppgifter och att spärra ett konto går inte längre alls. Båda förlorade sin plats i gränssnittet tidigare; endpointsen bakom dem är sedan dess borttagna också och svarar nu 404. En medlem som behöver andra uppgifter ändrar dem på sitt eget konto.
Medlemsroller
Varje medlems rad visar deras plattformsroll - admin, editor, installer eller en av viewer-rollerna. På de rader du får ändra blir den en väljare.
Att sätta en roll är inte begränsat till organisationsadministratörer. Om ni hanterar någon enhet i en organisation medlemmen tillhör får ni ändra eller rensa deras roll, och att ändra en roll kräver dessutom att er egen roll är admin.
Gränssnittet har inte hunnit ikapp: i dag erbjuds väljaren bara till organisationsadministratörer, så en enhetsansvarig ser rollen som vanlig text och får använda REST-API:et för att ändra den.
Ingen ändrar sin egen roll - enhetsansvarig, organisationsadministratör och ägare lika - så din egen rad står som vanlig text. Be en annan administratör i organisationen ändra den åt dig.
Externa kontakter
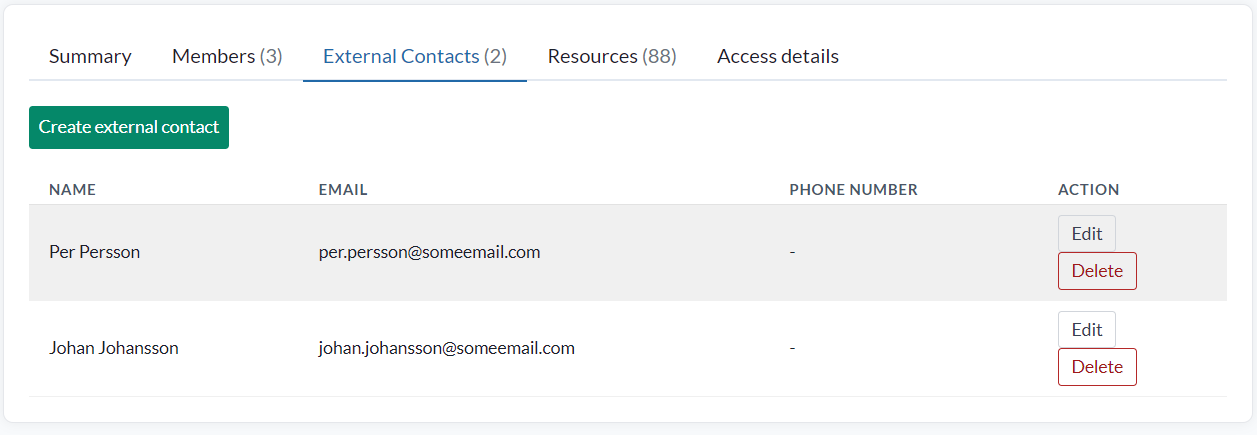
En extern kontakt är en e-postadress och ett telefonnummer för någon som ska ta emot notiser - ett mejl eller ett SMS från regelmotorn - utan Yggio-konto och utan åtkomst till plattformen. De finns i organisationens kontaktlista vid sidan av medlemmarna.
Regelmotorn erbjuder dem som mottagare: kontakter med en e-postadress i e-poståtgärder, kontakter med ett telefonnummer i SMS-åtgärder. Tar ni bort en kontakt ur organisationen misslyckas hela åtgärden i varje regel som fortfarande namnger den - även de övriga mottagarna på den slutar då få notisen - så rensa den ur regeln också.
Fliken ligger bredvid Medlemmar och visar hur många externa kontakter organisationen har. Bara organisationsadministratörer och ägaren ser den, och bara de kan ändra listan.
Listan visar varje kontakts namn, e-post och telefonnummer. Skapa extern kontakt lägger till en.
| Fält | |
|---|---|
| Namn | Obligatoriskt |
| Valfritt. Måste vara en giltig e-postadress | |
| Telefonnummer | Valfritt. Ange numret med landskod, till exempel +46701234567 |
Redigera på en kontakts rad öppnar samma formulär med de sparade värdena. Om du tömmer ett fält och sparar rensas det från kontakten.
Ta bort ber om bekräftelse och tar sedan bort kontakten permanent. Det går inte att ångra.
Resurser
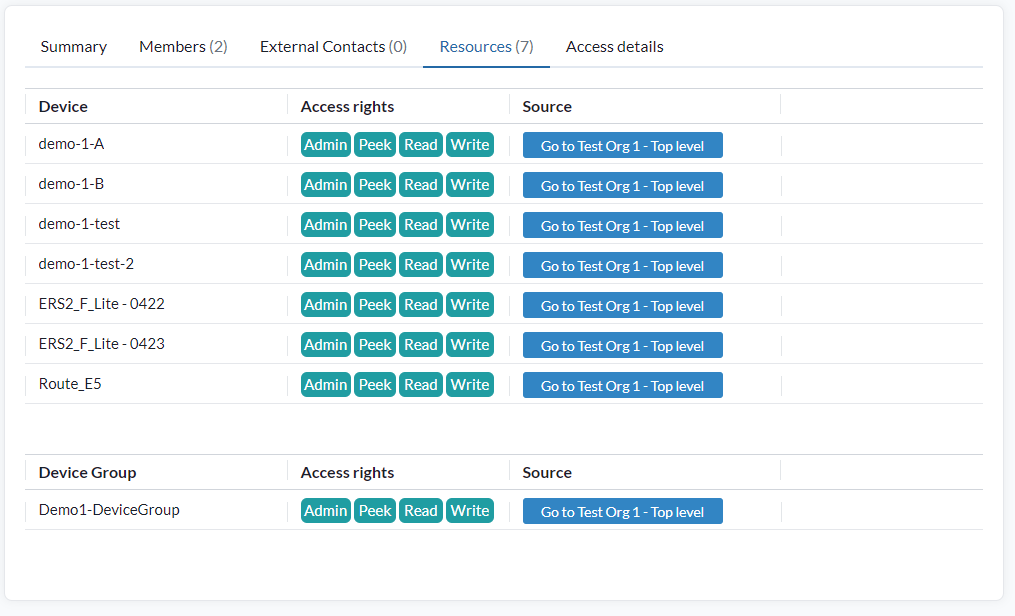
Allt som delats in i organisationen, i en tabell per typ, staplade: enhet, app, connector, rapportmall, basic credentials set, dashboard, bild, geofence och enhetsgrupp. En typ utan innehåll utelämnas.
Varje rad visar resursens åtkomsträttigheter och en Source-knapp som namnger en enhet den delas från och hoppar dit. Eftersom en delning ger varje enhet på vägen från roten ned kan knappen namnge en enhet längre upp - roten inräknad - i stället för den resursen faktiskt delades vid. Enhetens egen flik Resurser är det tillförlitliga stället att se var en delning gjordes.
Resurser du bara kan peeka på utelämnas ur de här tabellerna. Delning ändras inte härifrån - fliken är organisationens överblick över vad som delats och var.
Varje tabell sidindelas för sig, med 25 rader som standard, och sidstorleken går upp till 1000 för en organisation med en stor flotta.
Åtkomstdetaljer
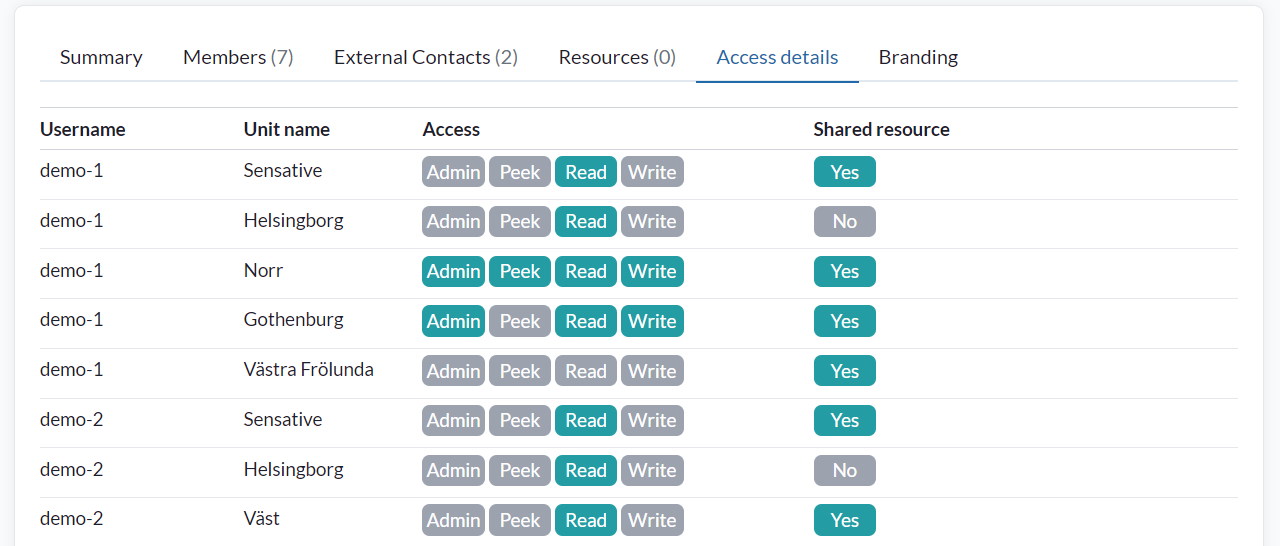
En rad per användare och enhet, som visar rättigheterna de har där och om deras egna resurser delas vid den enheten.
Det är överblicken som svarar på "vem når vad", och det snabbaste sättet att sätta upp en ny medlem rätt: hitta någon som gör samma jobb och matcha deras rader.
Alla i organisationen ser fliken, men den har bara rader för det ni får titta på: för någon som varken hanterar en enhet eller administrerar organisationen är den helt enkelt tom.
En organisationsenhet
Allt ovanför är Manage organization: själva organisationen, vilka som tillhör den, och vad som delats in i den. Inget av det ger någon åtkomst till något.
Det är här åtkomsträttigheter hanteras. En enhet är den enda plats där åtkomst kan ges, så en enhet måste vara vald innan det finns något att ge den på.
Att klicka på en enhet i hierarkin öppnar den. En enhet beter sig som en mapp: den innehåller resurser, och åtkomst given här når allt nedanför.
Rotenheten visar organisationens eget namn och beskrivning i stället för det bokstavliga namnet "root".
En vanlig medlem - någon som varken är organisationsadministratör eller hanterar en enhet - ser mindre av trädet. Den ser bara de enheter den har fått rättigheter vid, var och en med allt nedanför, placerade direkt under roten; syskonenheter och resten av trädet döljs, och den enda medlem den ser är sig själv. En medlem som ännu inte har rättigheter vid någon enhet ser bara roten. Administratörer och de som hanterar en enhet ser hela trädet.
Enheter har fyra flikar.
Sammanfattning
Enhetens namn och beskrivning.
Enhetsmedlemmar
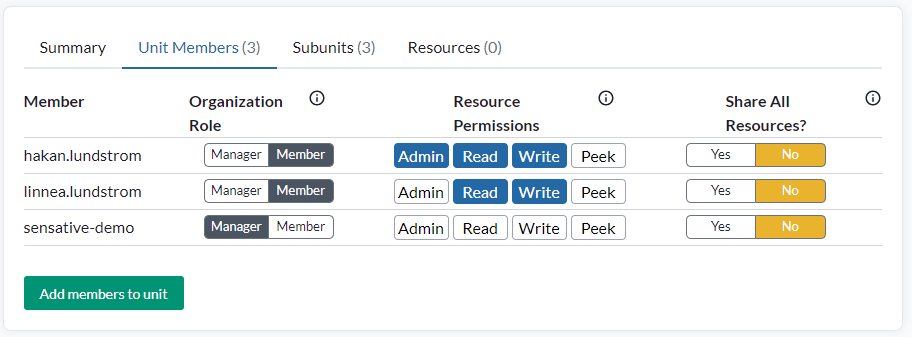
Det är här åtkomst faktiskt ges, och den nås genom att först välja en enhet i trädet. Det finns ingen motsvarighet under Manage organization: den panelen listar vilka som tillhör organisationen, medan den här avgör vad de kan nå.
Varje medlem i enheten har en rad med fyra saker på sig.
Organization role är Manager eller Member.
| Manager | Hanterar medlemmar och deras åtkomsträttigheter från den här enheten och nedåt i trädet, inklusive att sätta plattformsrollen för varje medlem utom sig själv - så länge den egna rollen är admin. Att skapa konton och lägga till befintliga konton i organisationen stannar hos organisationsadministratörer och ägaren |
| Member | Standard. Ingen enhetshantering |
Att ge och att ta bort Manager ber båda om bekräftelse.
Manager hålls per enhet, så att ge den på rotenheten täcker hela organisationen. Den tillåter inte att skapa organisationer - det avgörs av kontot, inte av rollen, som beskrivs under Organisationen.
Resource permissions är fyra knappar. Klicka på en för att ge den behörigheten, klicka igen för att ta bort den. Var och en ärvs av varje underenhet nedanför.
| Admin | Hantera resurserna vid den här enheten, inklusive att sätta deras åtkomsträttigheter och att radera dem |
| Read | Läsa data och se resurserna |
| Write | Skriva data till resurserna |
| Peek | Systemet får läsa resurserna, men de förblir osynliga för kontoinnehavaren. Används mest för att ge åtkomst till connectorer |
Det är samma fyra nivåer som på andra ställen i åtkomsträttigheter.
Share all resources? är Yes eller No. Yes delar allt medlemmen äger vid den här enheten, så att alla med åtkomst till enheten - direkt eller ärvd - kan arbeta med det på sin egen åtkomstnivå.
Allt betyder varje resurstyp, inte bara enheter: enhetsgrupper, dashboards, bilder, connectors, rapportmallar, basic credentials sets, geofences och appar följer med.
Vyer är undantaget, eftersom en vy inte är en resurs. Den bär inga egna åtkomsträttigheter, så inget delar den i klump. En vy förs vidare från enhetslistan, en i taget.
Att dela allt följer samma regel som varje annan delning - en enhet per organisation, och samma resurser kan gå in i flera organisationer. Att slå på det vid en andra enhet nekas så länge den första är på. Se En delning per organisation.
Båda riktningarna ber om bekräftelse, eftersom att stänga av det återkallar allt det gav.
Underenheter
Enhetens egna underenheter, där grenen nedanför byggs ut.
Resurser
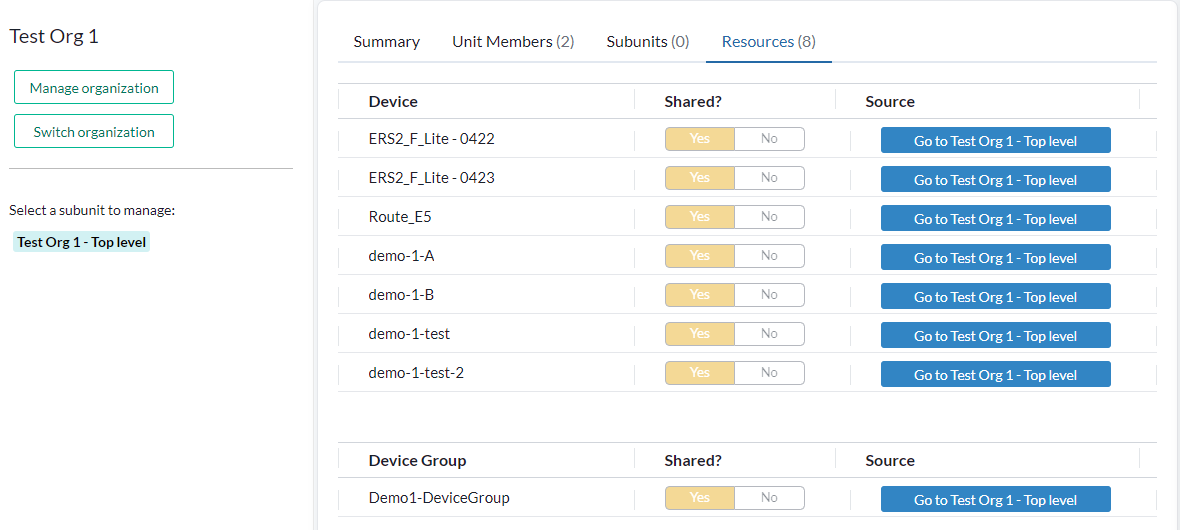
Resurserna som är tillgängliga vid den här enheten, oavsett om de delats här eller ärvts. Fliken är en överblick över vad som är nåbart här, inte där delning görs - det enda den ändrar är att sluta dela. Varje rad har ett Shared?-reglage med Yes och No till vänster om Source, som namnger enheten resursen är delad vid.
Att slå om en rad till No slutar dela den. Det ber först om bekräftelse och namnger resursen och enheten, och tar sedan bort delningen helt - vid enheten den gjordes och vid varje enhet den nådde därifrån. En delad enhetsgrupp slutar delas på samma sätt från sin egen rad i listan över enhetsgrupper.
Reglaget är gråat på rader som bara finns här genom någon annans delning - en medlems Share all resources?, eller en enhetsgrupp som resursen tillhör. De kan inte tas bort en resurs i taget, så ändra dem där de gjordes: medlemmens inställning för att dela allt, eller enhetsgruppens egen rad.
Varumärkesprofil
Varumärkesprofilen sätter ditt eget namn, din logotyp och dina färger på Yggio, så att de du betjänar ser ditt varumärke i stället för vårt. Det är värt att sätta upp: för en kommun eller en fastighetsägare som ger hyresgäster åtkomst ser plattformen då ut som en del av din egen tjänst.
Varumärkesprofil är en tilläggsfunktion. Den är inte påslagen som standard. Kontakta teknisk support för att få den aktiverad för din organisation.
När den är aktiverad ställs den in från organisationens flik Branding. Fliken visas för en OEM-administratör, och för organisationens ägare när deras konto bär varumärkestillägget. Organisationsadministratörer och enhetsansvariga får den inte.
| Flik | |
|---|---|
| Predefined themes | Fem färdiga teman - default, blå, röd, lila och grå - som förhandsvisas innan du använder ett |
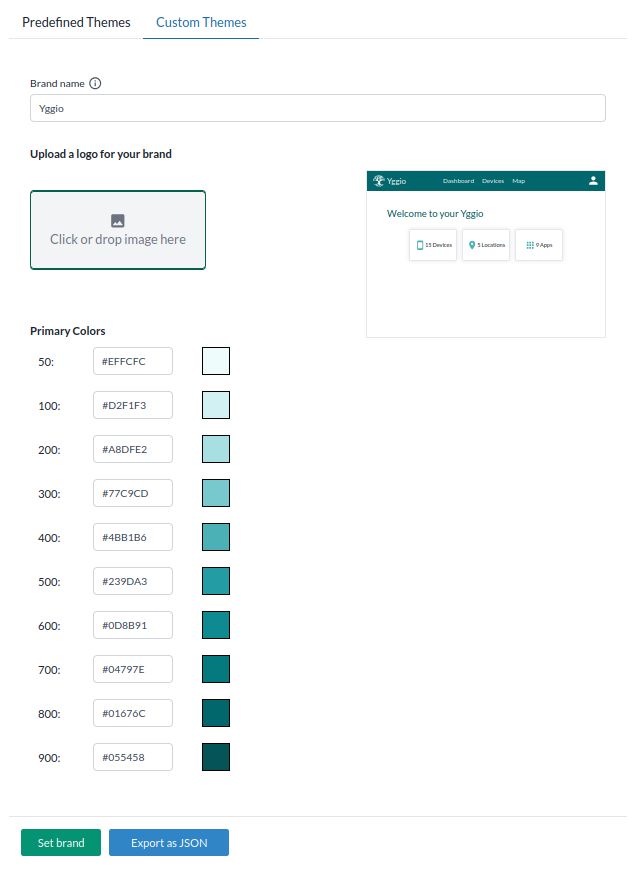
| Custom themes | Ditt eget varumärkesnamn, logotyp och primärfärger |
Varumärkesnamnet visas i applikationens övre vänstra hörn, och logotypen visas i sidhuvudet och på organisationen. De fördefinierade temana ändrar navigationsraden:



Egna teman går längre: ett varumärkesnamn, en uppladdad logotyp och de tio nyanserna av din primärfärg, med en direktförhandsvisning bredvid formuläret. Resultatet kan exporteras som JSON, vilket är så samma varumärke tillämpas på en annan organisation utan att ställas in igen.
Note: en användare som tillhör flera organisationer ser alltid Yggios standardvarumärke, oavsett vilket varumärke de organisationerna satt.
Det finns en utförligare genomgång i utbildningsmaterialet.